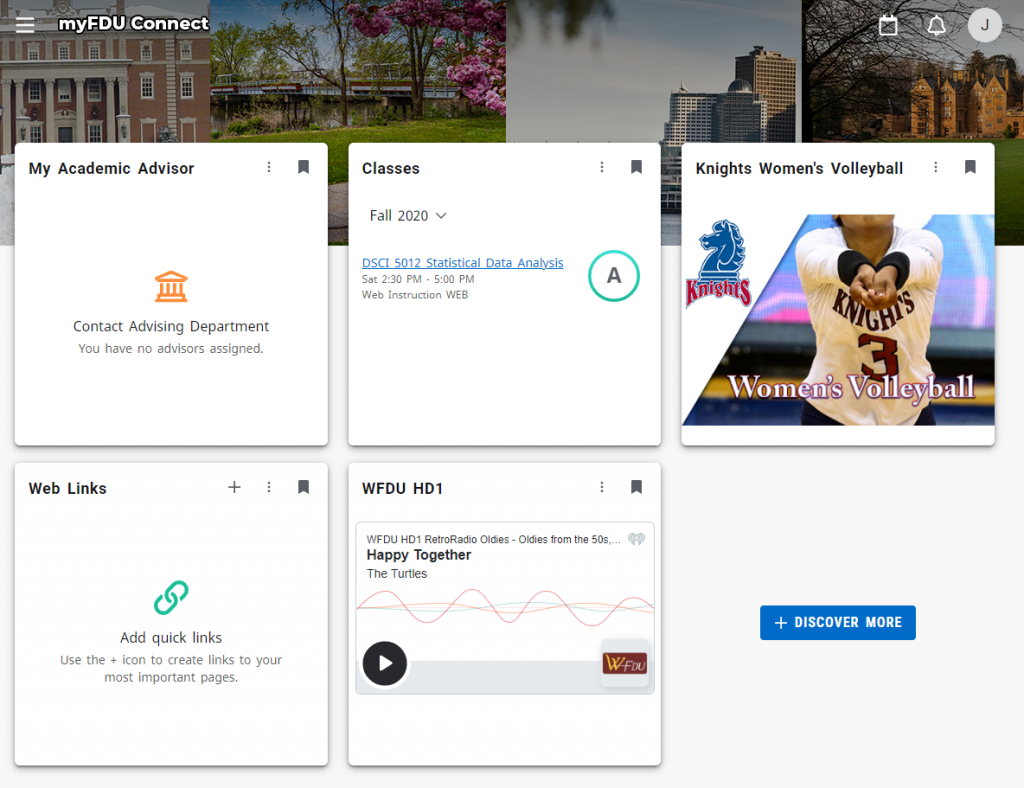
myFDU Connect is a place where Students, Faculty, and Staff can go as their single point of entry for everything FDU. The homepage consists of a dashboard full of “cards” that represent different aspects of FDU. Users can personalize their dashboard to display cards relevant to their life on campus..
How to Navigate myFDU Connect
To log into myFDU Connect, you will need to visit myfduconnect.fdu.edu and login with your FDU NetID. Once logged in, you will land on your customizable homepage
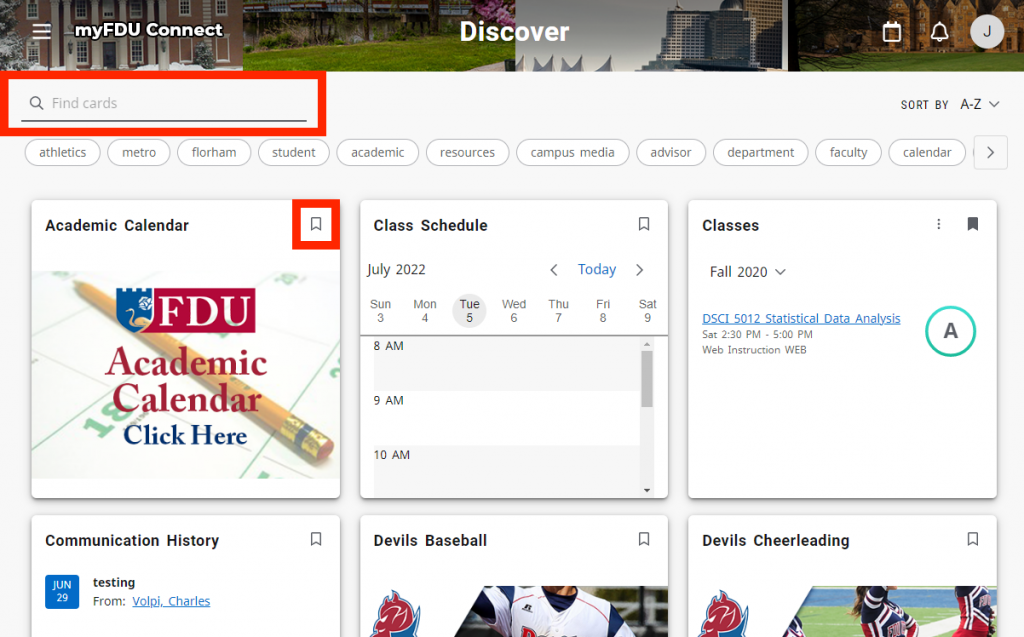
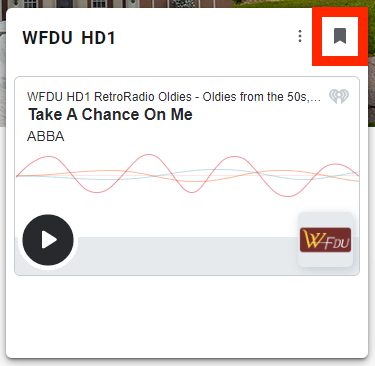
The cards you see can be added to, removed, and rearranged to your liking. To add a new card, click on the “+ Discover More” button
In the top left of the page, you can use the search field to find specific cards. You can also scroll through the page to see everything that is available. When you have found a card you would like to add to your homepage, click on the “save card” ribbon on the top right of the card
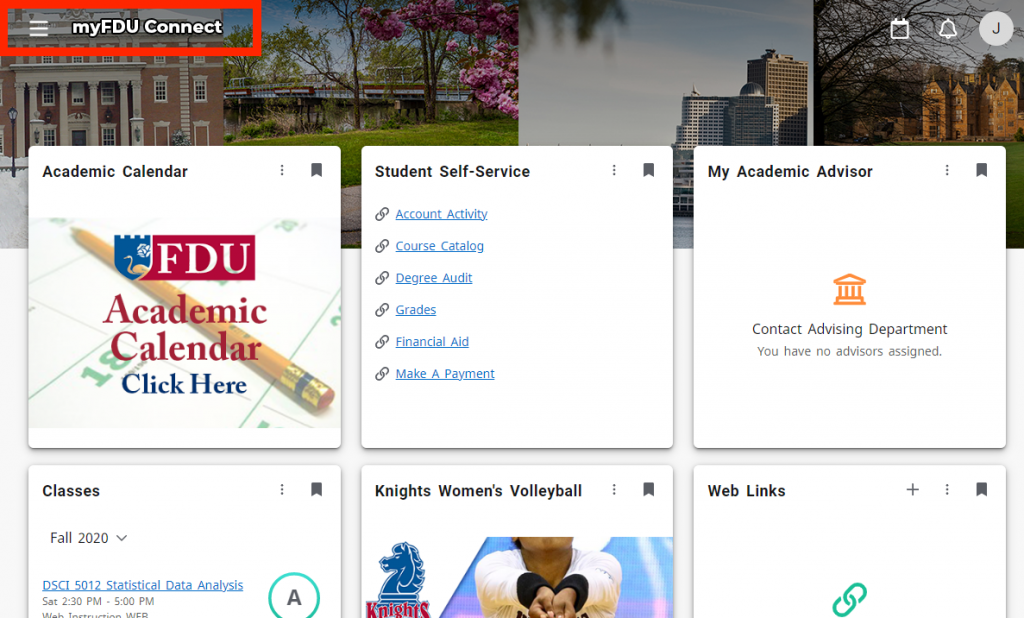
Click on “myFDU Connect” in the top left of the page to return to your homepage. You should see your new card in the first slot
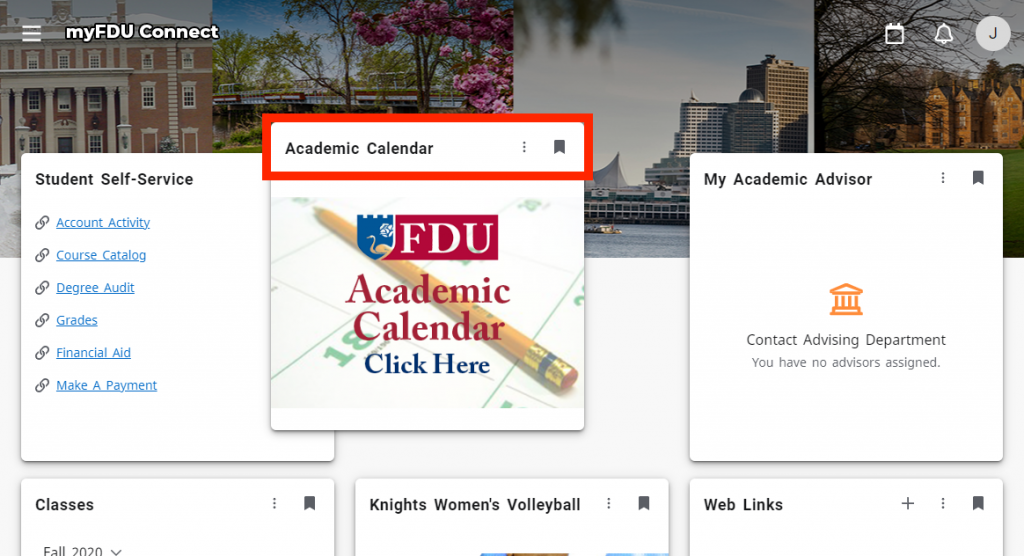
If you would like to change the order of your cards, click and hold on the top of the card and move the card to a new position
If you wish to remove a card from your homepage, click on the “remove card” ribbon on the top right
When new cards are available, you will be notified on the alarm button on the top right of the page
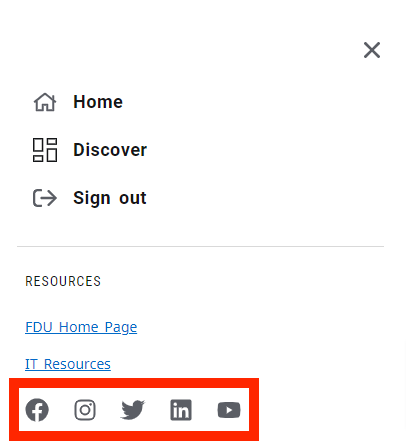
To access FDU’s social media pages, click on the hamburger menu in the top left of the page
The following tutorial will guide you through the process of connecting a printer while on-campus. Faculty and Staff members should review the purchasing process before engaging with the process for connecting a printer.
Note
Wireless printing is not permitted on campus. The information below is for wired connections only.
Connecting a Printer for Students in the Residence Halls
Most new printers are plug and play compatible with Windows 10. When you receive your new printer, you can unbox it and remove any orange tape you see. After plugging in the power and turning the printer on, allow the printer to initialize (most new printers will have a display to show you it’s progress). When the printer finishes initializing, just connect the usb printer cable from the printer to your computer. Windows 10 should automatically install the printer for you.
close
Printer Purchasing Process for Faculty and Staff
All printer purchases for faculty and staff on-campus use must appear on OIRT’s list of approved printer models. For the most up to date list of approved printer models, please contact the Purchasing Department. The purchase of any printer not on the list must be pre-approved by the CIO.
Determining if a Printer will be Directly Connected or On-Network
Faculty and Staff Members have the option of either making a direct or network connection to the printer. A direct connection is when a printer is connected to a single computer and an on-network printer means that multiple parties can print to it. Generally speaking, unless a printer is shared by three or more employees, users should request a direct connect printer.
If you are planning to use a direct connection, simply purchase any printer contained on the Purchasing Department’s list of approved models and follow the instructions for “Installing a Local Printer” in the “Connecting a Printer for Faculty and Staff Members” section below.
If your new printer will be on-network, please ask your department to contact the SAMI Service Desk for USAN to investigate the viability of any data jacks in the vicinity of where the printer will be located. The full workflow for this process is shown in the following diagram.
Most new printers are plug and play compatible with Windows 10. When you receive your new printer, you can Most new printers are plug and play compatible with Windows 10. When you receive your new printer, you can unbox it and remove any orange tape you see. After plugging in the power and turning the printer on, allow the printer to initialize (most new printers will have a display to show you it’s progress). When the printer finishes initializing, you can just connect the usb printer cable from the printer to your computer. Windows 10 should automatically install the printer for you.
Connecting to a Network Printer
Employees are able to add network printers to their own machines.
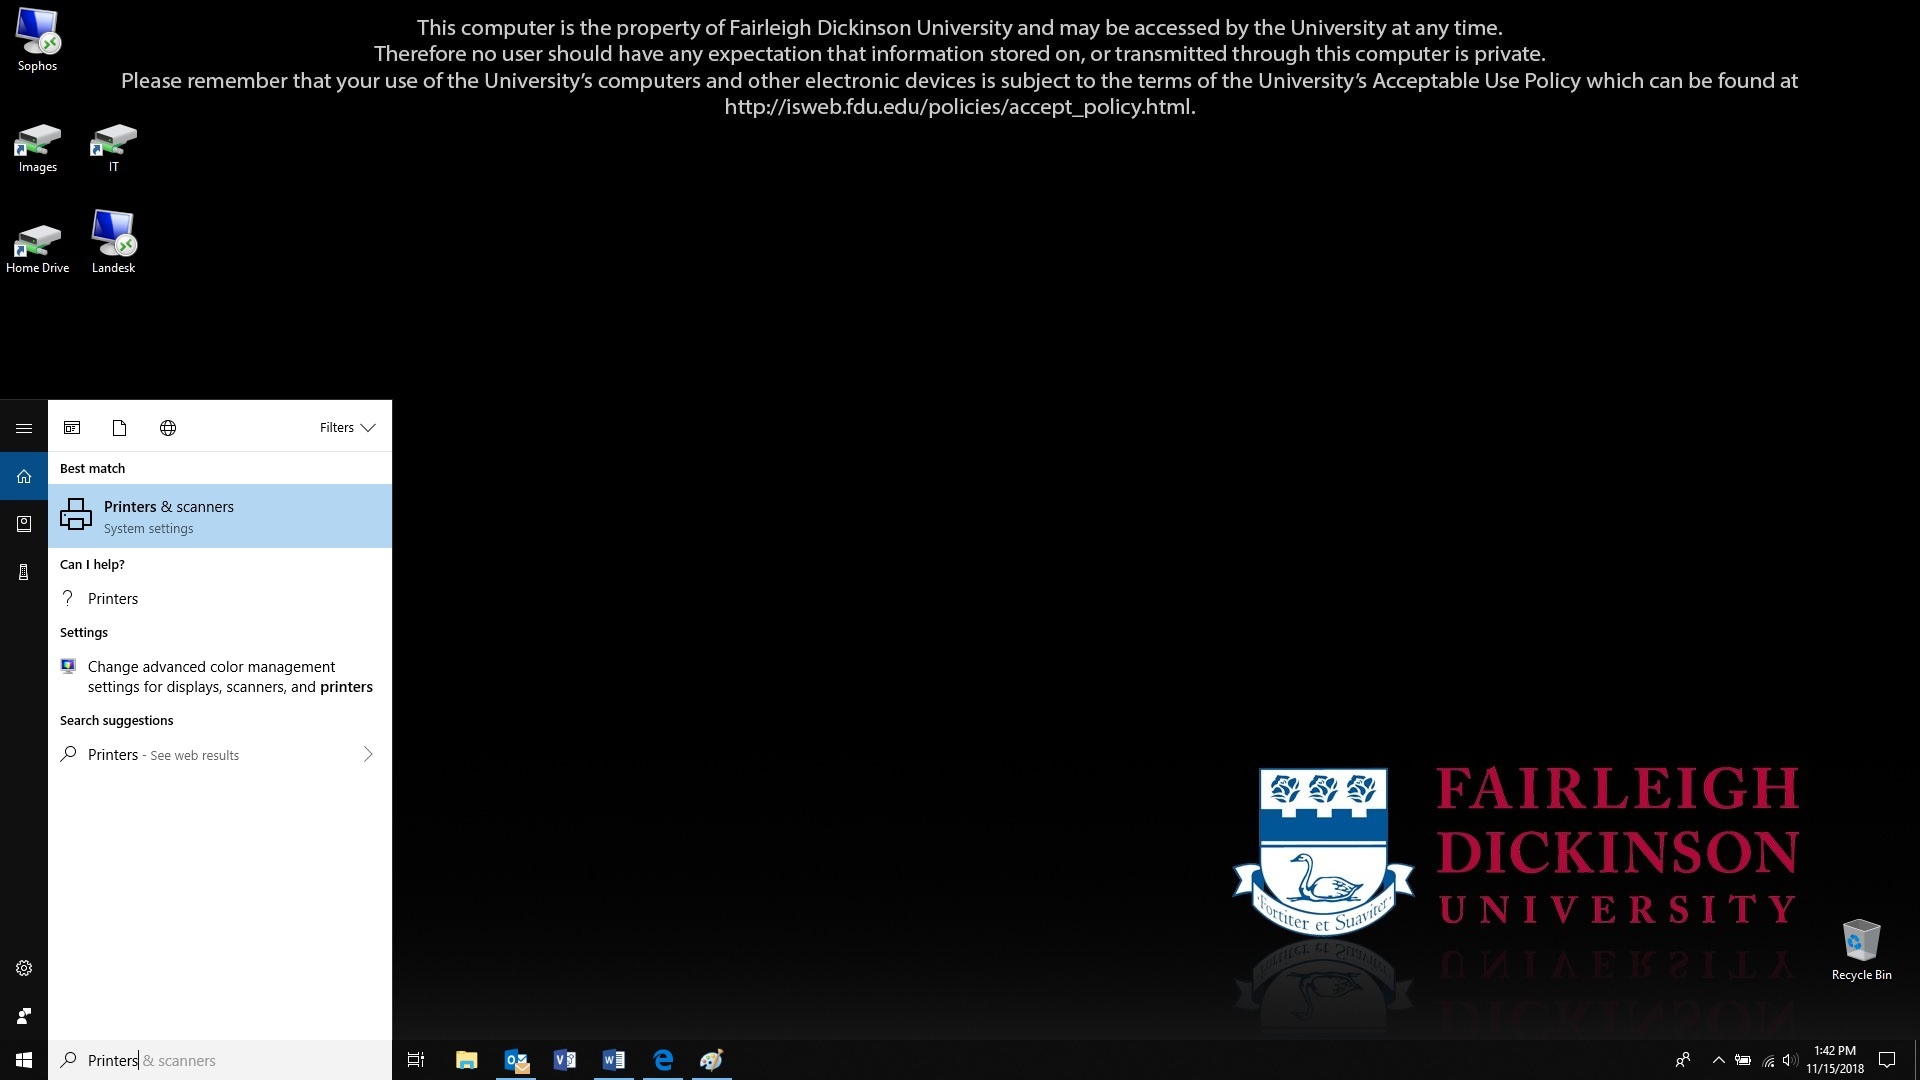
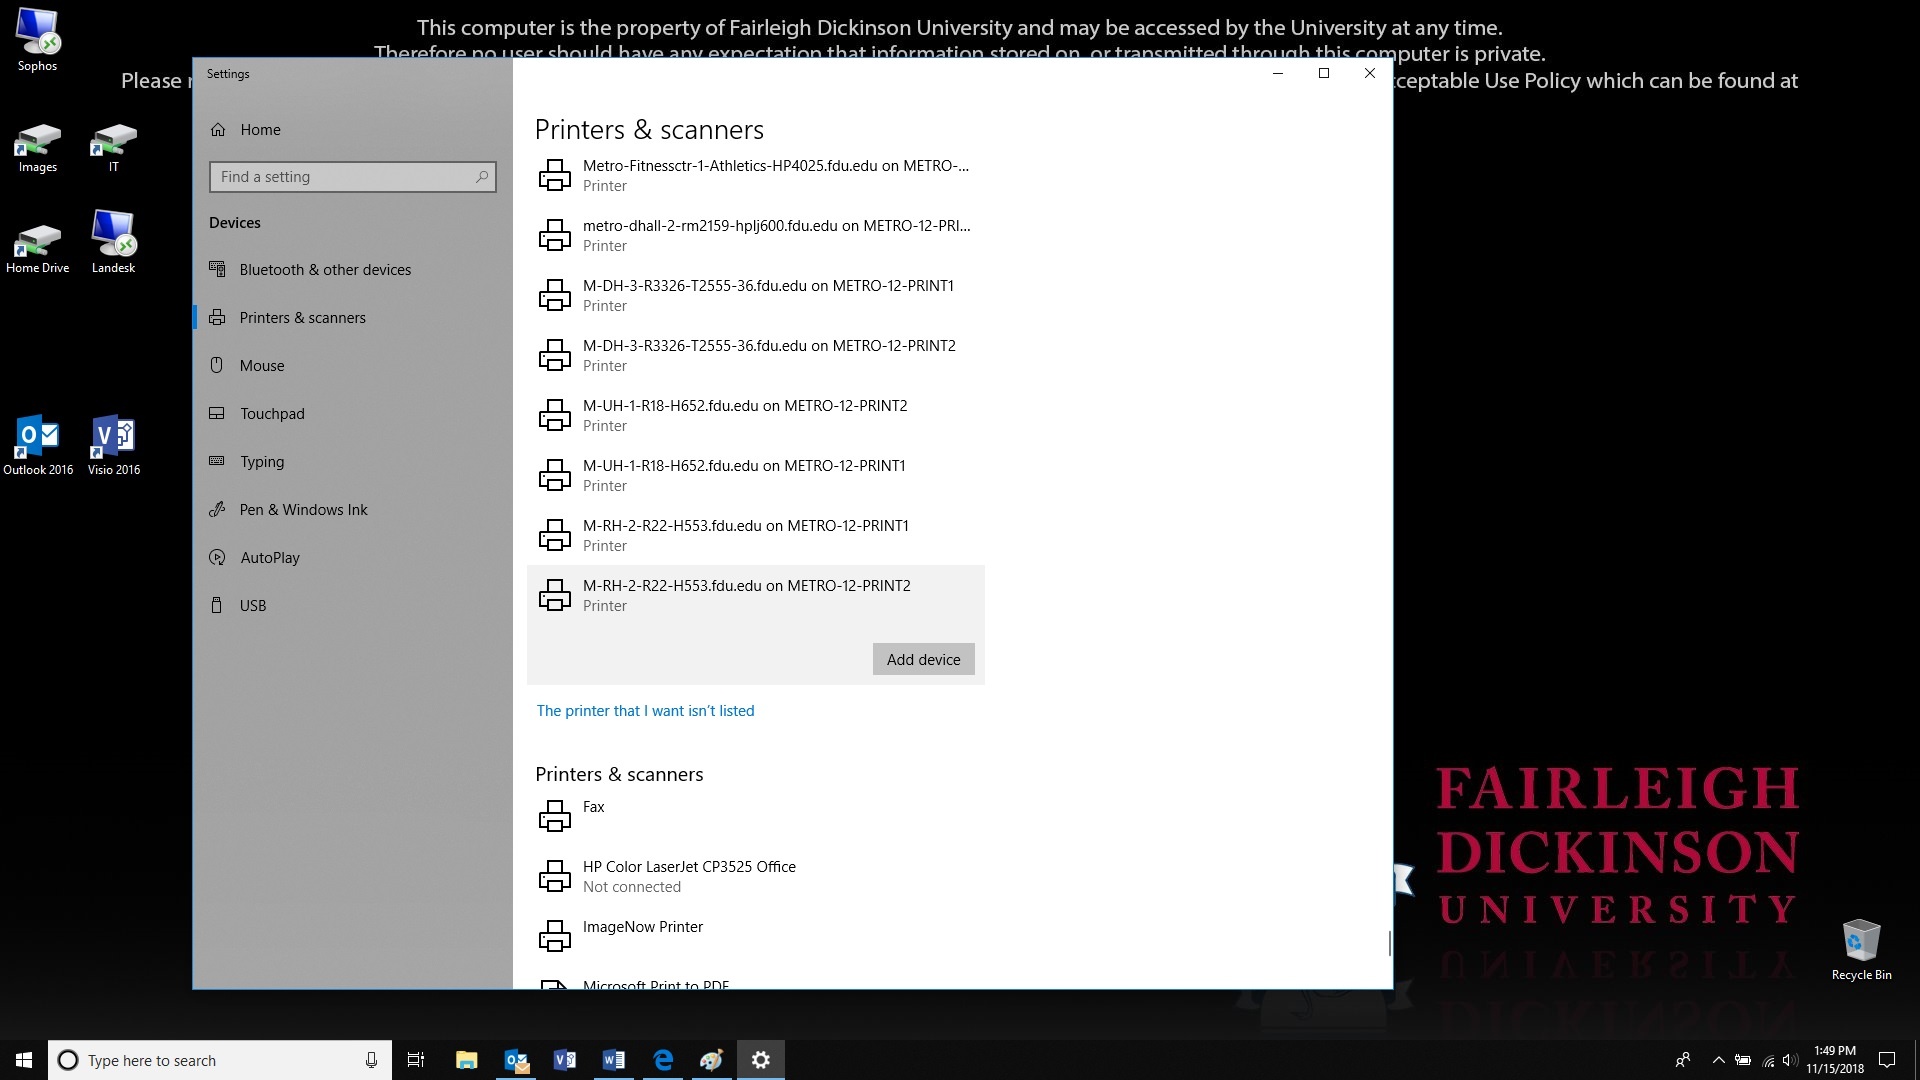
Do a search for printers, and click on “Printers & Scanners”
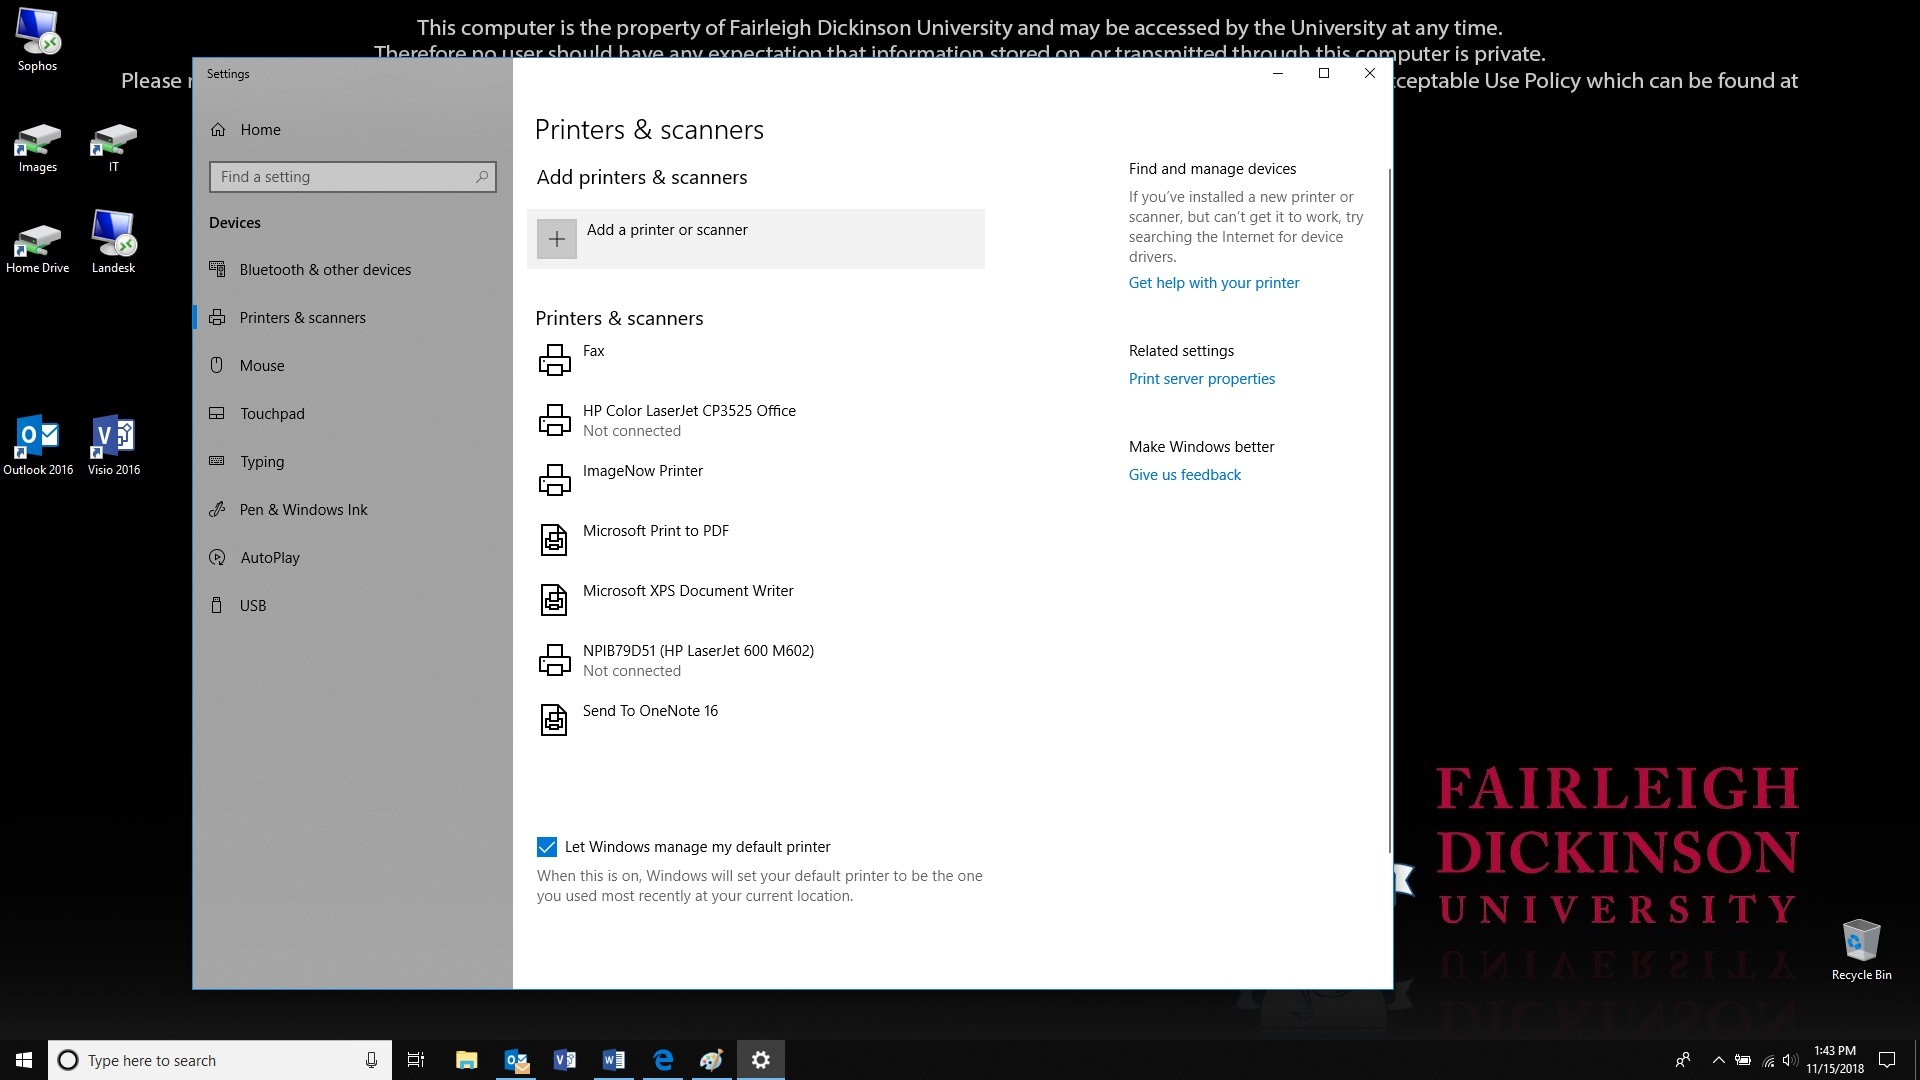
Click on “Add a printer or scanner”
The list will start to populate and if you find your printer you can click on it and then click on “Add device”, otherwise scroll down to the bottom of the list and select “The printer I wanted wasn’t listed”
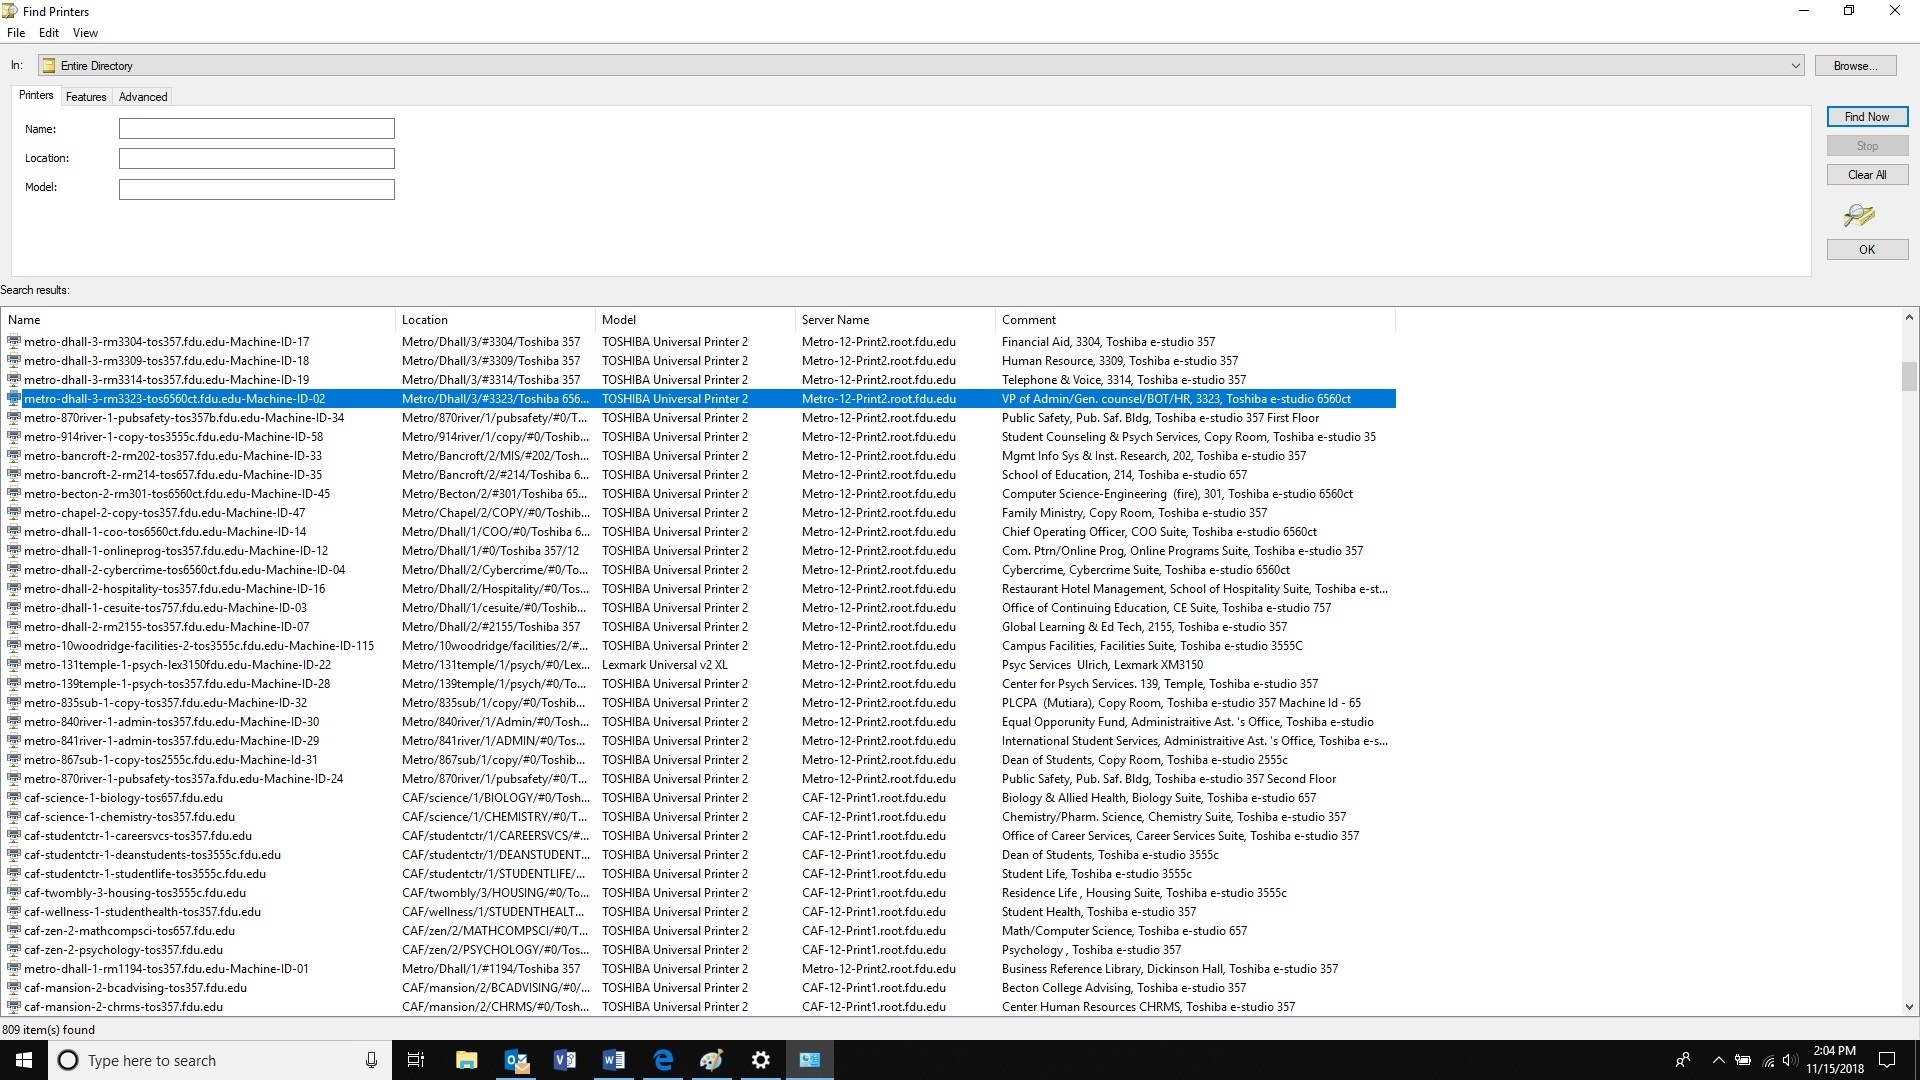
In the new dialog box, select “Find a printer in the directory” and click “Next”
Search for your printer and double click on it when you find it
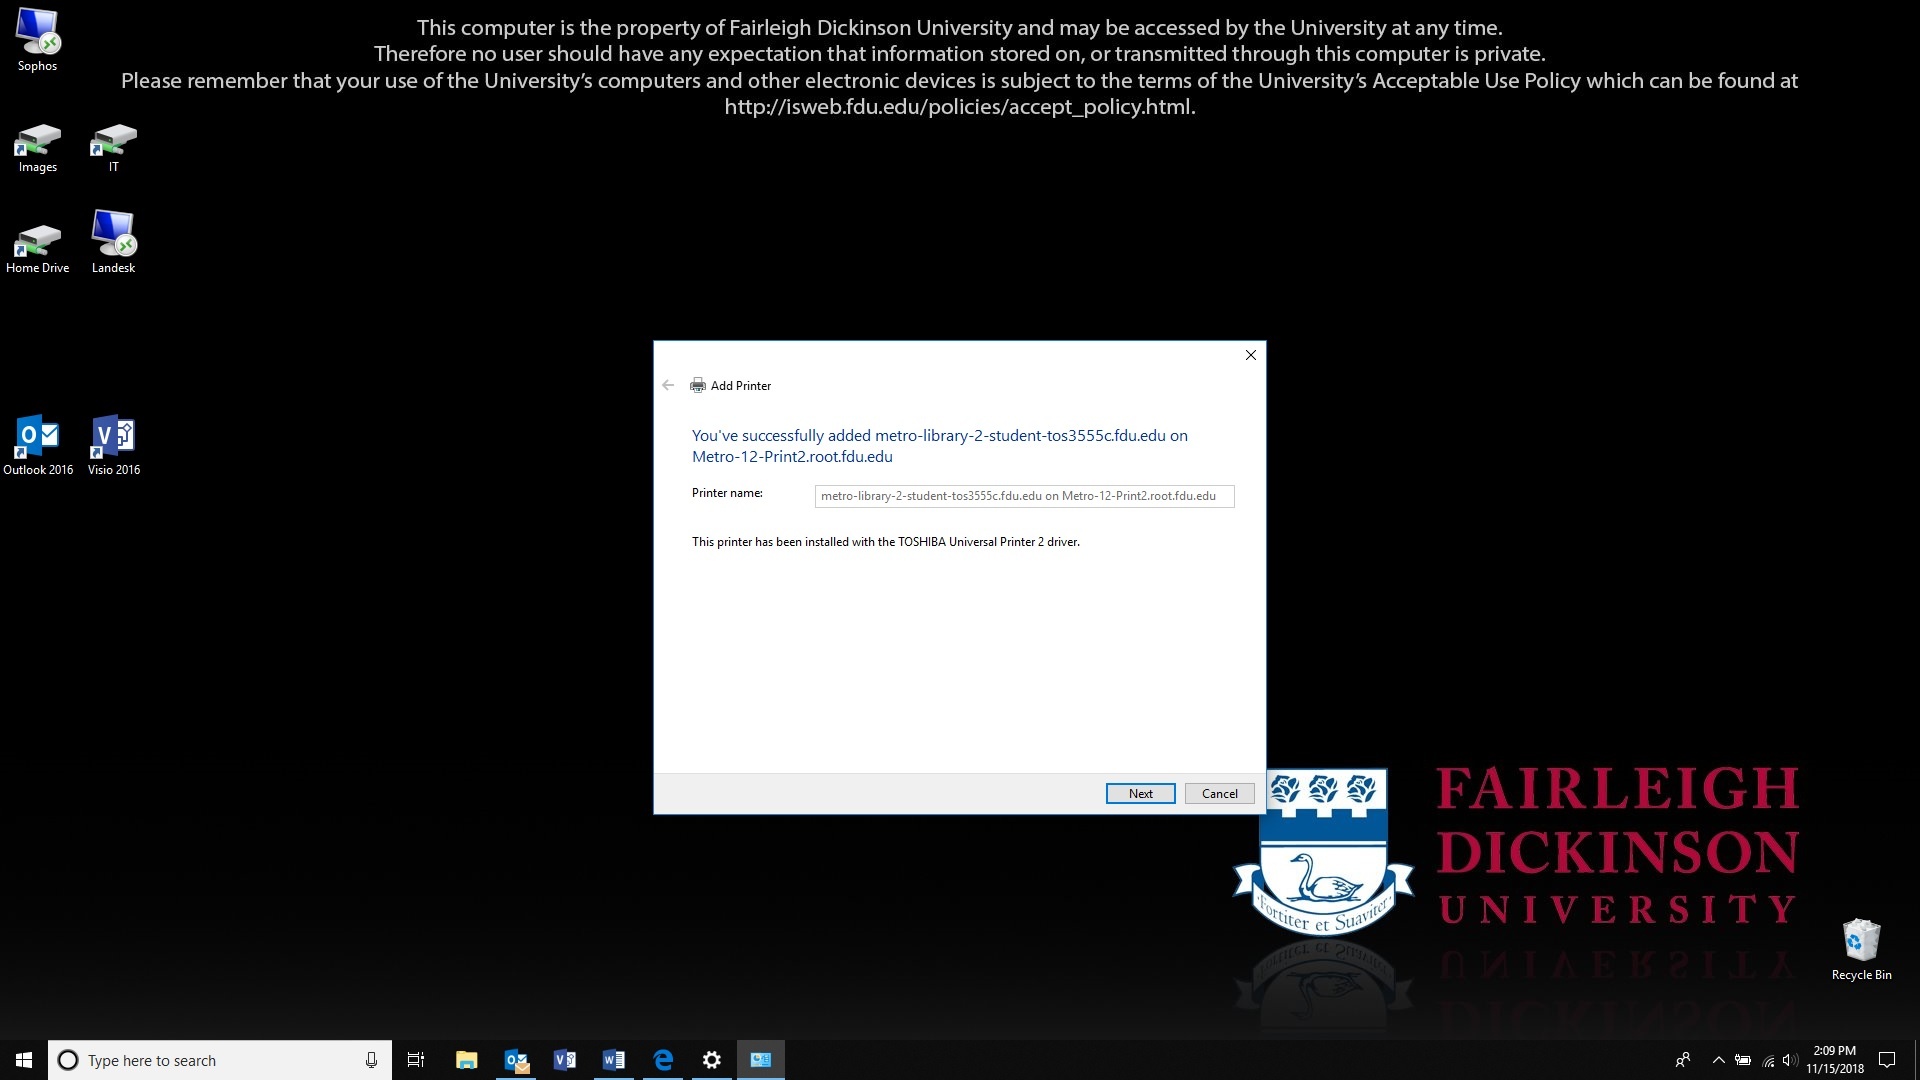
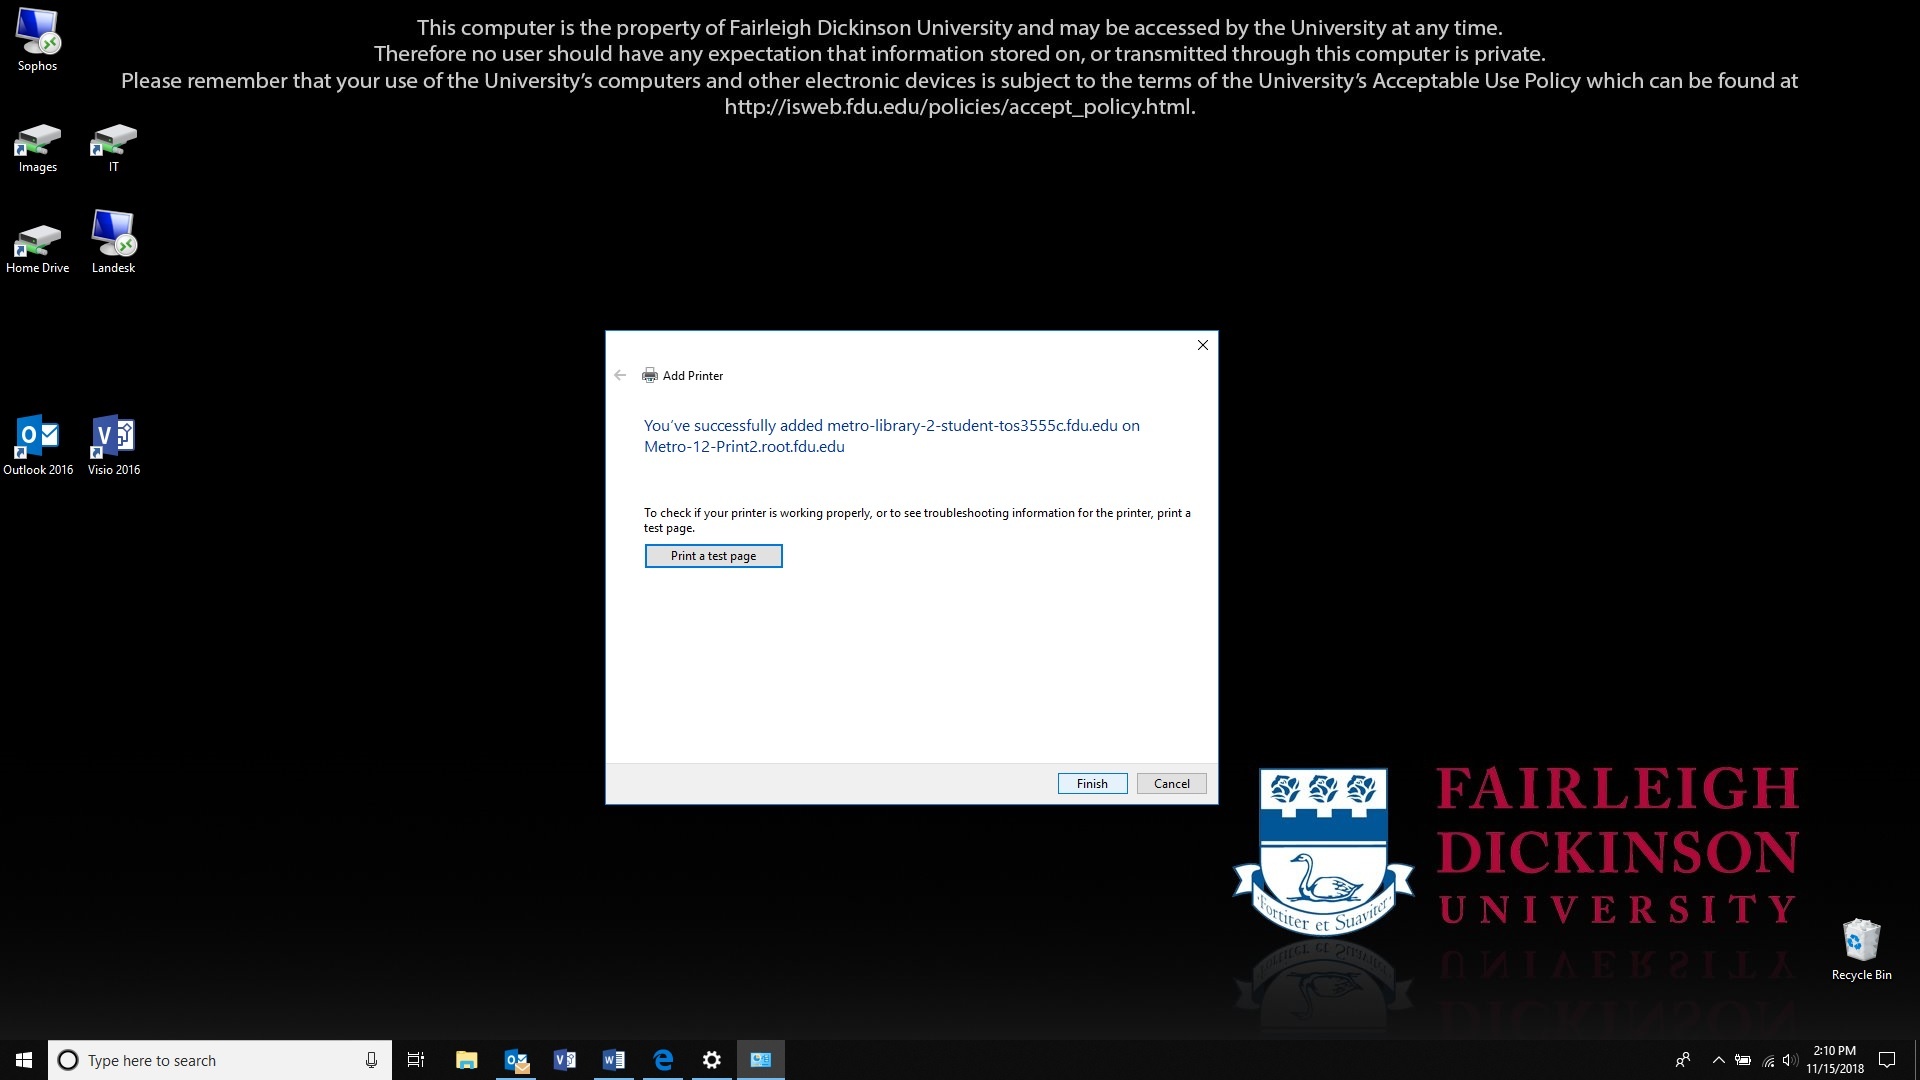
A box will let you know that the printer was successfully installed. Click “Next”
You can click on “Print a Test Page” to verify you are connected to the right printer otherwise click on “Finish”
Fairleigh Dickinson University’s Acceptable Use Policy for Computer Usage states, “All computers and mobile devices accessing any FDU resource must run an operating system and configuration that is supported by its vendor with regard to security patches and updates.”
This guide defines the lifecycle of our support for different operating systems.
Note
Apple does not publish official End of Life dates, but typically provides security updates for the current release of macOS, as well as the previous two releases.
Support Status Descriptions
Active (Default)
This platform is supported by FDU Computer Services & University Systems and Networking and new machines will be built with this platform unless otherwise requested.
Active
This platform is supported by FDU Computer Services & University Systems and Networking and will be installed on request.
Containment
This platform is currently supported by FDU Computer Services & University Systems and Networking but no new machines will be built with this platform. Platforms in containment will receive security updates and patches for the FDU supported software components. FDU Computer Services & University Systems and Networking Facilities will not provide new software or major revisions to existing software for these platforms.
Phasing Out
FDU Computer Services & University Systems and Networking is actively working to migrate assets away from this platform. Platforms go in to this status automatically 6 months before the FDU End of Support Date. Platforms may be placed in this status before that time.
EOL
This platform is no longer supported by FDU Computer Services & University Systems and Networking. Software support will be dropped from any asset running this platform. Other levels of support may be dropped as circumstances warrant. A valid reason is required to maintain an asset running this platform past the End of FDU Support date. All exceptions must be logged and periodically reviewed.
Supported Operating Systems
Desktop
OS Family
Operating System
Latest Release
FDU Support Status
Vendor Release Date
Start of FDU Support
End of FDU Support
Latest Vendor EOL Date
macOS
Tahoe
26
Active (Default)
Sep-2025
Nov-2025
Jun-2028
~2028
Sequoia
15
Active (Default)
Sep-2024
Nov-2024
Jun-2027
~2027
Sonoma
14
Phasing Out
Sep-2023
Nov-2023
Jun-2026
~2026
Windows
Windows 11
25H2
Active (Default)
Sep-2025
Nov-2025
Sep-2028
Oct-2028
24H2
Phasing Out
Oct-2024
Jun-2025
Sep-2027
Oct-2027
23H2
Phasing Out
Oct-2023
Jul-2024
Oct-2026
Nov-2026
Windows 10
22H2
EOL
Oct-2022
Dec-2022
Oct-2025
Oct-2025
Mobile
OS Family
Operating System
Latest Release
FDU Support Status
Vendor Release Date
Start of FDU Support
End of FDU Support
Latest Vendor EOL Date
Apple
iOS
26
Active (Default)
Sep-2025
Nov-2025
Oct-2028
~2028
18
Phasing Out
Sep-2024
Nov-2024
Oct-2027
~2027
17
Containment
Sep-2023
Nov-2023
Oct-2026
~2026
Android
Baklava
16
Active (Default)
Jun-2025
Dec-2025
~2028
~2028
Vanilla Ice Cream
15
Active
Sep-2024
Dec-2024
~2027
~2027
Upside Down Cake
14
Active
Oct-2023
Dec-2023
~2027
~2027
Tiramisu
13
Phasing Out
Aug-2022
Oct-2022
~2026
~2026
Snow Cone V2
12.1
Phasing Out
Mar-2022
Jul-2022
~2026
~2026
Latest Release
The latest release for desktop operating systems includes all minor and incremental updates.
End of Life
Any operating system not listed above is considered EOL (End of Life) and will not be supported. Examples of EOL Operating Systems include:
Windows: 95,98, XP, ME, VISTA, 7, 8, 8.1, & 10
macOS: Yosemite, El Capitan, Sierra, High Sierra, Mojave, Catalina, Big Sur, Monterey, & Ventura
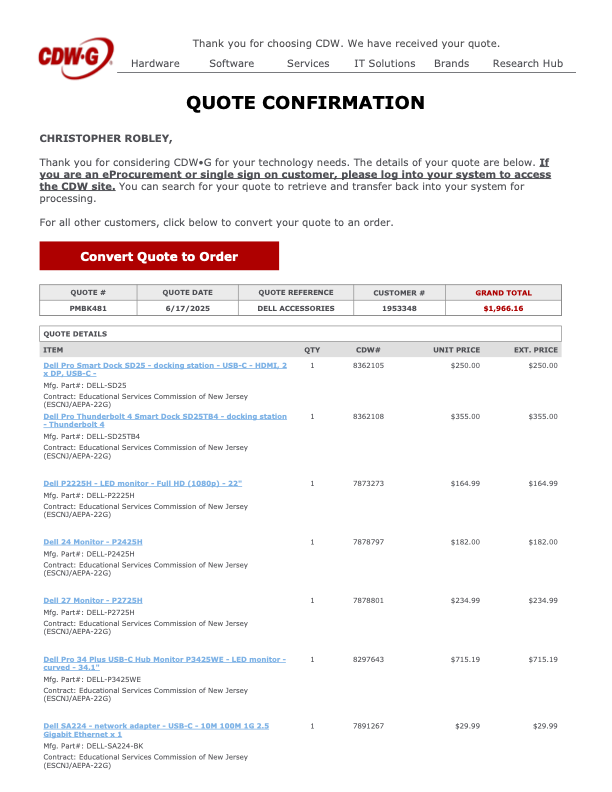
The following PC laptop accessories for university-owned Apple MacBook Pro and Dell laptops may be purchased from our approved vendors. Please use the following PC laptop accessories list and vendor contact information below to help guide you when obtaining optional laptop accessories.
Dell Pro 14 Plus PC Laptop Accessories
A/C Adapters
Only one A/C adapter will be provided with the new Dell laptops. If a user needs a second A/C adaptor, they will need to order the part below.
Accessory
Description
Manufacturer Part Number
CDW Part Number
Cost
Dell 65W USB-C Adapter
Dell AC Power adaptor (USB-C)
492-BDQM
7796926
$34.00
*Prices are noted as of July 2025
close
Docking Stations
Accessory
Description
Manufacturer Part Number
CDW Part Number
Inputs
Cost
Multi-Monitor Docking Station
Dell Pro Smart Dock SD25 – docking station – USB-C – HDMI, 2 x DP, USB-C – 1GbE, 2.5GbE
DELL-SD25
8362105
1 HDMI 2 DisplayPort 1 USB-C
$250.00
Multi-Monitor Docking Station
Dell Pro Thunderbolt 4 Smart Dock SD25TB4 – docking station – Thunderbolt 4 – HDMI, 2 x DP, 2 x Thunderbolt 4, USB-C
DELL-SD25TB4
8362108
1 HDMI 2 DisplayPort 2 Thunderbolt 4 1 USB-C
$355.00
*Prices are noted as of July 2025
close
Keyboards
Keyboards will not need to be replaced for users that already have them. Users that are new to the PC laptop docking station setup may want to buy a wired USB keyboard. There are no IT requirements for purchasing keyboards; however, if users want to go with a basic model, they can order the below part number.
Accessory
Description
Manufacturer Part Number
CDW Part Number
Cost
Wired USB Keyboard
Dell KB216 – keyboard
KB216-BK-US
4306011
$22.93
*Prices are noted as of July 2025
close
Mice
There are no IT requirements for purchasing external wired USB mice; however, if a user wants to go with a basic model, they can order the below part number.
Accessory
Description
Manufacturer Part Number
CDW Part Number
Cost
Wired USB Mouse
Dell Optical Wired Mouse – MS116
MS116-BK
3938481
$22.93
*Prices are noted as of July 2025
close
Monitors
For users who already have a monitor and wish to use it with one of the new docking stations, your existing monitor must have either an HDMI or DisplayPort (DP) input connection. If your monitor only has a DisplayPort (DP) connection, you will need an HDMI to DisplayPort (DP) adapter. Users should check their current monitor connections for compatibility; if new monitors are required or desired, please choose from the list below.
Accessory
Description
Manufacturer Part Number
CDW Part Number
Inputs
Features
Cost
24″ External Monitor
Dell P2425H 24-inch Full HD LED Monitor
DELL-P2425H
7878797
1 HDMI 1 DisplayPort 1 VGA
Built-in Camera: No
Built-in USB Hub: Yes
$182.00
27″ External Monitor
Dell P2725H – LED monitor – Full HD (1080p) – 27″
DELL-P2725H
7878801
1 HDMI 1 DisplayPort 1 VGA
Built-in Camera: No
Built-in USB Hub: Yes
$234.99
34″ External Monitor
Dell Pro 34 Plus USB-C Hub Monitor P3425WE – LED monitor – curved – 34.1″
There are no IT requirements for purchasing an external wireless keyboard and mouse combo set; however, if a user would like to go with a basic model, they can order the below part number.
Accessory
Description
Manufacturer Part Number
CDW Part Number
Cost
Wireless Keyboard & Wireless Mouse
Logitech MK850 Performance Keyboard and Mouse (wireless)
920-008219
4540578
$67.07 from CDW-G
*Prices are noted as of July 2025
close
Lenovo Desktop PC Accessories
Keyboards
Keyboards will not need to be replaced for users that already have them. Users that are new to the PC laptop docking station setup may want to buy a wired USB keyboard. There are no IT requirements for purchasing keyboards; however, if users want to go with a basic model, they can order the below part number.
Accessory
Description
Part Number
Cost
Wired USB Keyboard
Lenovo Preferred Pro II USB Keyboard – US English
4X30M86879
$26.17 from CDW-G
close
Mice
There are no IT requirements for purchasing external wired USB mice; however, if a user wants to go with a basic model, they can order the below part number.
Accessory
Description
Part Number
Cost
USB Mouse
Lenovo Essential USB Mouse
4Y50R20863
$18.80 from CDW-G
close
Monitors
Accessory
Description
Part Number
Inputs
Features
Cost
24″ External Monitor
Lenovo ThinkVision T24v-30 – LED monitor – Full HD (1080p) – 23.8″
63D8MAR3US
HDMI, DisplayPort, VGA
Built-in Camera: Yes
Built-in USB Hub: Yes
$324.38 from CDW-G. This monitor is the preferred 24″ model to purchase if the the user requires a built-in web camera.
27″ External Monitor
Lenovo ThinkVision T27hv-30 – LED monitor – QHD – 27″
63D6UAR3US
HDMI, DisplayPort, USB-C
Built-in Camera: Yes
Built-in USB Hub: Yes
$628.58 from CDW-G. This monitor is the preferred 27″ model to purchase if the the user requires a built-in web camera.
close
Wireless Keyboard and Mouse Combo
There are no IT requirements for purchasing an external wireless keyboard and mouse combo set; however, if a user would like to go with a basic model, they can order the below part number.
Accessory
Description
Part Number
Cost
Wireless Keyboard
Logitech MK850 Performance Keyboard and Mouse (wireless)
920-008219
$67.07 from CDW-G
close
Apple MacBook Pro Laptop Accessories
A/C Power Adapters for 14-inch & 16-inch MacBook Pro
Accessory
Description
Part Number
Cost
A/C Power Adapter
Apple USB-C – Power Adapter – 96 Watt
MX0J2AM/A
$63.19 from CDW-G
A/C Power Adapter
Apple Power Cable – 24 pin USB-C to MagSafe 3 – 6.6 ft
MLYV3AM/A
$41.65 from CDW-G
close
Docking Stations
Accessory
Description
Part Number
Inputs
Cost
Single Monitor Docking Station or Hub
HyperDrive Ultimate USB-C Hub – This model supports a single external monitor setup. One HDMI port supports video resolutions up to 4K at 30 Hz. Featuring three USB 3.1 Gen 1 Type-A ports, 1 USB Type-C Power Delivery port, one ethernet port, and one 3.5mm audio jack, plus SD and microSD card readers.
HD30FGRAY
1 HDMI, 1 Mini DisplayPort, 1 VGA
$89.99 from B&H.com. This model is the preferred single monitor hub to purchase
Dual-Monitor Docking Station or Hub
HYPER HyperDrive Viper 10-in-2 USB Type-C Hub (Space Gray) – This model is essential for connecting up to two external monitors. This hub provides two HDMI and three USB 3.1 Gen 1 Type-A ports, as well as ports for Gigabit Ethernet, 3.5mm audio, and USB Type-C with 60W of power delivery. UHS-1 SD and microSD card readers are also present.
HD392-GRAY
2 HDMI
$129.99 from CDW-G. $129.99 from B&H.com. This model is the preferred dual-monitor hub to purchase
Single Monitor Docking Station or Hub
HYPER Hyperdrive 4-In-1 USB Type-C Hub – This model supports a single external monitor setup. Supports a single 4K display at 60 Hz via the one HDMI port. Featuring two USB 3.2 Gen 1 Type-A ports and one USB Type-C port to deliver up to 100W of pass-through power to your laptop or tablet.
HD41
1 HDMI
$59.99 from B&H.com. This model does not contain an ethernet port
Single Monitor Docking Station or Hub
HyperDrive 5-Port USB Type-C Hub – This model supports a single external monitor setup. Supports a single 4K monitor at 60 Hz via the one HDMI port. Features two USB Type-A ports, one ethernet port, and one USB Type-C port to deliver up to 86W of power to your laptop or tablet.
HDMB2
1 HDMI
$84.59 from CDW-G
Single Monitor Travel Hub or Docking Station
Lenovo Powered USB-C Travel Hub – This model supports a single external monitor setup. Features one ethernet port, one USB Type-A port, one USB 3.1 Gen 1 Type-A port, and one USB-C power port.
4X90S92381
1 HDMI, 1 VGA
$82.28 from CDW-G
close
Monitors
Accessory
Description
Part Number
Inputs
Features
Cost
24″ External Monitor
ASUS ProArt PA247CV – LED monitor – Full HD (1080p) – 23.8″
PA247CV
HDMI, DisplayPort, USB-C
Built-in Camera: No Built-in USB Hub: Yes
$201.69 from CDW-G
You may also refer to the Lenovo Desktop PC Accessories – Monitors section above to select an external monitor for the Apple MacBook Pro.
close
Accessories
USB Flash Drives
There are no IT requirements for purchasing USB flash drives. USB 3.0 is recommended. Users are reminded about adhering to the Written Information Security Program (WISP). No WISP-protected data may be placed on external devices without specific authorization, as indicated in the policy.
close
External Hard Drives
There are no IT requirements for purchasing external hard drives. USB 3.0 is recommended. Users are reminded about the Written Information Security Program (WISP). No WISP-protected data may be placed on external devices without specific authorization as indicated in the policy.
close
Printers / Scanners
For a current list of approved printers and scanners, please reach out to the Purchasing Department. Please remember that most printers don’t have USB printer cables included upon purchase.
Note
While most modern printers support wireless connectivity, wireless printing capabilities may not be enabled on any printer without the explicit authorization of the Director of Networking.
close
Purchasing
FDU Purchasing
To purchase any of the laptop accessories listed above, please submit a PO to the Purchasing Department. Users need to get a quote from either vendor through the contact information below. Please reference the item numbers from the attached quotes. Unless stated otherwise, the products listed are currently available. Prices may vary. Other University approved vendor reseller information and common products that departments may be interested in purchasing can be found by visiting:
Departments should consolidate orders as much as possible. There is no additional discount for quantity. Departments should designate the ‘ship to’ to their respective department. Vendors’ contact information is listed below.
close
Sample Purchase Order (PO) Quotes
Tip
View the Sample PO quotes to help guide you when obtaining your own quote prior to submitting to the Purchasing Department.
The instructions below pertain to any Vancouver user that will use the Secure Print, Scan to email, and Copy functions of the Xerox printers.
Account Balances
Vancouver users have the following account balances listed below:
Free Quota, is a designated account balance that is applied to all the students and is auto-replenished on schedule – before the start of the semester. This is the first balance that gets deducted after which the secondary “Paid_Balance” goes into effect.
Paid Balance is the amount credited onto a student’s account when they pay for extra printing credits.
Each user listed below has a specified amount of Free Quota replenished according to a schedule:
Adjuncts: $1000.00 replenished at the start of the school year
Student IT Assistants And Student Workers: $200.00 replenished at the start of every school term
Staff and Faculty: $1000.00 replenished at the start of every school term
Students: $10.00 replenished at the start of every school term
Paid Balance Reload / Replenishment
The instructions below are for Students on how to reload/replenish their Paid Balances:
Go to Enrollment Services to pay for the amount they wish to recharge
Bring the receipt to IT Office to request the reload for their Paid Balance
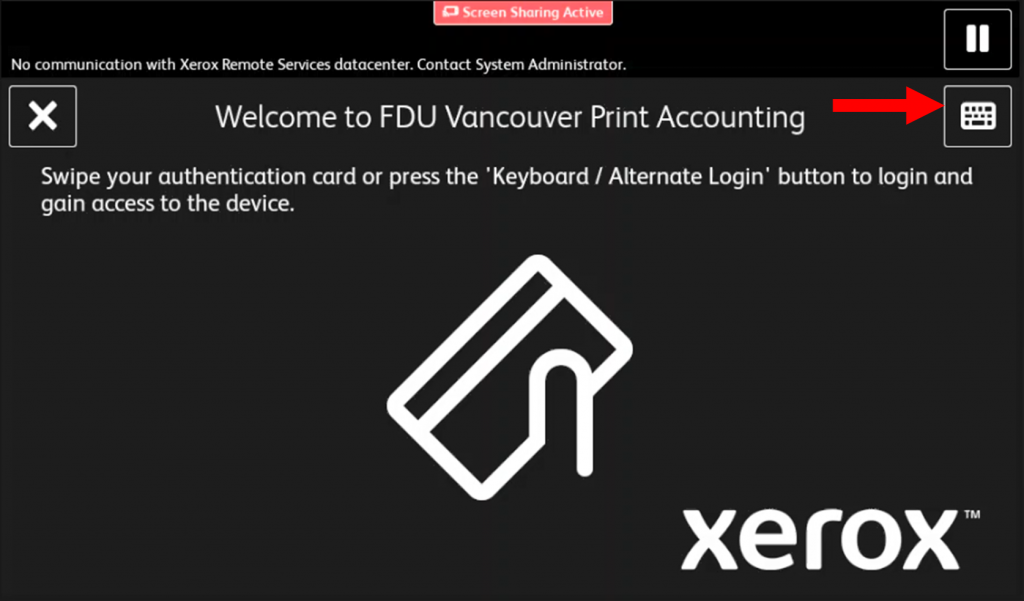
Logging In
Users can either swipe their badge or use their FDU NetID and password to log in. To use your credentials press the “Keyboard” button on the top right of the screen
If upon swiping your badge the following screen appears on the Xerox printer screen. Enter your credentials to associate them with your account. For a detailed walkthrough, play the video below:
close
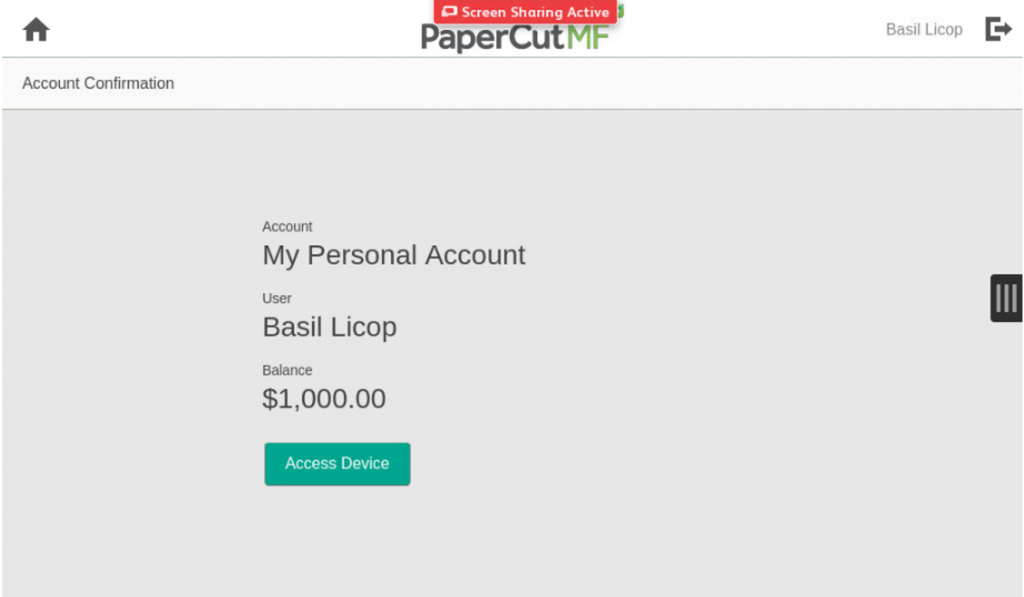
Checking Account Balance on Printer
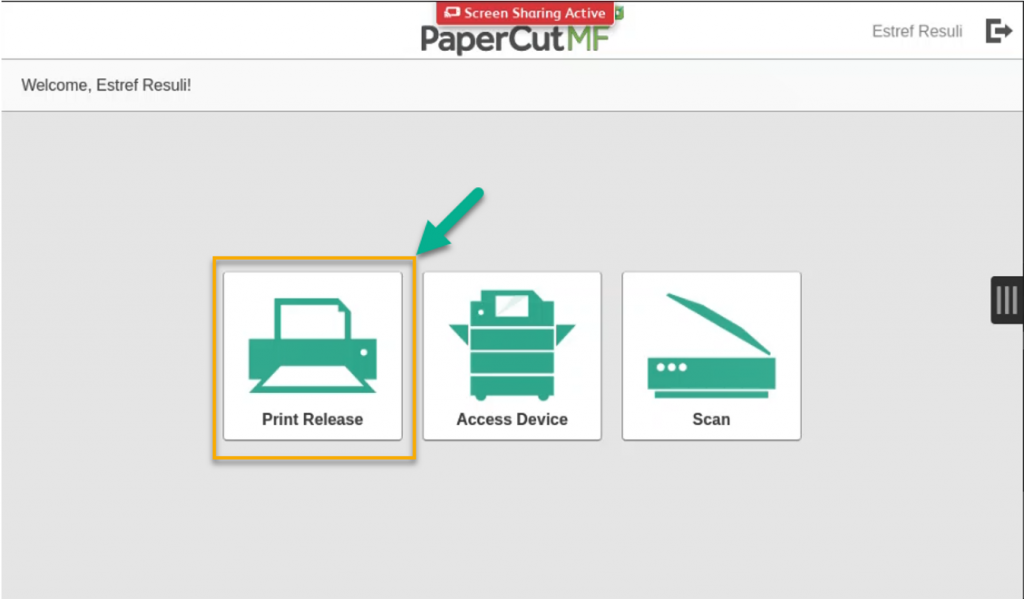
To check your total balance from the printer, log into that printer and press the “Access Device” button. The balance will be displayed on the screen.
close
Secure Print
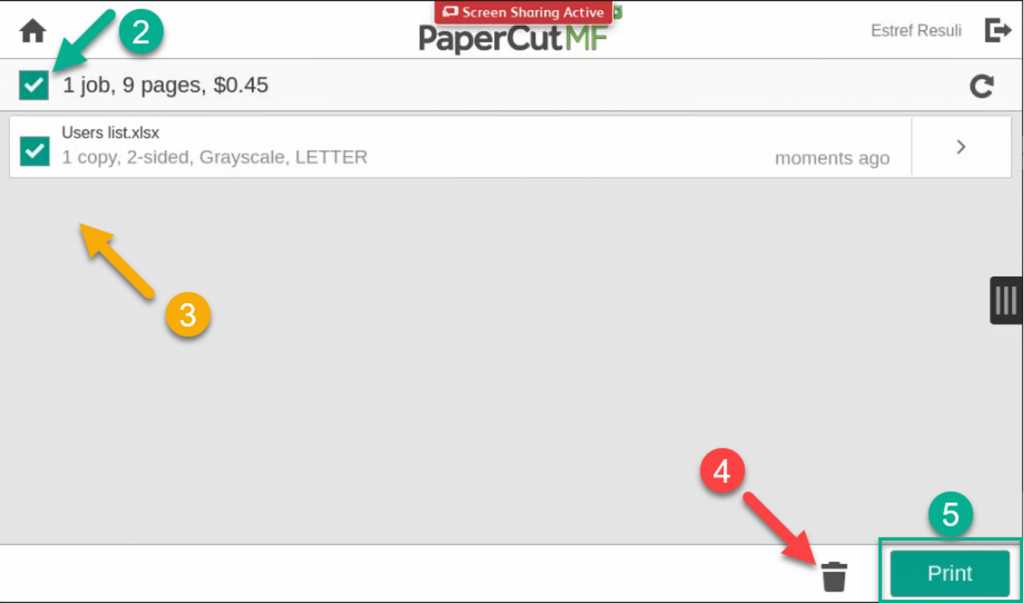
To release a print job after you have sent a print job to the appropriate printer and logged into that printer. Press the “Print Release” button
To print all jobs under the queue press the checkbox above all the jobs (2) then press the “Print” button (5)
To print a selection of the jobs, select the appropriate checkbox beside the jobs you want to print (3), then press the “Print” button (5)
To delete jobs from the printer’s queue, select the appropriate checkbox beside the jobs you want to delete (3), then press the “Trashcan” button (4)
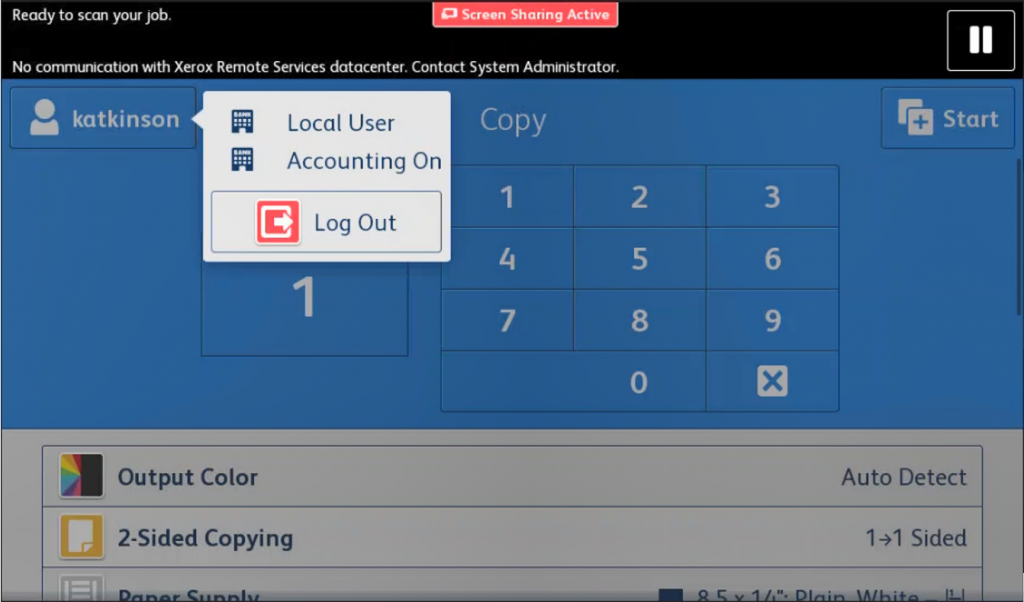
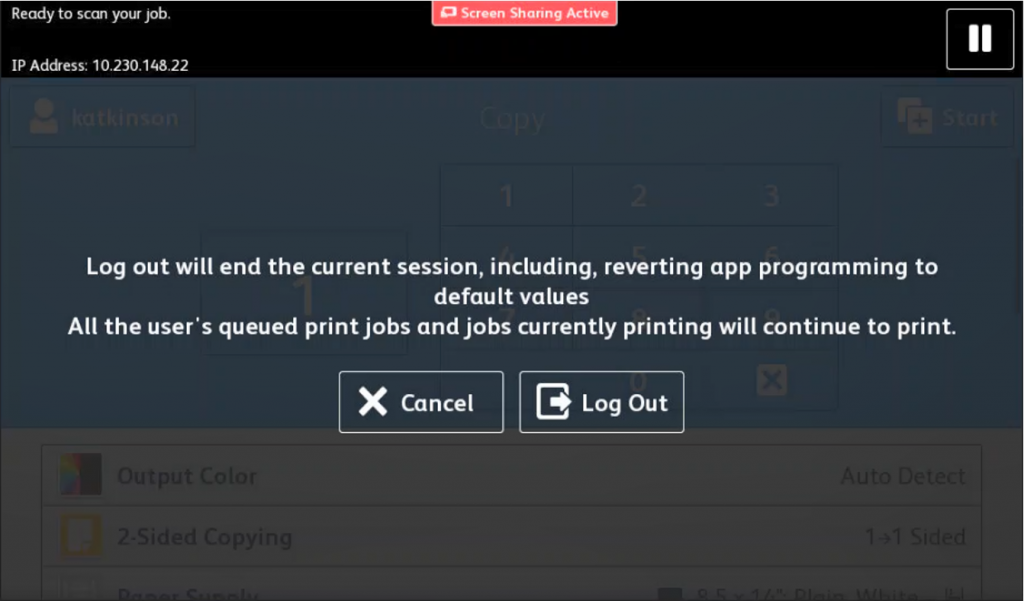
To log off of the printer, press the “Log Out” icon on the top right next to your name
close
Scan to Email
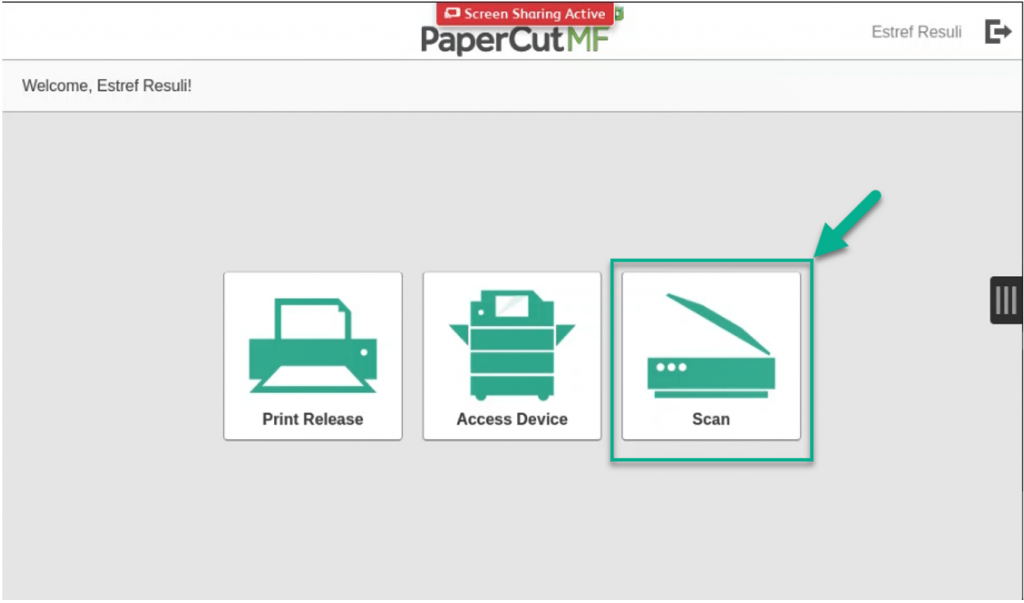
To start a scan-to-email job, log into a printer and press the “Scan” button
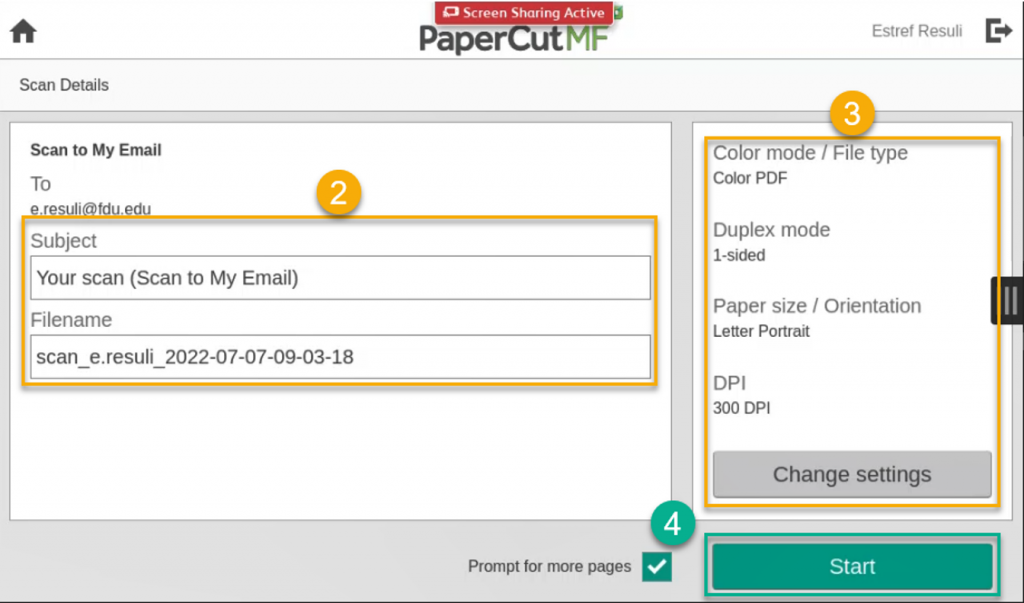
You can press the “Star“’ button (4) immediately to start scanning
Optionally you can edit the Subject and Filename entries (2) and the scan settings (3)
To log off of the printer, press the “Log Out” icon on the top right next to your name
close
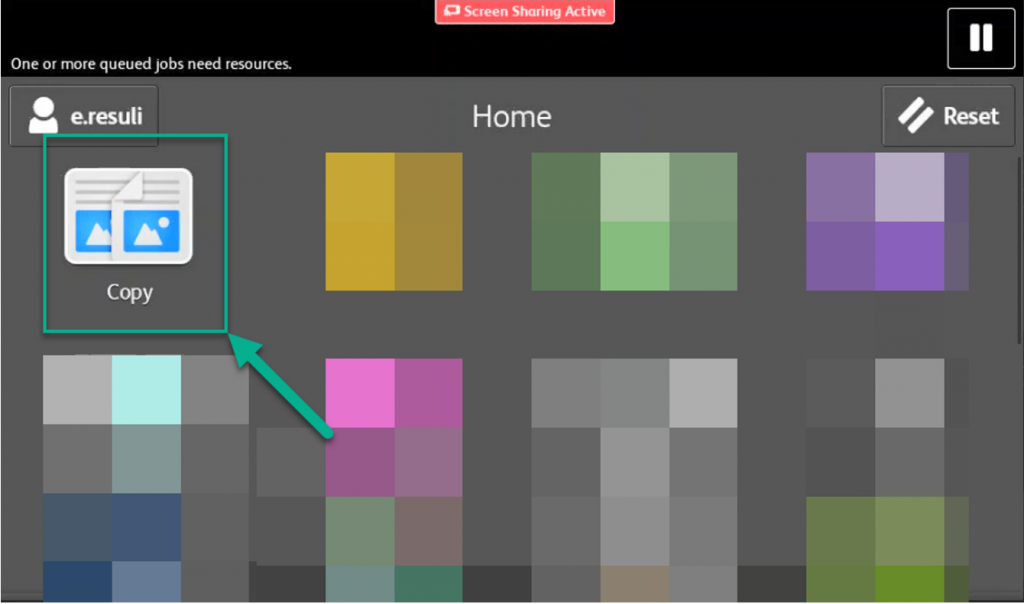
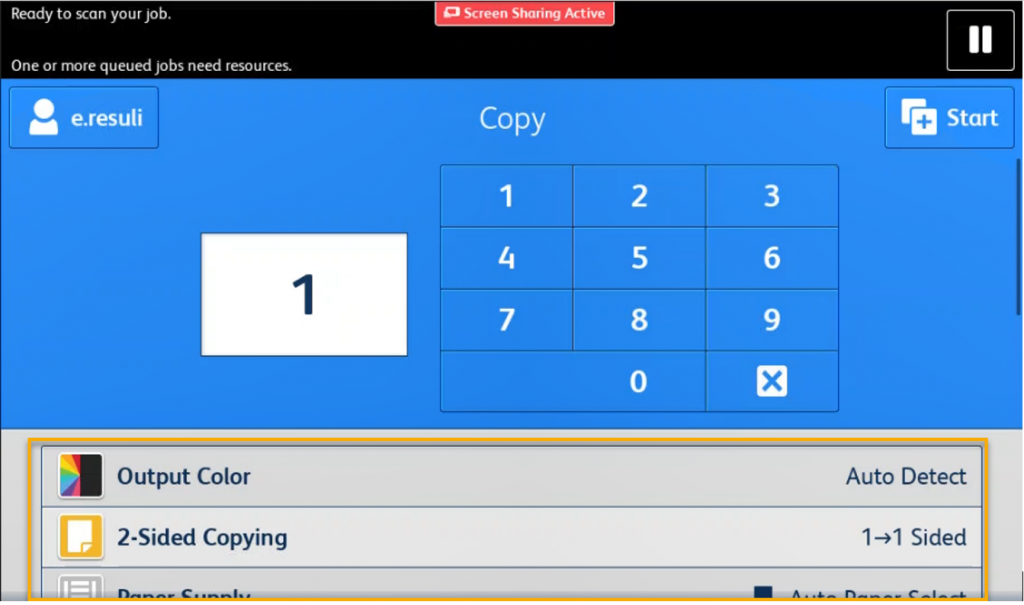
Copying
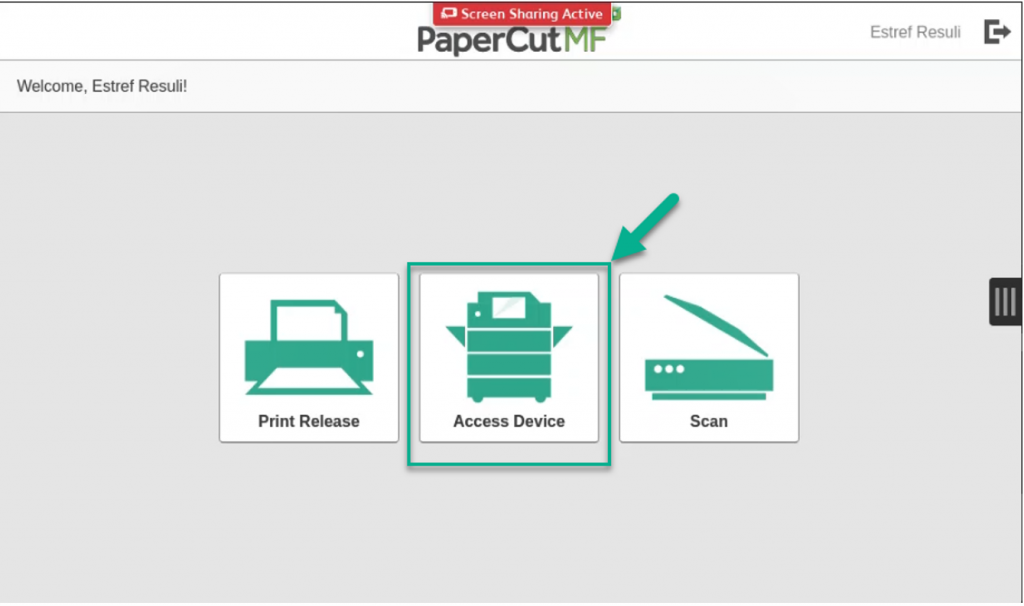
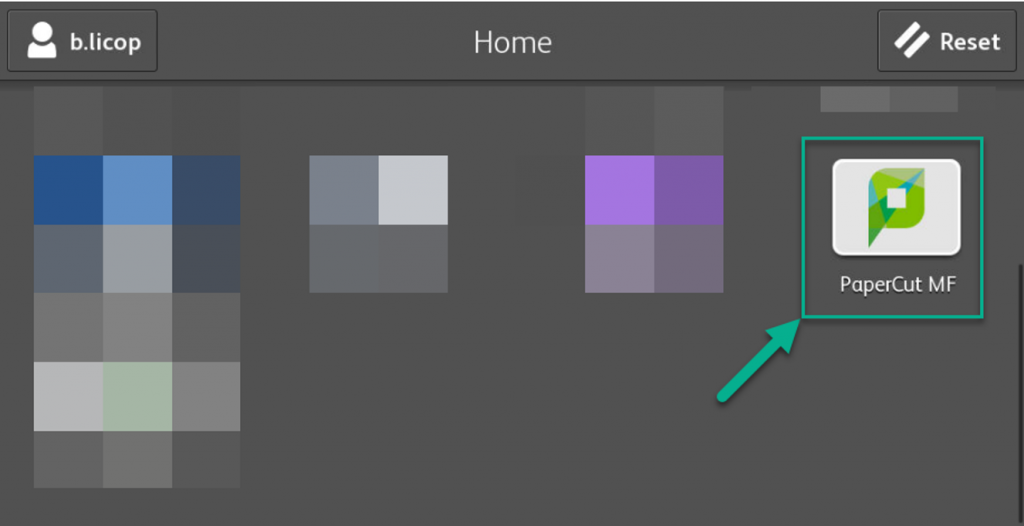
To start a copy job, log into a printer and press the “Access Device” button
Press “Access Device“
To return to the PaperCut MF main screen, press the “PaperCut MF” button
To copy, press the “Copy” button
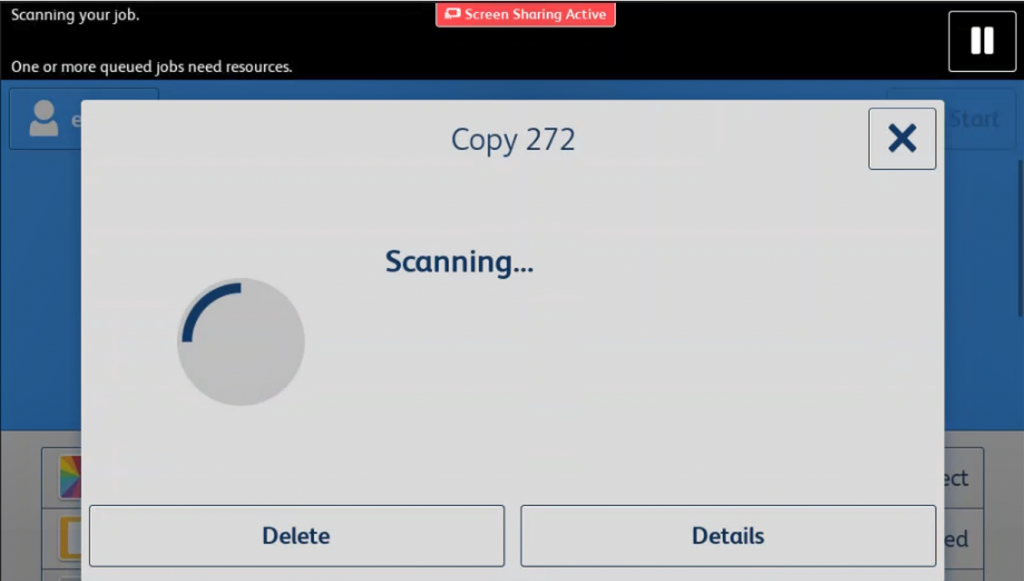
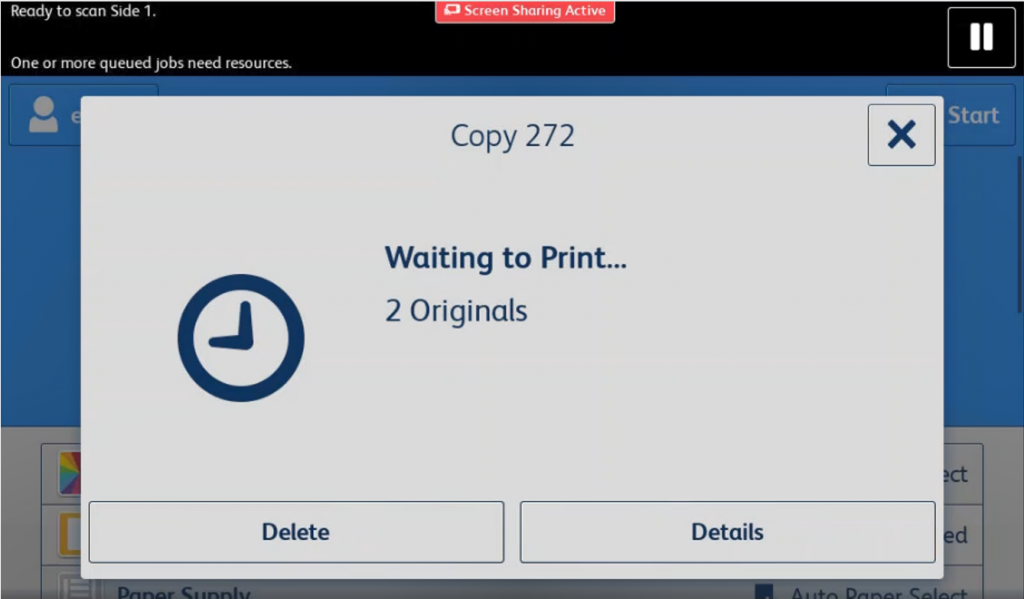
Enter the number of copies and then press the “Star“’ button for the default selection (Auto Detect Color, 1-1 Sided copies). Optionally you can change the settings shown in the yellow box below, then press the “Star” button
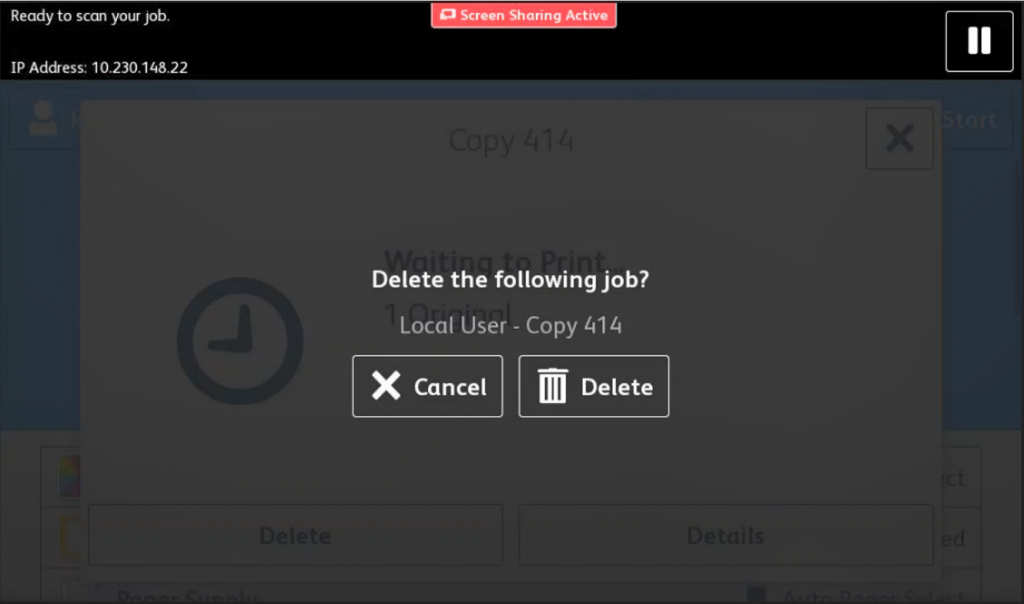
You can delete the job at any point in the previous screens by pressing the “Delete” button. If only N number of pages have been printed, you will only be charged N times
To log off of the printer, press your username on the top left and then press the “Log Out” button.
Log in using your FDU netID then select the “Login” button
You can review your Transaction History, Balances, Recent Print Jobs & Jobs Pending Release by selecting the appropriate tab on the left-hand side. You can also see your environmental impact according to your print, scan & copy activities
Creating strong, secure passwords is essential to protecting your personal information and maintaining the safety of your FDU NetID account. This article provides clear guidelines for password creation, including complexity requirements, helpful tips, and best practices to ensure your account remains secure. By following these guidelines, you can create passwords that are not only compliant with university policies but also resilient against potential threats.
Guidelines for Passwords
Passwords must be between 8-16 characters
Pass a basic complexity check
Password Requirements:
At least one uppercase letter
At least one lowercase letter
At least one number
At least one special character
Passwords must not:
Contain your first or last name
Be the same as any prior passwords
Helpful Tips:
Longer passwords (or “passphrases”) can be created using a phrase or sentence. These are easy to remember but difficult for others to guess.
A short, meaningful phrase or sentence is often easier to recall.
Other Important Password-Related Guidelines:
Your account is your responsibility. Do not share your password with others, including technicians. FDU IT staff will never ask for your password.
Avoid choosing a password based on personal information that someone who knows you could guess.
Do not use your FDU NetID or your name/department name as your password.
Refrain from using your FDU NetID and password to access third-party systems (e.g., online shopping, newspapers, travel websites).
Avoid letting software save or store your passwords. This increases the risk of unauthorized access and makes it harder to remember your password if you don’t type it in regularly.
Always log out of programs or websites and close your browser (e.g., Internet Explorer, Firefox, Chrome) when done, especially on public computers.
Treat your passwords as valuable and protect them accordingly.
Passwords must be changed every 90 days.
To learn how to change your NETID password, follow the steps in this article:
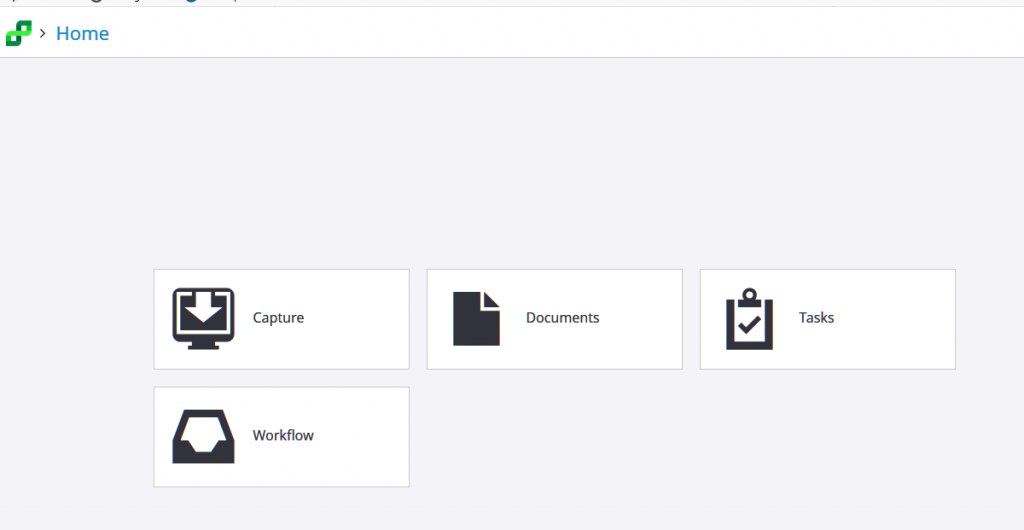
After you login, you should have a screen that looks something like this:
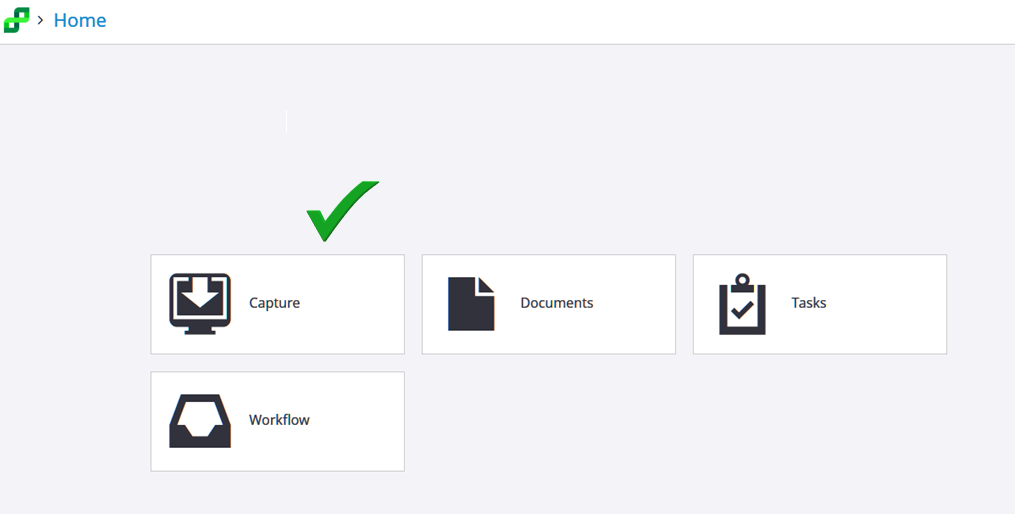
Capture
To capture a document to store in Perceptive, click on the Capture tab on the main Experience screen.
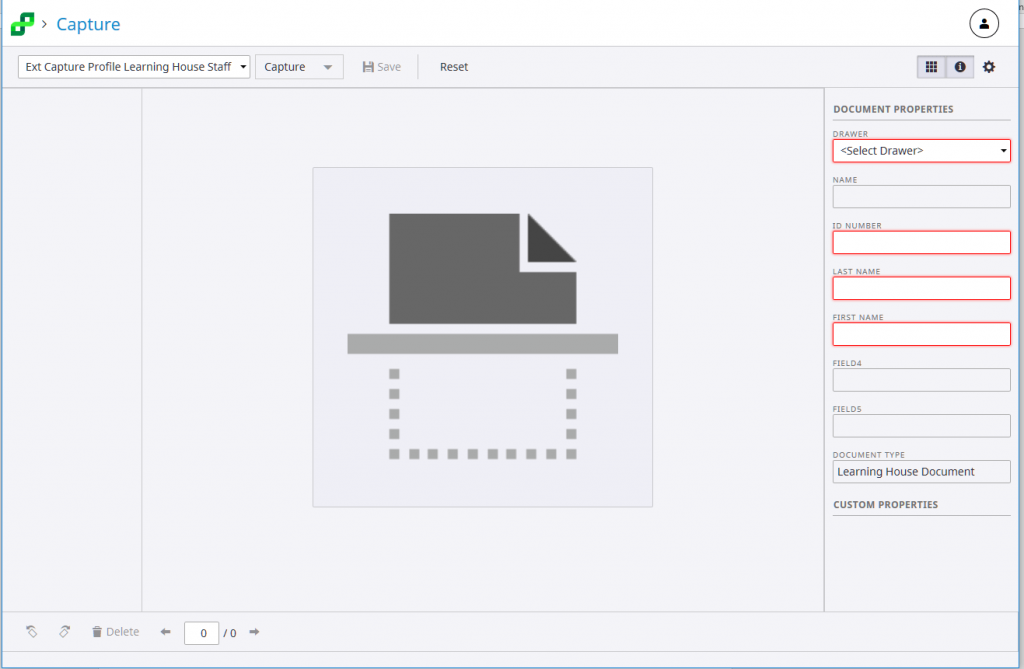
Now the Capture screen will display.
Now you will choose the appropriate Application Plan to Use
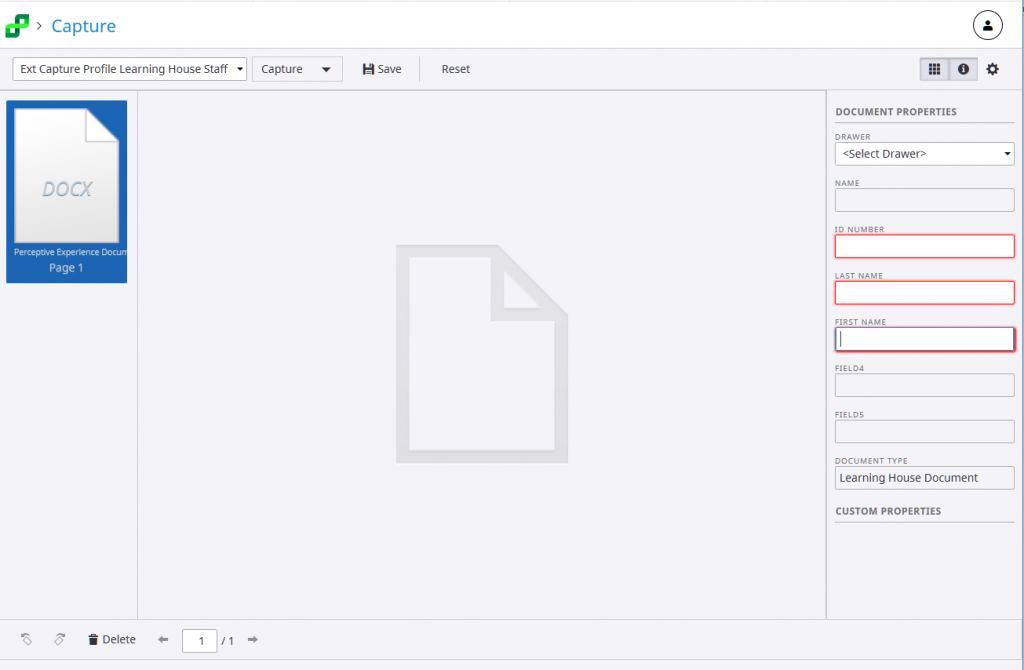
Make sure that in the box on the top left under the Perceptive logo and Capture has the correct Capture Profile you will use to store the document. In this example, the Ext Capture Profile Learning House Staff has been chosen. When chosen, the Document Properties box will appear on the right side of the screen with the appropriate field labels.
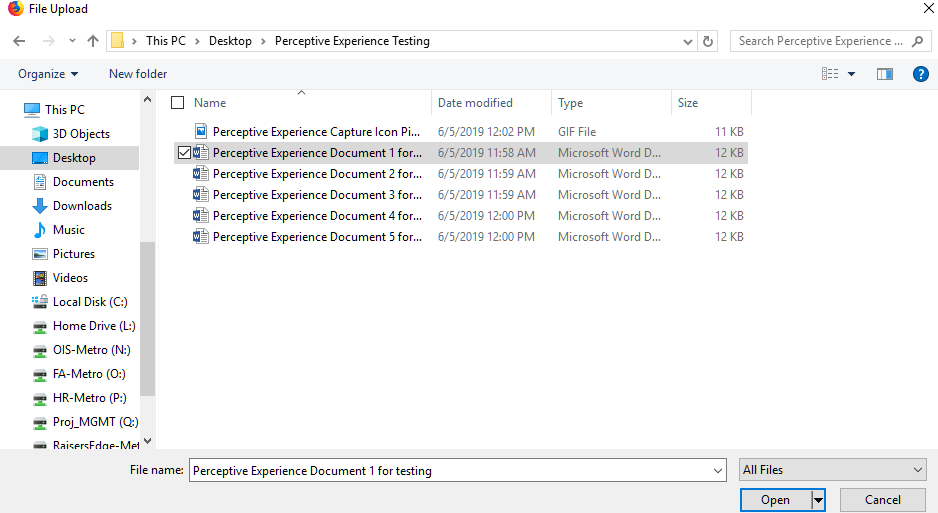
Now click on the Capture tab next to the Capture Profile that you picked. A new dialog box will appear:
Click on the Browse tab. This will bring up File Explorer. Choose the file you want to save to Perceptive.
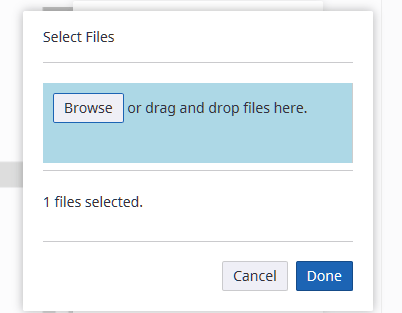
When you click Open, it will bring you back to the Dialog Box. There will be a pause and when the document has been selected, the message “1 file selected” will appear.
Click on the highlighted tab that says “Done”.
The Capture screen re-appears and the selected document will appear in a box on the left. The Document Properties box will re-appear on the right.
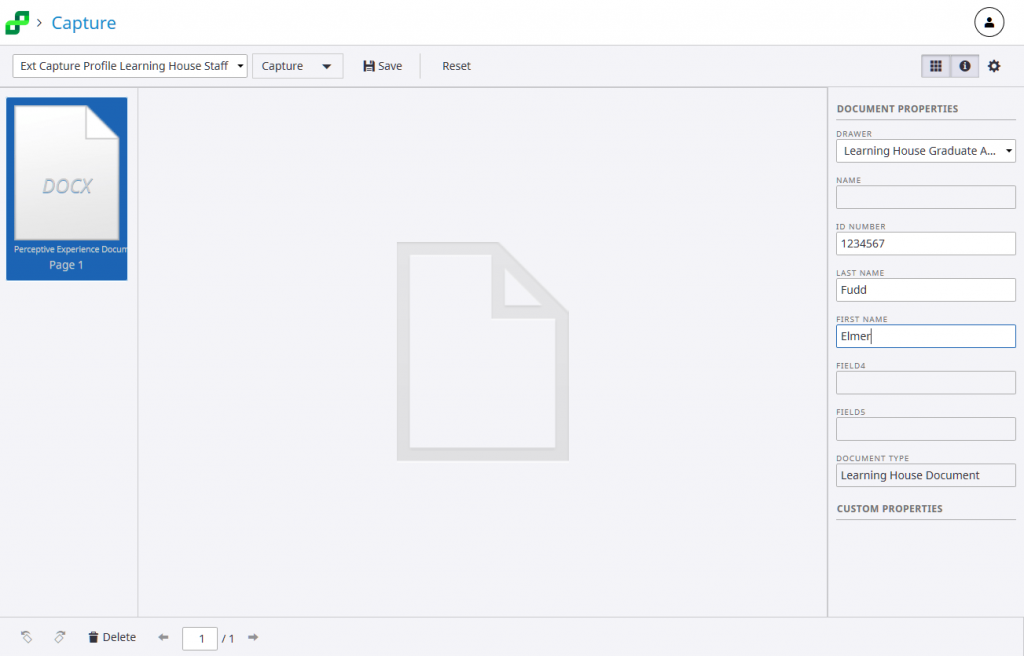
In the first field, choose the drawer in which you wish to store the document. Now fill in the remaining fields with the appropriate information.
When done filling in the data, click on the Save tab at the top middle of the screen next to the Capture drop down.
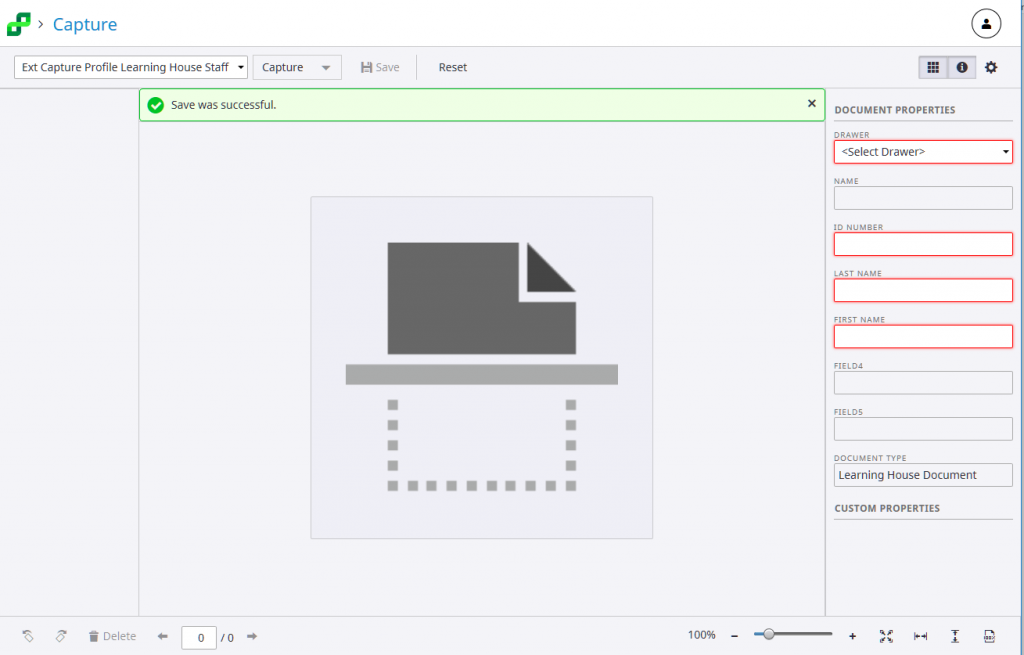
Once you click Save, the document has been stored in Perceptive and you will see a “Success” message highlighted in green:
The data that you entered will also disappear from the Document Properties box. Now you are ready to capture your next document for Perceptive going through the same steps that you just went through.
Document Search
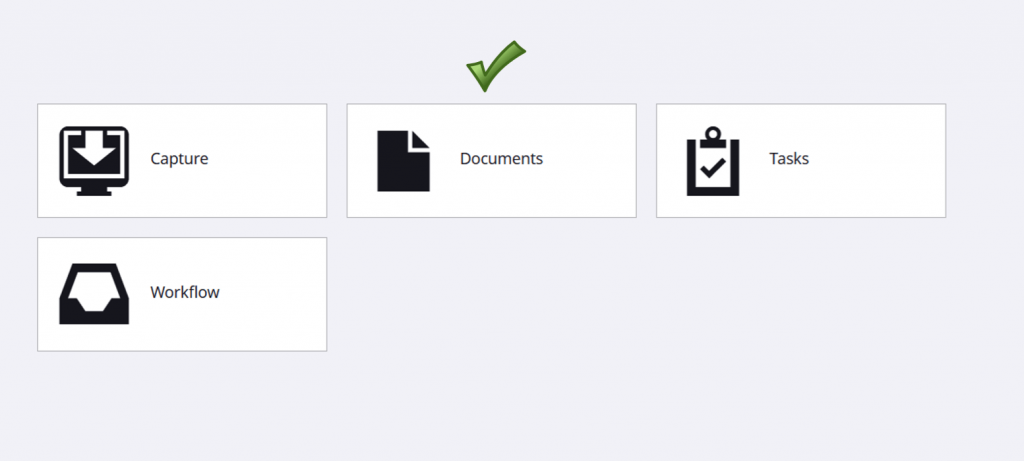
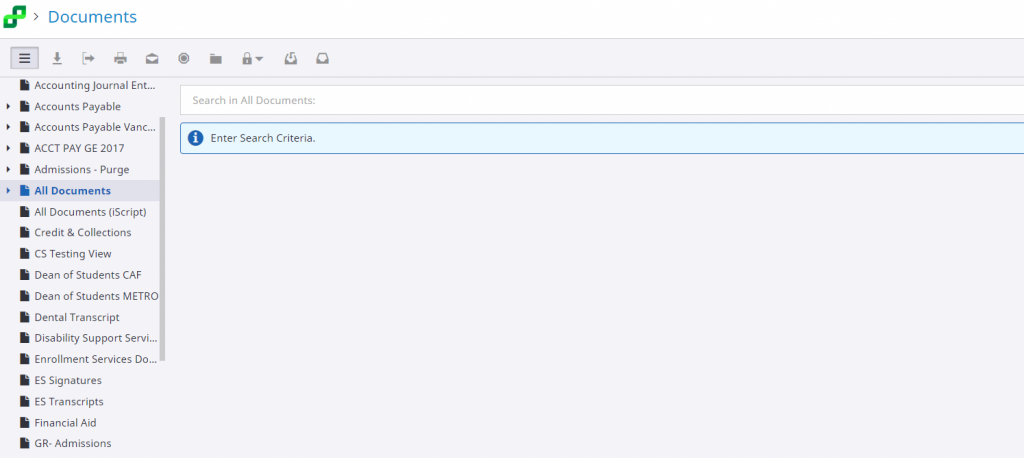
To search for a document in Perceptive Experience, click on the Documents tab on the main Experience screen.
Now the Documents Search screen will display. On the left hand side, a column labeled “Document Views” will appear showing the drawers for which you will have access. Please highlight and click on the appropriate drawer where you document resides.
Also, two boxes will appear in the middle – a white box with the words “Search inthe name of the highlighted drawer on the left”. The second blue box says Enter Search Criteria.
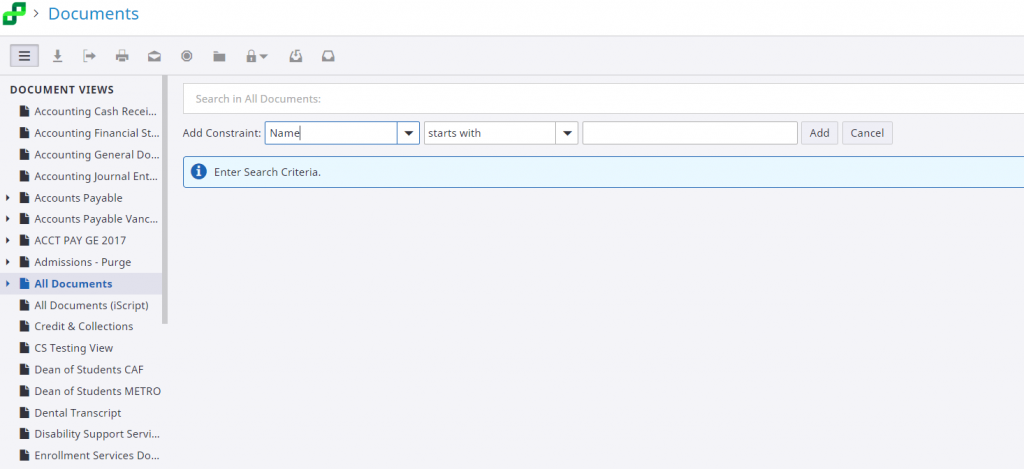
To enter search criteria, click inside the white box. A new row of boxes will appear between the two original boxes. These new boxes are the criteria and method you wish to conduct a search. The first box is labeled “Add constraint”. It is a dropdown box with a list of keys you may search on. Name will always appear as the first entry. Do not attempt to use that constraint. It is not what you think it might be. It is a parameter that we do not use. Choose the constraint or key that you wish from the drop down – usually ID number or Last Name. The second box is also a drop down box. It is for the operation that will be performed – normally you would choose “starts with” or “equal to”. The third box is where you would type in the actual value of the key you are looking for, usually the last name or ID number of the person you are searching for. There is a wild card that you can use if you are unsure about the spelling of the key or the complete ID number. The wildcard is the percent sign (%). An example would be BRAN% or %ancon% or 01234%. Also in the case of ID numbers, the leading zero is important to include. If searching for ID# 0956712 using “equal to” you must make sure that the leading zero is included.
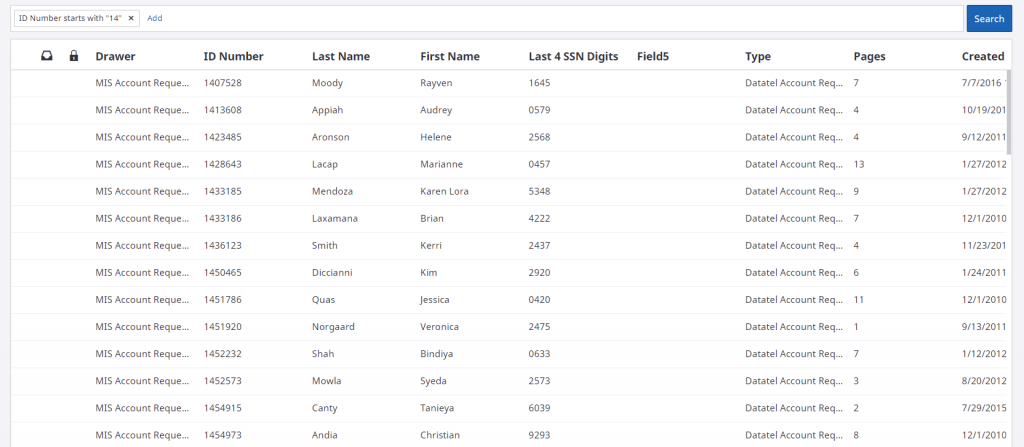
Below is an example of a search where I want to find MIS COLLEAGUE Account Requests for anyone who has an ID number beginning with “14”. I would click on the clear white box to get the three prompt boxes. I would then put in the Constraint (Key), then the operand and finally the value of what I am searching for – ID number – starts with – 14. I would then click on the Add button and that gets entered into the previously blank search box. You may add another constraint (key) if you like or just click on the blue Search button at the very right.
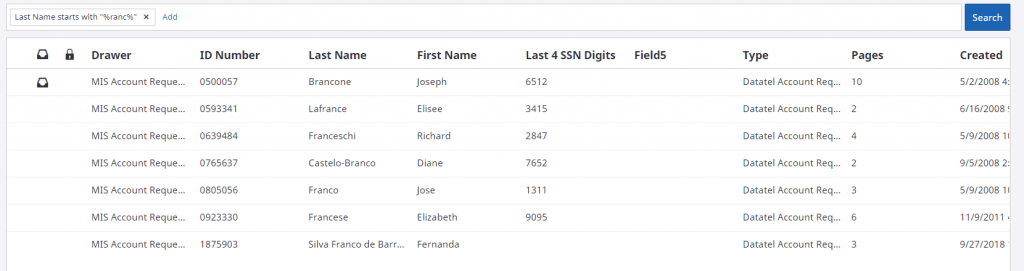
Here is another example below where I am looking for anyone in this drawer that has the string ‘ranc’ in the last name. Notice the operand and the placement of the % signs in the value field.
Editing projects can vary greatly in complexity, from straightforward cuts to those requiring specific graphics, logos, music tracks, and lower-thirds. To ensure a smooth and efficient editing process, it’s important to communicate these requirements to our team prior to production. This allows us to be prepared and begin editing shortly after the video has been recorded.
For more complex video projects, involving a variety of unique elements like graphics, B-ROLL, transitions, voiceovers, and music tracks, collaboration between the editor and producer is key. This process typically involves the editor sending raw footage to the producer, who then uses the Frame.io platform to make edit decisions and provide additional stylistic guidance.
A preview version is created based on this feedback and emailed back to the producer for review. This cycle of review and revision may require several iterations, potentially two to four passes, before reaching a final version. This final product is then subject to approval by individuals responsible for the video project, ensuring that it meets all necessary standards and criteria.
To prevent excessive printing, the Department of Computing Services charges students a small fee for printing in the FDU Computer Labs. Black and white printing costs $0.05 per page and color printing is $0.25 per page.
Each student pays a technology fee which includes $10.00 of lab printing for each of the fall, spring, and summer semesters. Printing charges above the $10.00 per semester will appear as a Printing Fee on the next tuition bill.
The $10 per semester printing credit is a standard allotment that expires each semester and has no cash value. No refunds will be given for pages not printed and unused prints for each semester’s allotment do not carry forward.
FDU staff and faculty members can use lab printers on a limited basis without charge for the purpose on conducting FDU business. Please use your department’s printer(s) as your primary printing resource. Faculty and staff members are limited to 200 pages per semester. Any attempt to print past this quota will result in an error message stating that the account does not have enough credit.
Note: You are responsible for all activity on your account. If you share your password with others or forget to log out, you will be held responsible for any activity done via your account, including printing charges. Computing Services strongly recommends that you use non-trivial passwords and log out completely before leaving a workstation.
View and Manage your Lab Printing
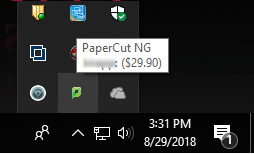
PaperCut Icon
Hovering your cursor on the Papercut tray icon shows the Balance
When you click on the Papercut tray icon, it opens a new window as seen below:
Clicking on the “Details…” button on the lower right of the Balance within the Papercut window opens a web browser that will let the user log in and see their job history
Receiving Credit for Printing Errors
Credit will be given for errors caused by the printer (paper jams, toner problems, etc.) In such situations, please take the bad printouts to a Lab Assistant in Dreyfuss, Dickinson Hall, or University Hall. Your information will be taken, and reimbursement will be made in the form of a credit applied to your total charge for the semester. Situations which could have been prevented before printing, such as extra blank pages at the end of a document, will not be reimbursed.
Can I Use My Own Paper in These Printers?
No. Jobs are printed as they are received. There is the possibility that after loading the printer with your paper someone will print a job that will then be printed out on your paper. Transparencies and mailing labels are not allowed in the lab printers due to the high heat that laser printers use and the potential for damage to the equipment.
Multimedia Services ensures the long-term preservation of all video material by storing and backing it up indefinitely on Sony CI, our cloud-based video storage library. This comprehensive backup encompasses everything from raw footage and project files to graphic files and the final program. Should your video project require updates in the future, we have the capability to access and revise the project as needed.
Project Delivery
Multimedia Services delivers final program material using Frame.io, offering a rapid, secure way to send large files. This platform facilitates team collaboration with features for leaving time-coded notes. While the Frame.io link enables previews and approvals by project stakeholders, it is not intended for long-term storage. After video approval and download, the content is archived and the link will expire.
Should you require access to a completed project, please email danielpando@fdu.edu.
Note
If you need to access to a previously completed project after the Frame.io link expires, requesting a new link may take 3-5 business days.
To access Forms, you will be directed to our SAMI Support Portal where you will be asked to log in using your NETID and authenticate using Duo. Once you click “Next,” you will be forwarded to samisupport.fdu.edu in a new window or tab.