The Computing Services department manages the University computer labs, develops and maintains the configurations of University owned laptop and desktop computers, performs maintenance and repairs on University owned software and hardware, deploys and maintains PC software site licenses, and provides general technical support for PCs at the University.
Virtru email encryption is the preferred method to send and view encrypted emails and files with your FDU email address. Available for FDU Faculty and Staff upon request. Click the link below to request access to Virtru Email Encryption.
If you are not approved for Virtru email encryption, the articles below are alternative, FDU OIRT and DSIRT approved methods for encrypting Microsoft Office and Adobe PDF files and comply with the University WISP.
According to FDU’s Written Information Security Program (WISP), in no case should they be sending or storing WISP protected information without the explicit authorization of the Chief Information Security Officer (CISO). If approved, these instructions will provide you with guidance on the methodology.
For more information, visit the link at the bottom of the page.
Follow these easy to use instructions for encrypting Word, Excel, and Acrobat files using built-in features.
Encrypting Word & Excel Documents
For Word and/or Excel files, first click on File on the upper left-hand corner
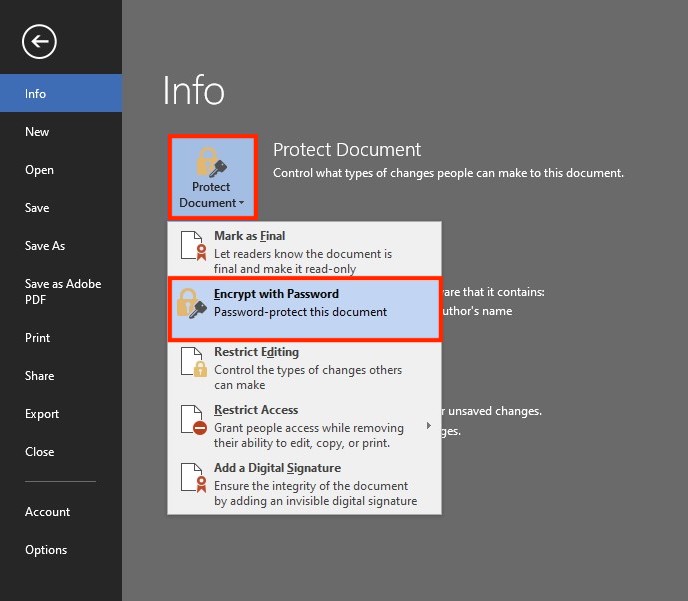
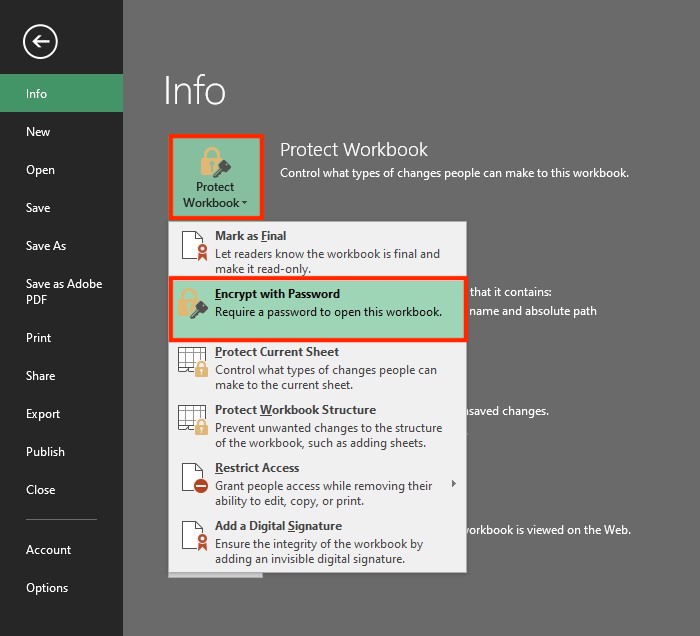
Under the Info tab, click on Protect Document for WordandProtectWorkbook for Excel followed by Encrypt with Password
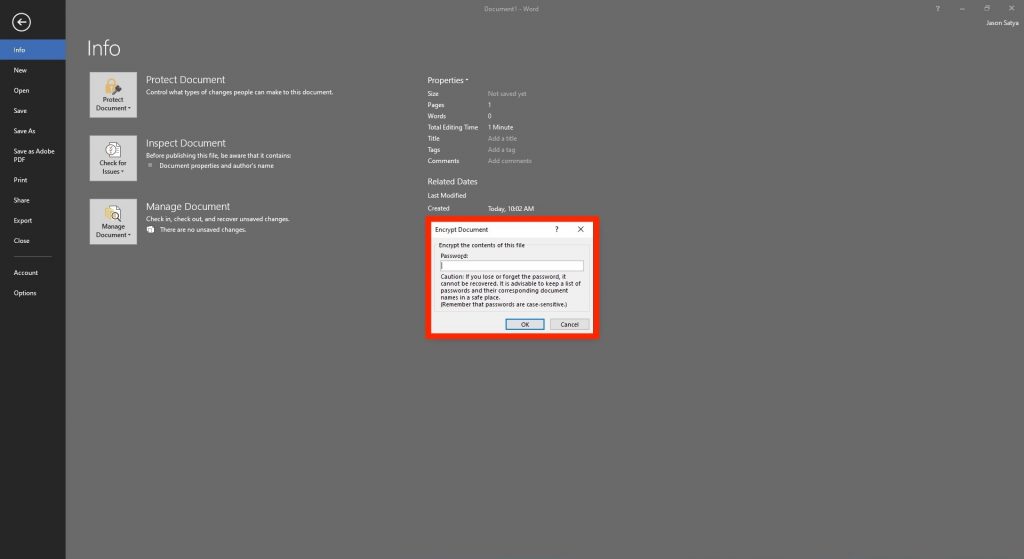
Enter a password in the pop-up window. Re-enter the password in the next window to confirm
The below message will confirm your document has been password-protected
To open a password-protected file, double-click on the file and enter the created password
close
Encrypting PDF Files
NOTE:
Adobe Acrobat Pro DC or Adobe Acrobat for macOS is needed to encrypt PDF files with a password. This feature is not available in the free version of Adobe Acrobat Reader DC.
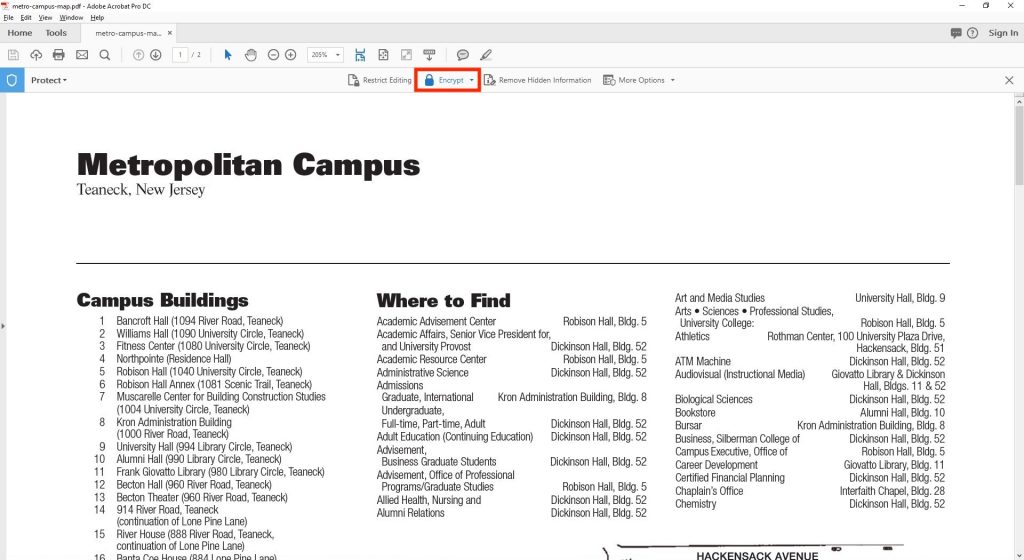
Select Toolson the Navigation Taband then select Protect
On the Protect Tab select Encrypt
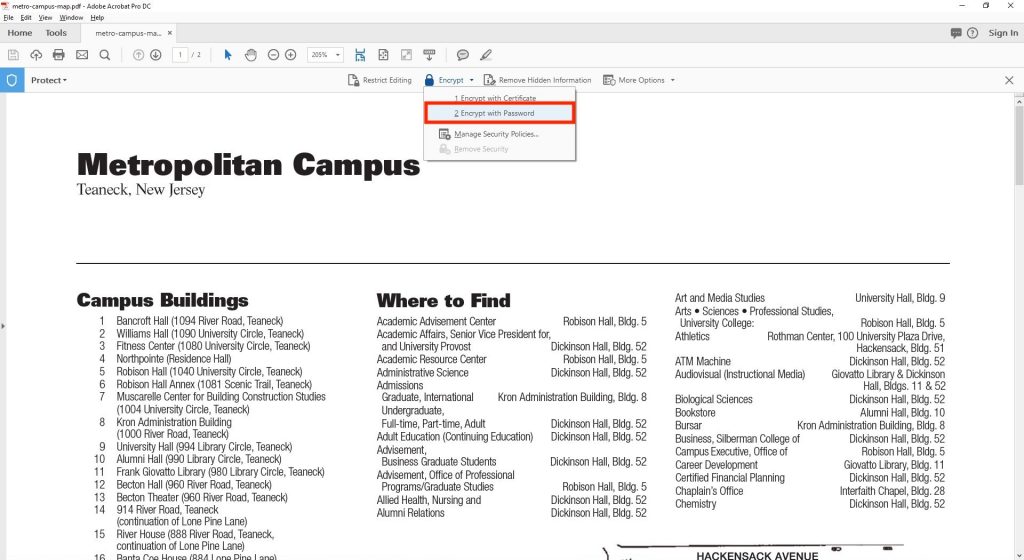
Select Encrypt with Password. Then select Yes on the security pop-up window
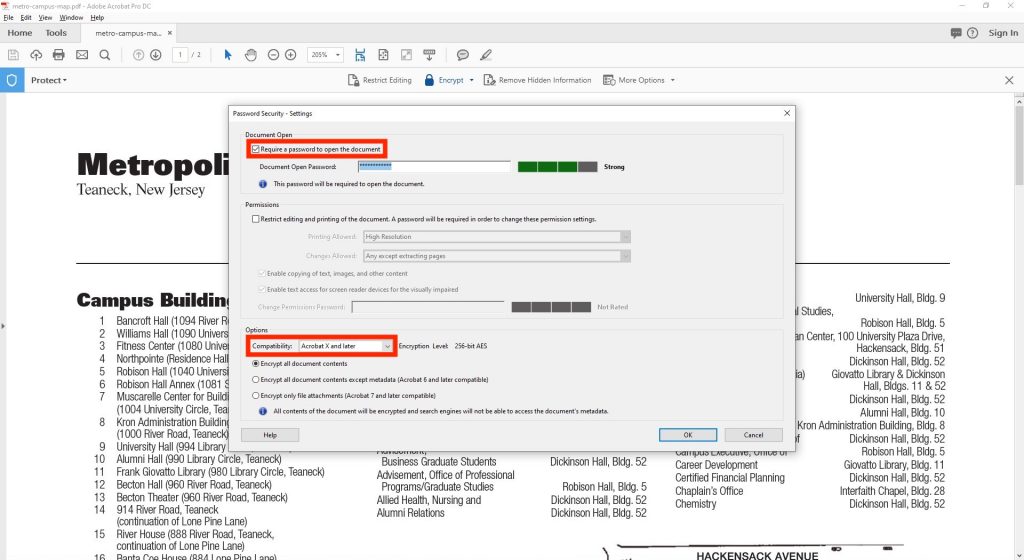
Check Require a Password to Open the Document and then choose a strong password. Under compatibility, choose Acrobat X and laterto change the encryption method to 256-bit.
Confirm the password when requested. Please note that the document WILL NOT be fully encrypted until it is saved
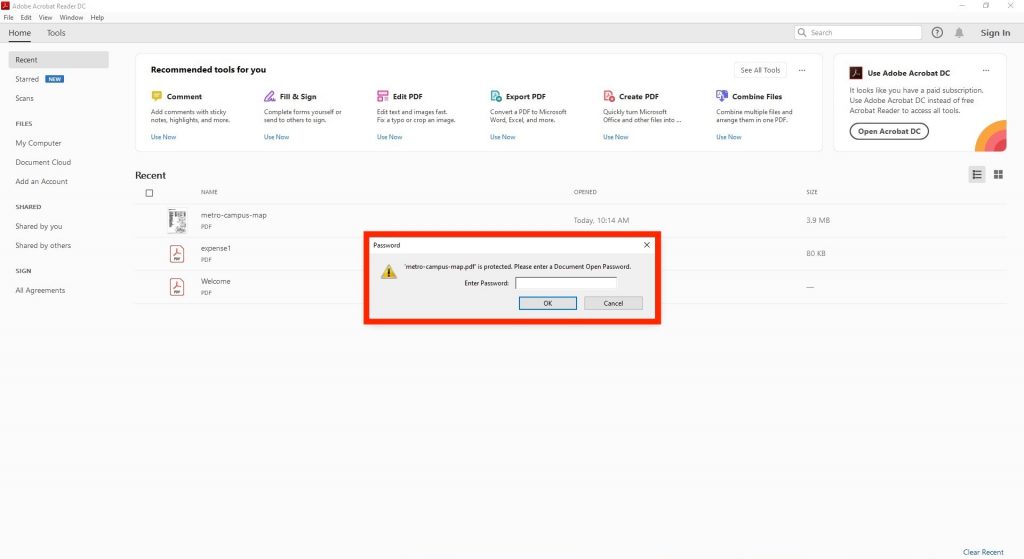
To open the file, double-click the file and enter the created password.
Create a standard procedure by which Manager’s and their employee’s transfer University data during the period of time from when an employee makes their intention clear that they are separating from the University or the transfer of University data at the time of an employee’s involuntary separation from the University.
II. PRODUCURES
Voluntary Separation
It is the manager or direct supervisor’s responsibility to work with the separating employee to extract any data or files that reside locally on their computer that would be needed for business continuity. The supervisor should also ensure they understand what shared drives the separated employee used and have access to those drives if need be.
Using appropriate security precautions, the manager should meet several times with the separating employee to ensure all information is transferred over either email, a shared drive, One Drive or a thumb drive.
During the separation process, through the Employee Separation Checklist, the employee’s manager can select the ability to access the separating employee’s email for up to 30 days and/or forward emails addressed to the separated employee for up to 60 days.
Upon receiving the separation notice, Computing Services will validate through our Backup system that the separating employee’s complete laptop or desktop Image has been backed up.
Computing Services will manually trigger an additional backup within three days of separation.
Immediately upon the effective date of the separation, the separating employee’s manager is responsible for turning over the separating employees’ computer to Computing Services.
Computing Services will store the computer for 14 days as a precaution, and then wipe the data from that computer, reimage the computer, and shelf the computer for redistribution.
If it is discovered that information that resided on the separated employee’s computer was missed during the separation process and needs to be retrieved at a later point, the supervisor would need to contact the Vice President of Human Resources and request the specific data that would need to be recovered from our Backup system.
Involuntary Separation
Upon the dismissal of the individual, Human Resources, would immediately engage Computing Services as well as the direct supervisor to view and extract any data that might be needed by the department to ensure business continuity. This would take place as soon as possible from the date of dismissal.
If a legal hold is required, Computing Services and USAN would be notified and the existing processes of extracting and encrypting the hard drive as well as protecting all email correspondence would be executed. Computing Services would then remove the computer.
If a legal hold is not required, Computing Services will validate through our Backup system that the dismissed employee’s Image has been properly backed up and remove the computer.
Computing Services will store the computer for 14 days as a precaution, and then wipe the data from that computer, reimage the computer, and shelf the computer for redistribution.
If it is discovered that information that resided on the separated employee’s computer was missed during the separation process and needs to be retrieved at a later point, the supervisor would need to contact the Vice President of Human Resources and request the specific data that would need to be recovered from our Backup system.
III. IN CASE OF QUESTIONS
Questions regarding this procedure can be directed to the Vice President of Human Resources.
Foxit PDF Editor Pro is Fairleigh Dickinson University’s replacement for Adobe Acrobat Pro. Foxit PDF Editor improves document productivity and efficiency. FoxIt PDF Editor Pro can create, convert, edit, and sign PDFs across devices and is available from the FDU Self-Service Portal under “Software” for all full-time faculty and full-time staff only. Due to limited licensing, a request form found at samisupport.fdu.edu must first be submitted.
Foxit PDF Editor Pro vs. Adobe Acrobat Pro
Faster: Foxit PDF Editor Pro uses fewer overall resources and is able to open PDFs faster. Also, due to less overall resources required, there are fewer automatic updates required.
Standards-compliant: Foxit PDF Editor Pro works with existing PDFs and uses the PDF standard which makes it cross-compatible with Adobe Acrobat.
More secure: Foxit PDF Editor Pro offers better protection against security vulnerabilities than it’s Adobe counterpart.
Familiar user interface: Using the Microsoft Office style ribbon user interface makes transitioning from Adobe Acrobat a breeze.
Better editing: FoxIt PDF Editor Pro uses word processor like features to offer better text and image editing.
Compatibility: Files created with FoxIt PDF Editor Pro are fully compatible with Adobe Acrobat. Also, files created with Adobe Acrobat are fully compatible with FoxIt PDF Editor Pro.
Comparison Charts
For a full comparison list as well as a list of added features please view the comparison charts below.
Create and Export PDF
Feature
Foxit PDF Editor Pro
Adobe Acrobat Pro
Create industry standard PDF files from virtually all PC applications and the clipboard
✔
✔
One-click PDF creation from IE, Edge, Chrome, and Firefox
✔
✔
One-step PDF creation from Microsoft Word, Excel, PowerPoint and Outlook
✔
✔
Convert PDF to Microsoft® Office, HTML and image formats
✔
✔
Append created PDF to an existing file
✔
PDF Printer
✔
✔
close
Edit PDF
Feature
Foxit PDF Editor Pro
Adobe Acrobat Pro
Editing from Client
✔
✔
Editable Forms
✔
✔
Add/Remove/Reorder pages
✔
✔
Merge PDF (Local)
✔
✔
Merge PDF (Network)
✔
✔
close
Collaborate and Share PDF
Feature
Foxit PDF Editor Pro
Adobe Acrobat Pro
Commenting
✔
✔
Notes
✔
✔
Redacting
✔
✔
close
Scan and OCR PDF
Feature
Foxit PDF Editor Pro
Adobe Acrobat Pro
Scan to create new PDF
✔
✔
Scan to insert into existing PDF
✔
✔
Convert scanned/image-based PDFs to searchable editable documents
✔
✔
Find OCR Suspects and mark them as not text or edit the recognition results in batch
✔
Not in Batch
Scan Presets
✔
✔
Scan to save Mutiple Files
✔
✔
close
Protect and Sign PDF
Feature
Foxit PDF Editor Pro
Adobe Acrobat Pro
Feature
Foxit PDF Editor Pro
Adobe Acrobat Pro
PDF Encryption
✔
✔
Fill and Sign / Digital Signatures
✔
✔
Create Multiple Signatures
✔
✔
DocuSign/Adobe Sign Support
✔
✔
Lock for Editing
✔
✔
close
View and Print PDF
Feature
Foxit PDF Editor Pro
Adobe Acrobat Pro
Multi Tab Viewing PDF documents
✔
✔
View and navigate page thumbnails, bookmarks
✔
✔
Reflow view
✔
✔
Ruler, Guides, Grids to help position objects in the PDF
✔
✔
Text viewer, Magnifier
✔
Line Weights and Toggle Ruler to help viewing PDF
✔
Only Line Weights
Read out loud
✔
✔
Search including bookmark and comments
✔
✔
Search in all opened PDF Files
✔
✔
Print PDF Documents and Forms
✔
✔
Print with comments for efficient review
✔
✔
close
Accessibility
Feature
Foxit PDF Editor
Adobe Acrobat Pro
Accessibility full check and check report
✔
✔
Fix failed parts after accessibility check
✔
✔
Touch up reading order to add and edit tags
✔
✔
Auto tag Document and tag report.
✔
✔
close
Video Tutorials
Below are some helpful video tutorials for some of the more popular functions of FoxIt PDF Editor Pro.
There are a few different ways to change your University NetID password. However, Computing Services strongly urges everyone to change their FDU NetID password using a provided Apple or Windows university computer.
The process for changing your FDU NetID password on a macOS device differs from a Windows device, so please follow the instructions provided for macOS computers below.
If you do not have a university-owned Apple or Windows laptop/desktop and cannot use a University lab computer, please follow the procedures described in “Using identity.fdu.edu Web Portal to Change your FDU NetID Password” below.
Please click on one of the links below for instructions on how to change your FDU NetID password:
Changing a FDU NetID Password on a FDU-owned Windows Computer
Note
To change your password, you must be logged into the machine and either on campus or connected to the Cisco AnyConnect VPN.
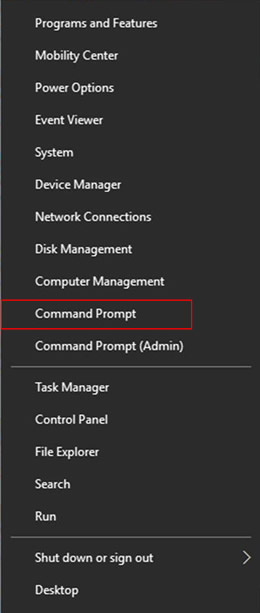
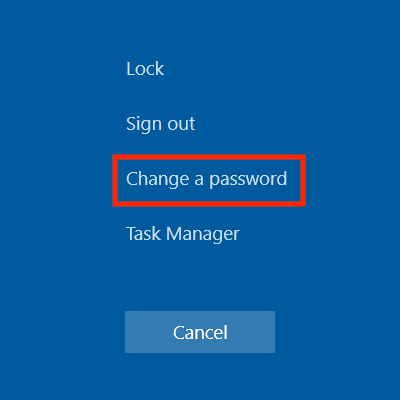
On FDU-issued laptops, desktops, and lab machines, the FDU NetID password can be changed by pressing the “Ctrl+Alt+Del” button combination on the keyboard from any screen and selecting “Change a Password”
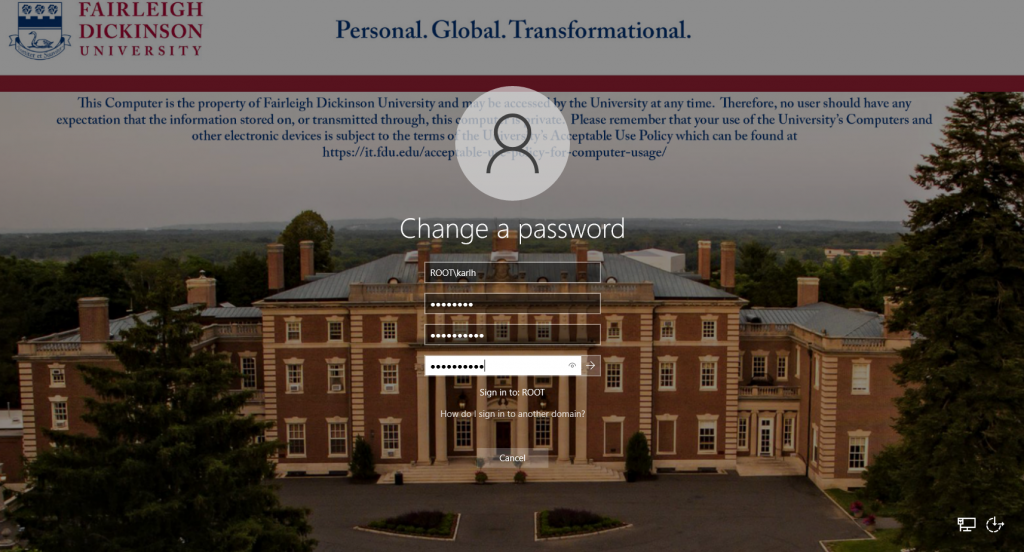
Now enter the following:
Your old or current password
Type in a new password
Retype the new password to confirm
Press the “Right Arrow” button to continue
Tip
The newly created FDU NetID password must meet the complexity requirements.
Use 8 to 16 characters for your new password. Passwords must include all of the following 4 character types: Upper case letters, lower case letters, numbers, and special characters. Allowed special characters are: ! # $ @ _ + , ? [ ] . – ) ( ` ~ % ^ & * = { } | : ? , / and a dot. Please refrain from using portions of your name or email address within the password. Please refrain from using a password that you have already used.
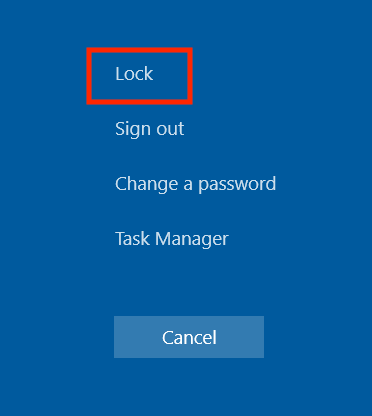
Once this has been done, you must lock and unlock the machine once to complete updating your password:
Press the “Ctrl+Alt+Del” keys combination again
Click “Lock”
Then log back in with your new password
Your FDU NetID password was changed successfully!
Note
Your new password will need to be updated in all web browsers with saved passwords and email clients across all devices. Examples include faculty and staff e-mail accounts synched to their iPad, iPhone, and or Android device. FDU-Secure Wi-Fi network access is also attached to your FDU NetID username and password and will need to be updated on devices that use it.
close
Changing and Syncronizing your FDU NetID Password on a FDU-owned Apple Computer
To change and/or synchronize your FDU NetID password with your FDU Issued Apple computer, please follow the directions provided in the following article:
Using “identity.fdu.edu” Web Portal to Change your FDU NetID Password
Adjunct professors, students, and anyone with a personal laptop/desktop/tablet device will use the FDU Identity Web Portal to change their NetID password.
Open a web browser (e.g., Google Chrome, Mozilla Firefox, Internet Explorer, Safari) and navigate to the following URL:
Click on “Account Maintenance” on the top right hand of the web page
You will be redirected to the FDU Single-Sign-On login page. Enter your FDU NetID email and password in the corresponding text boxes and click “Sign In.” Complete the FDU 2fa Duo push notification to proceed
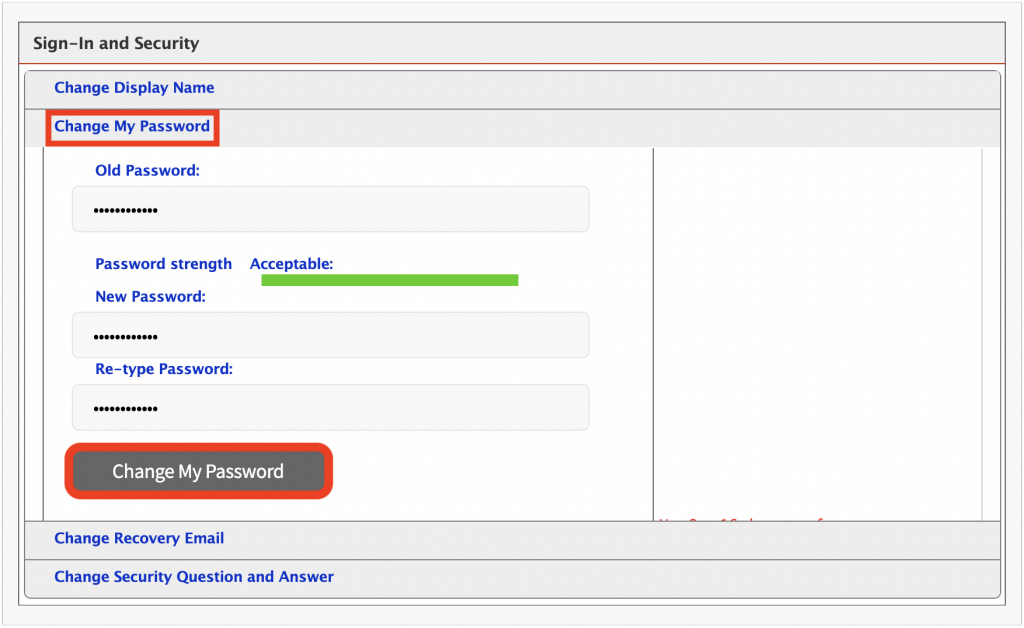
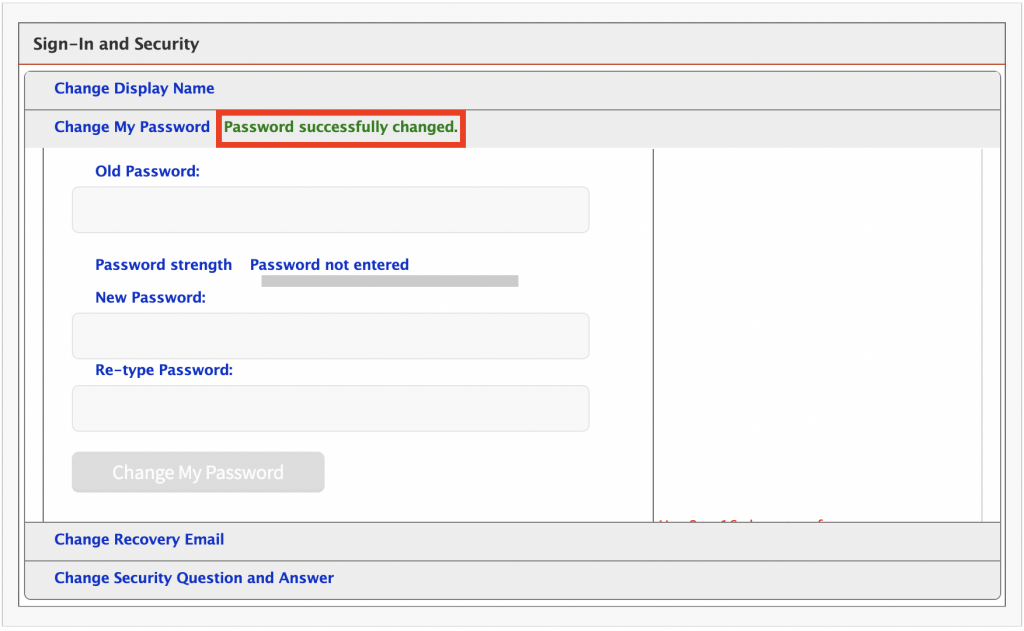
Under Sign-In and Security, select “Change My Password”
Enter your current password
Enter a new password
Retype your new password to confirm
When finished, select “Change My Password”
Tip
The newly created FDU NetID password must meet the complexity requirements.
Use 8 to 16 characters for your new password. Passwords must include all of the following 4 character types: Upper case letters, lower case letters, numbers, and special characters. Allowed special characters are: ! # $ @ _ + , ? [ ] . – ) ( ` ~ % ^ & * = { } | : ? , / and a dot. Please refrain from using portions of your name or email address within the password. Please refrain from using password that you have already used.
“Password successfully changed” will be displayed if your FDU NetID password was successfully changed
Note
Your new password will need to be updated in all web browsers with saved passwords and email clients across all devices. Examples include faculty and staff e-mail accounts synched to their iPad, iPhone, and or Android device. FDU-Secure Wi-Fi network access is also attached to your FDU NetID username and password and will need to be updated on devices that use it.
close
Using “identity.fdu.edu” Web Portal to Change your FDU NetID Display Name
You also have the option to change the name that is displayed on your NetID account.
Open a web browser (e.g., Google Chrome, Mozilla Firefox, Internet Explorer, Safari) and navigate to the following URL:
Click on “Account Maintenance” on the top right hand of the web page
You will be redirected to the FDU Single-Sign-On login page. Enter your FDU NetID email and password in the corresponding text boxes and click “Sign In.” Complete the FDU 2fa Duo push notification to proceed
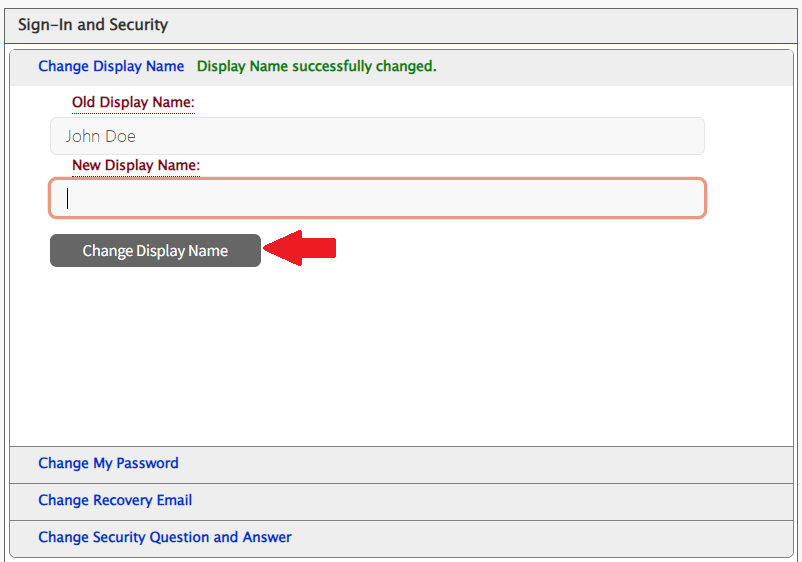
Under Sign-In and Security, select “Change Display Name”
Enter your New Display Name
Click on “Change Display Name“
“Display Name successfully changed” will be displayed if your Display Name was successfully changed
Lab reservation requests for the entire semester, (i.e. January through May or September through December are processed by the Office of Enrollment Services. To make a lab reservation request for the Summer, Winter, Fall, or Spring semesters, please contact the Scheduling Officers in Enrollment Services for the Florham and Metropolitan campuses. The phone and fax numbers are listed below:
Metropolitan Campus Ph. (201)-692-2217 / 2517
Florham Campus Ph. (973)-443-8600
Reserving a Computer Lab for Specific Dates within a Semester
Once logged into the support website, locate ‘Forms for Faculty & Staff’ and click on the “Computing Services – Lab Reservation & Lab Software Request (Faculty & Staff NJ Only)” option.
You will be directed to a reservation request form. Please provide the necessary details, such as the desired date, time, and location of the lab reservation. Additionally, please include any specific requirements or equipment you may need for your session.
After completing the form, you can submit your request by locating and clicking the submit button.
Once your request has been submitted, the Lab & Operations Manager will review and confirm the details of your request. You will receive written confirmation of your request.
Should you require any further assistance, please feel free to reach out to the Lab & Operations Manager, Denzel W. James (d.james@fdu.edu).
Any changes including cancellations to your request should be submitted by using the SAMI support link to locate the ‘My SAMI Support Request’ tile and browse for your lab related request ticket. All updates can be entered directly into the ticket.
Thank you for choosing Computing Services for your lab reservation needs. We look forward to providing you with a seamless and efficient experience.
This document outlines how the help desk should handle issues regarding supporting personal hardware.
All support tickets for personal hardware will need to be created and supported by the help desk. Limited support will be provided by completing basic troubleshooting and diagnostics.
This includes:
Laptops and Desktops
iMacs and MacBooks
Docking Stations, Monitors, and Peripherals
Mobile phones and Tablets
Note
The SAMI Service Desk should communicate directly to the users that limited support can be provided for personally owned devices, the service desk will assist by providing the below troubleshooting steps. Escalation of the request to Computing Services can be performed. If additional support is needed Computing Services will direct the user to contact their hardware manufacturer for additional support directly if needed.
The following basic troubleshooting steps can and should be performed when any of the above hardware is having issues:
The device should be power cycled and/or rebooted to ensure all device resources have been refreshed.
If the machine or device is frozen locate and hold the power button for a minimum of 60 seconds until the device has powered down and then have the user power on the device and attempt to use the equipment.
The help desk can check and confirm if any updates have recently been loaded on the workstation that may be pending a machine reboot to complete the installation.
The following should not be performed on any personal machines:
Upgrading or downgrading of any Microsoft or Apple operating system.
Removing and/or reinstalling any licensed software such as but not limited to Microsoft Office, Microsoft Visio, Microsoft Project, Adobe Creative Cloud, etc.
Other software such as antivirus, games, or manufacturer-issued diagnostic utilities.
Regarding the troubleshooting of issues related to personal docking stations, monitors, peripherals, mobile phones and tablets. The basic functions of unplugging the power cable and/or power cycling the equipment will be the acceptable troubleshooting necessary.
We do not want to perform any updates for devices operating systems such as mobile phones or tablets. The steps involved in completing these kinds of updates require a more extensive timeframe to be available to successfully be completed.
If you have any questions or require additional information, please contact the FDU Director of Computing Services Peter Mannarino via email p.mannarino@fdu.edu
Microsoft has implemented a new feature to its mail client called Clutter. Clutter acts as a filter that separates e-mails that it Deems low priority. The e-mails are placed in a folder and are out of sight, with no notifications visible to the user. The problem with Clutter is that it is a learning program that tries to guess what emails are important or low priority and might filter out emails that you need.
Disabling Clutter rules in Outlook
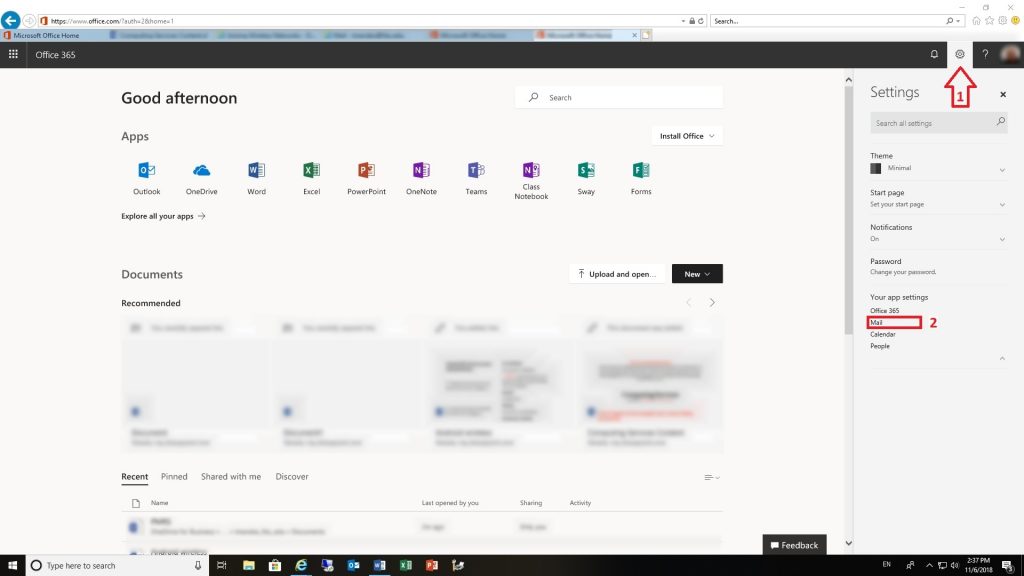
If you wish to disable clutter, log in to Office 365 using our portal office365.fdu.edu with your NetID credentials.
Look for the settings icon on the upper right corner of your window and click on it
Click on the “Mail” option under “Your app settings”
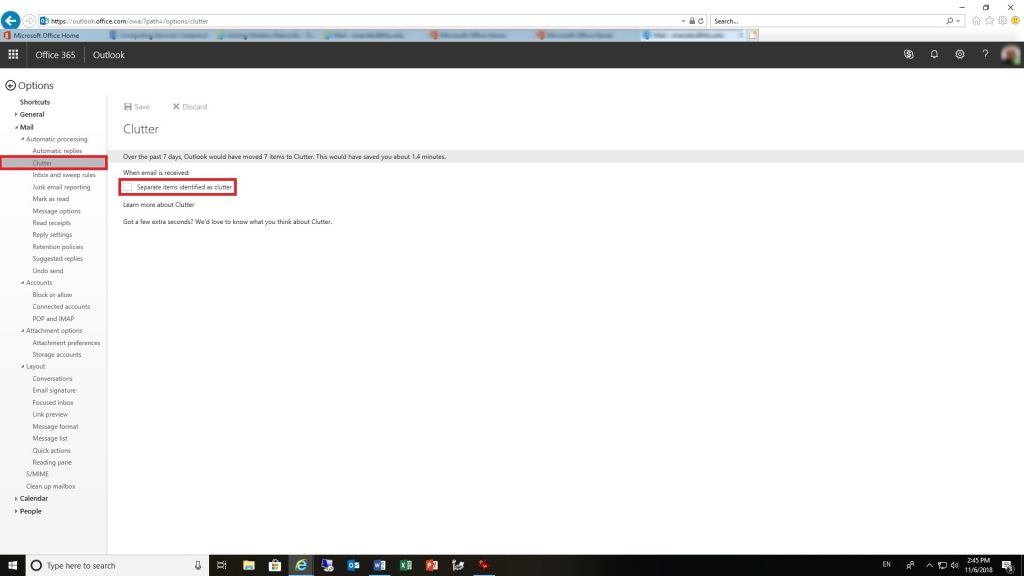
Drill down to “Mail > Automatic processing > Clutter”
Microsoft Teams is a unified communication and collaboration platform that combines persistent workplace chat, video meetings, file storage, and application integration. Continue reading to find more information about the new Teams app, common features and settings most commonly used.
A New Teams client is rolling out! Though it looks nearly identical to classic Teams, it has been redesigned from the ground up to take advantage of future developments. Microsoft has discontinued the use of classic teams in July of 2024.
For a comprehensive list of all the new features of Microsoft Teams, click the link below:
Looking for the new Teams experience? The upgrade process itself is quick and silent, where Microsoft 365 will install the new Teams client in the background.
For all university owned computers, the new Teams app has been silently rolling out in the background and may be presented with as the following options to switch over
New Teams experience has been delivered to the device
You may be presented with an option to Upgrade your device with the New Teams experience
A notification prompt to switch your device to the new Teams experience
A “Try the new Teams” toggle switch will present itself if the new Teams app upgrade has completed but continue to use the classic Teams experience.
During the transition phase, which will end in June of 2024, you might see two icons. The old Teams is labelled Microsoft Teams classic (work or school), and the new Teams will be labeled Microsoft Teams (work or school). The new Teams will also have a cyan “New” label on the icon as well.
Windows 10 Search for Microsoft Teams
Windows 11 Search for Microsoft Teams
macOS spotlight search for Microsoft Teams
Note
The new Teams app should be used unless there is a specific reason not to (like troubleshooting a Teams Application issue).
For a complete list of all changes in the New Microsoft Teams, visit:
When you’re upgraded to the new Teams, your display settings will reset. Here’s how to change the most commonly accessed display settings.
Click on the “Ellipses” in upper right-hand corner, and then “Settings”
The default theme for new Teams is Light, which appears grey. Dark will color the window black. Classic will bring back the purple/gray theme from classic Teams
Another commonly changed display setting is Layout. You can choose your Teams to display in a Grid view, which is the new Teams default, or a List view, which will show all your Teams in a list on the left, similar to how Outlook displays folders.
There are many other settings in Teams, and we encourage you to review your device settings and video effects (blurred and custom backgrounds) prior to joining your next meeting. Custom backgrounds may need to be re-added.
What happened to my Contacts list on the Chat tab?
Microsoft has moved the Contacts list to the People app. You can find People by clicking the “…” tab in the left navigation bar and typing “People” in the search.
To pin it to your sidebar, right click “People” then select “Pin”
Note
If People is not able to be found when searching, this means that the People App is already Pinned.
close
Where are my Saved Items?
Saved Items are not currently available in new Teams. Microsoft plans to release a new functionality that will replace it and offer you a method for exporting Saved Items from Teams Classic in the near future. For now, Microsoft recommends using Classic Teams to access Saved Items.
close
Why are my Office documents opening in my browser or Teams app unexpectedly?
We have observed some cases where upgrading to new Teams will reset your file open preference. You can change it by going to “Settings > Files and Links” from the (•••) menu at the upper right.
close
Why can’t I tag some private channels?
We have observed that you cannot @ mention or tag some private channels in the new Teams experience. This issue appears most likely to affect older private channels and has been reported to Microsoft.
close
What happened to Groups?
Groups are now called Categories and how to create and manage categories will be discussed in the Section for Teams Chat.
close
What happened to Contacts?
Contacts have been moved to the People App. How to manage and use People will be discussed in the Teams Chat Section.
The page will automatically detect your operating system and redirect you to the appropriate desktop client (e.g. Windows, macOS) or mobile client (e.g. Android, Apple iOS).
The Microsoft Teams application is automatically pushed to all university owned computers. To determine if you already have it installed, search for “Teams” using the Windows Search Bar or Spotlight Search on Apple devices. If you are working on a university computer and you cannot locate the Microsoft Teams application, you can install by following the instructions below.
Windows – FDU Self Service Portal for Software
Press the “Windows key” on your keyboard and type “FDU Self”
Launch “FDU Self Service Portal for Software” from the search results list
Select the “Microsoft Teams” experience from the list and click “Install”
The classic Teams experience will be available until the end of June of 2024.
Web – Access the Office Web Application
The web client is a full, functional client that can be used from a variety of browsers including Google Chrome, Edge Browser, and Mozilla Firefox. Microsoft Teams will also be available on Safari soon.
Teams allow’s for text-based conversations using the Chat feature. Although it does not replace email in all use cases, it is a great tool for asking quick questions or just saying hello. When using chat, be mindful and adhere to FDU’s Written Information Security Program.
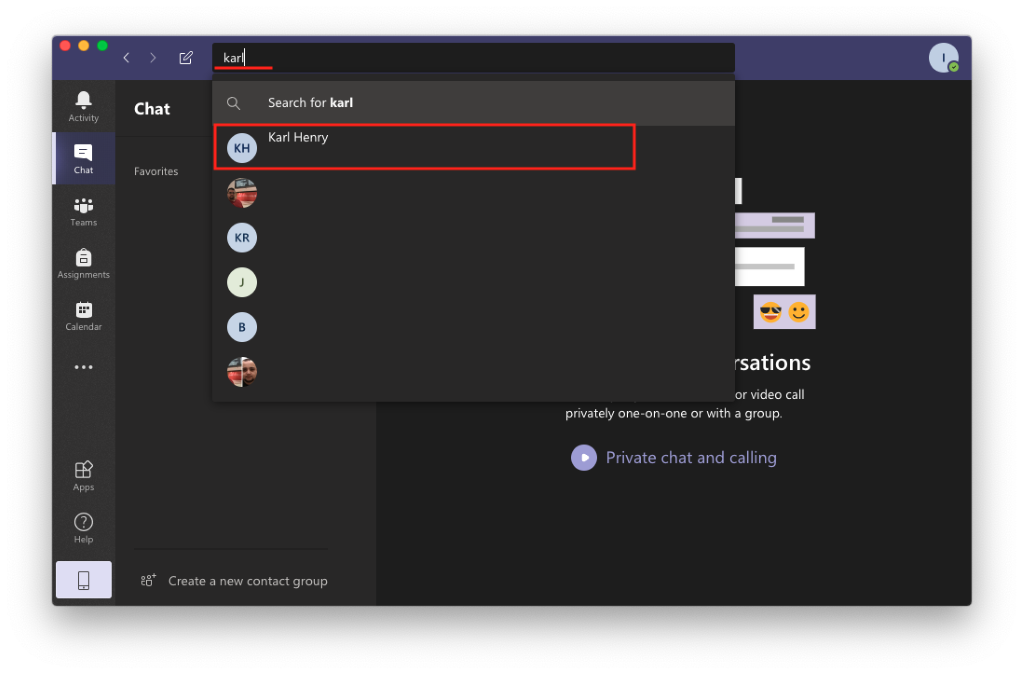
Select “Chat” from the left menu and then click on the top search bar
Classic Teams
New Teams
Type the name of the person you are attempting to locate and click on their name. Only FDU faculty, staff, and students are accessible in Microsoft Teams
Classic Teams
New Teams
You will be brought to the chat window and can start your conversation
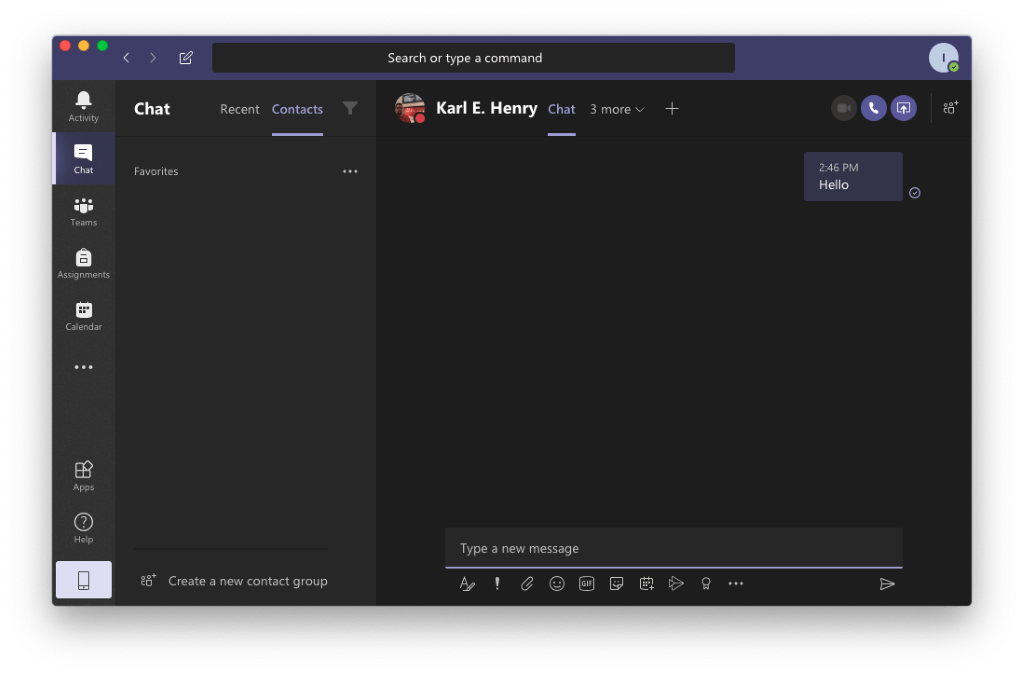
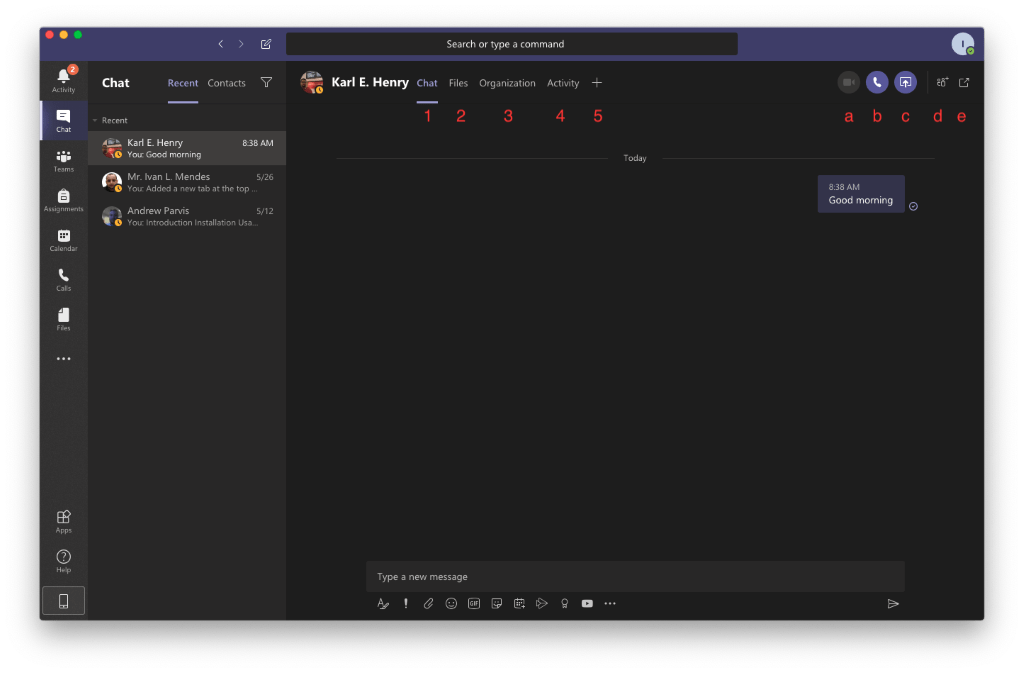
The Chat window has many convenient tabs and shortcuts aimed at improving collaboration. Near the top of the screen, next to the name of the contact that you are chatting with, you will notice the default tabs, followed by a plus sign.
Classic Teams – Tabs
Chat: tab contains the conversation
Files: tab contains all files shared in during the conversation
Organization: Two person conversations, the Organizationtab shows your contact’s organization chart. This information is pulled from Office 365
Note
Datatel remains the authoritative source for this information and the data contained here is not intended to be 100% accurate.
In two person conversations, the “Activity” tab will list the latest activity of your contact
You can use the “+ sign” to create a new tab from a file or an app. This can be a quick and convenient way to access a collaborative file that was previously shared in the conversation
To the right of these tabs are a series of shortcut icons which perform the following functions:
Classic Teams – Shortcuts
Video call: icon starts a new video call
Audio call: icon starts a new voice call
Screen sharing: icon allows you to share your desktop or an application
Add people: icon is used to invite additional people to the chat
Pop out chat: icon creates a separate window with your chat
close
New Teams – Tabs
Chat: contains the conversation
Files: Contains all files shared in during the conversation
Add a Tab: Add an App to the tab list for all users
To the right of these tabs are a series of shortcut icons which perform the following functions.
Shortcuts – New Team
Audio Call icon starts a new voice call
Add people icon is used to invite additional people to the chat
Ellipses is used for additional features:
Open Chat in New Window: Pops chat in separate window
Schedule Meeting: schedules a meeting with individual
Screen Sharing: initiates a screen sharing session and calls individual
Pin: Pins person to pinned section in teams
Note
Depending on your screen resolution and application window size, your view may differ from the picture above, but all options outlined will be available.
The Chat function allows you to have conversations with one person or groups of people. In classic Teams, this is known as Contacts and in the New teams, this is called People.
The pane on the left-hand side of the screen is split into Recent and Contacts. Contacts acts like a rolodex that allows you to store and sort a list of the people you contact most frequently. The Recent list will display your most recent conversations with single people or group messages.
Types of Contacts
There are two types of contacts, directory contacts which come from your organization, and local contacts which you can add from scratch to your copy of Teams.
Directory contacts have some fields set by your organization, and additional fields which can be edited by you.
Local contacts are stored within your local copy of Teams, and do not synch with an organization’s directory.
Note
For contacts you create based on the company directory, the admin may control some of the fields, like the name and email. They will appear grayed out and you will not be able to modify them.
Classic Teams – Contacts
By default, the Contacts tab will already have a “Favorites” group. However, creating new groups can be a helpful way to organize your contacts. For example, you may wish to create a group for people that you are working with on a project or for people that you interact with from a department.
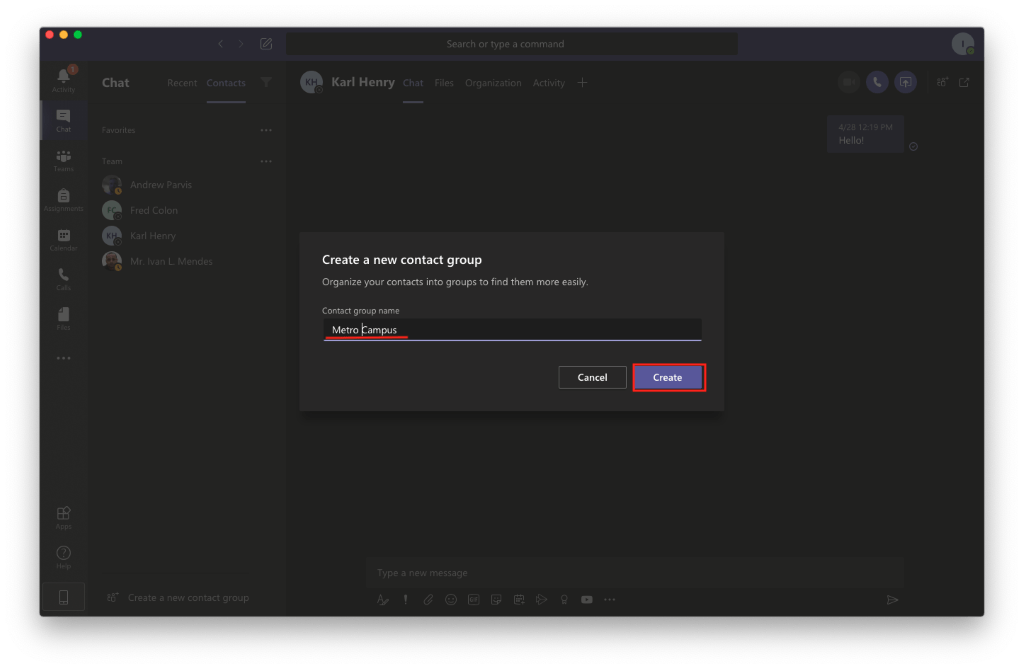
To create a new contact group, click “Create a new contact group” on the bottom of the pane
Enter a name for your group, and click “Create”
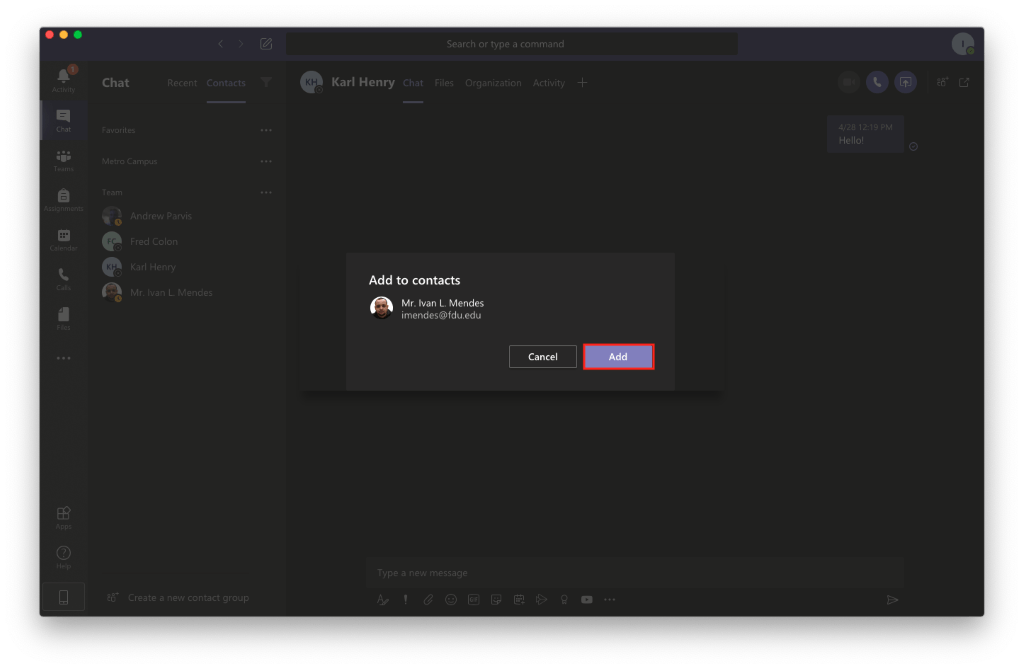
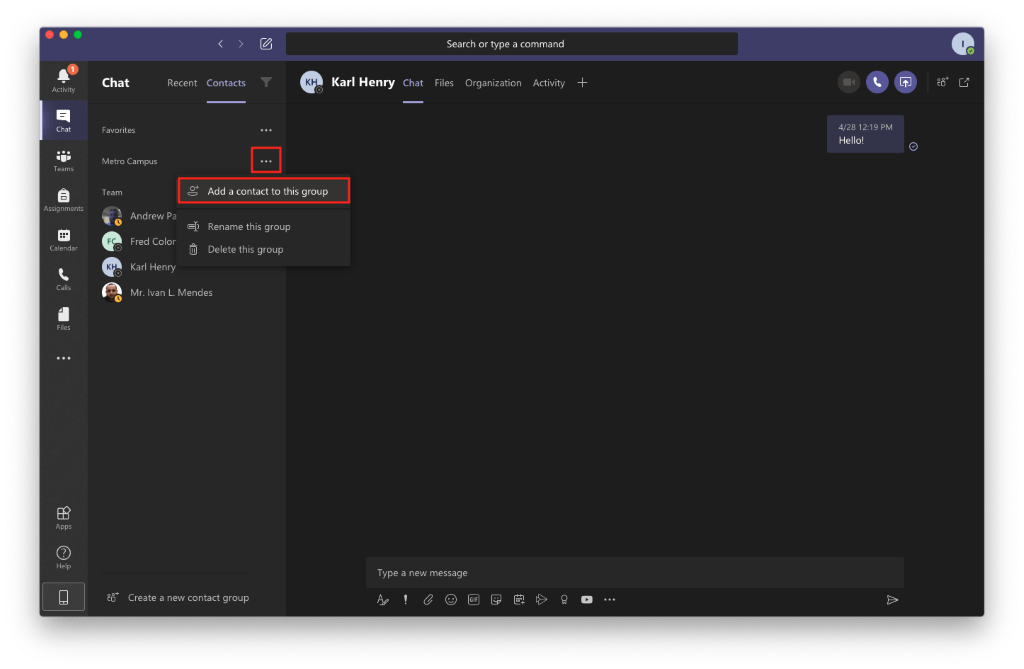
To add contacts to a group, click the “More options” icon (•••) next to the group name and select “Add a contact to this group” from the drop-down menu
Begin typing the name of your contact. Once you see their name appear, select it and select “Add”
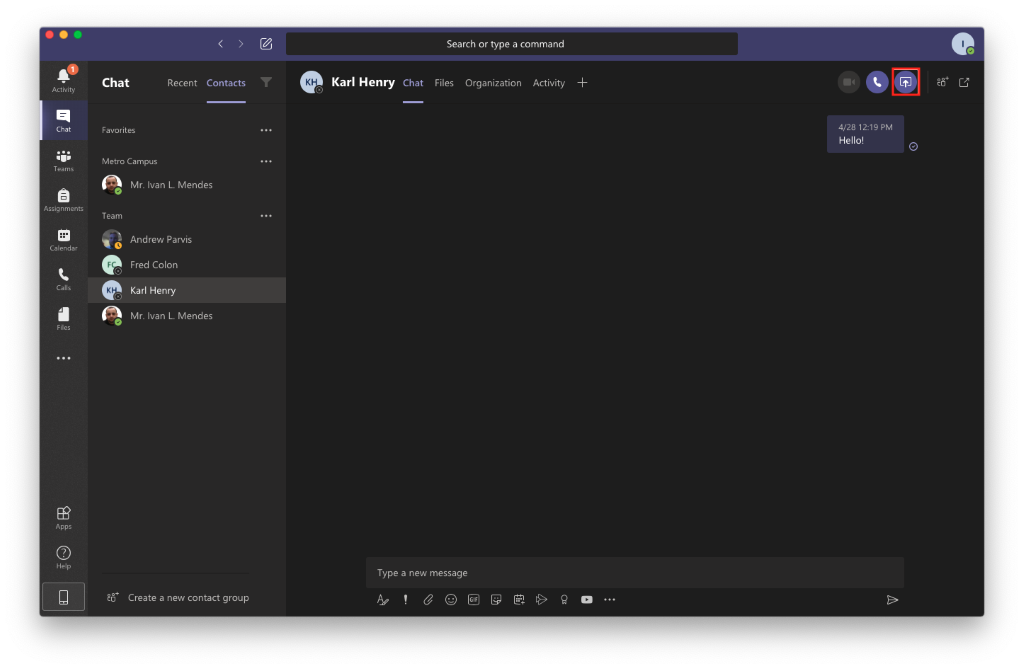
You can add the same contact to as many groups as you would like. The chat with your contact will remain the same regardless of which group you are accessing the conversation from.
close
New Teams – People
Microsoft has moved the Contacts into the People App. By default, the People tab will already have a “Favorites” group and a “My Group” category. However, creating new categoriess can be a helpful way to organize your contacts.
For example, you may wish to create a category for people that you are working with on a project or for people that you interact with from a department.
Add People to Favorites
Find the contact you wish to be added to favorite and click the star in front of their name
Add People to Category
Next to the contact, click the ellipses button and then click “Add Category”
Type in the name of the new Category, search for an existing category, or select from the provided list
Screen sharing is one of Microsoft Teams’ most powerful collaborative features. You can show your screen to your colleagues and even grant them control to edit Microsoft Office files with you in real time.
Note
Before you get started, make sure that you are using the installed version of Microsoft Teams, as the browser-based Teams version does not support this functionality.
From the chat window or from an ongoing call, click on the “Screen Sharing / Share” icon
Classic Teams
New Teams
You be given a choice to either share your desktop or an application from the Microsoft Office suite, click on the window you want to share
Classic Teams
New Teams
Once you select the screen you wish to share, the members of your chat or call will be able to view your screen and request access to remotely control your desktop or program.
You can only share your screen with a mobile device user if you are engaged in an active voice or video call with them.
Creating a team provides remote team members with the ability to work together and share information via a common online space. You can also organize your information by creating channels to help optimize your team’s workflow.
To create a Microsoft Team, you must request one using an online form on SAMI Support. To request a team, follow these instructions:
Navigate to the SAMI Support using the link below, logging in with your FDU NetID account
Scroll down to “Microsoft Team Request” and click on it to expand the information
Fill out all the fields and click on the “Submit” button
Note
You can specify additional team owners. Owners will have rights to invite and make other changes to the team after its creation.
You should now see a screen informing you that your form was successfully submitted
Note
Please allow 3 to 5 business days for the Team to be created.
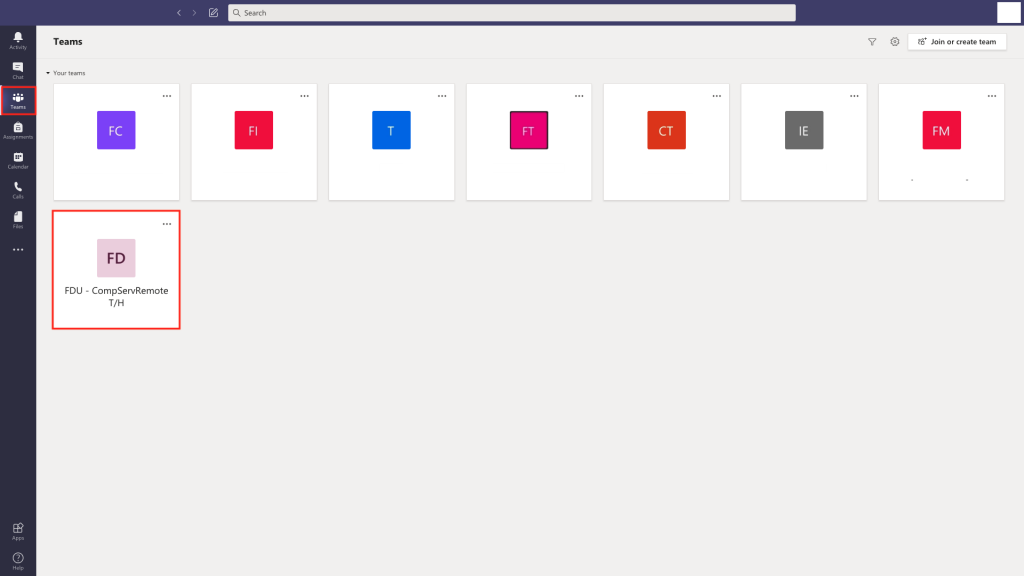
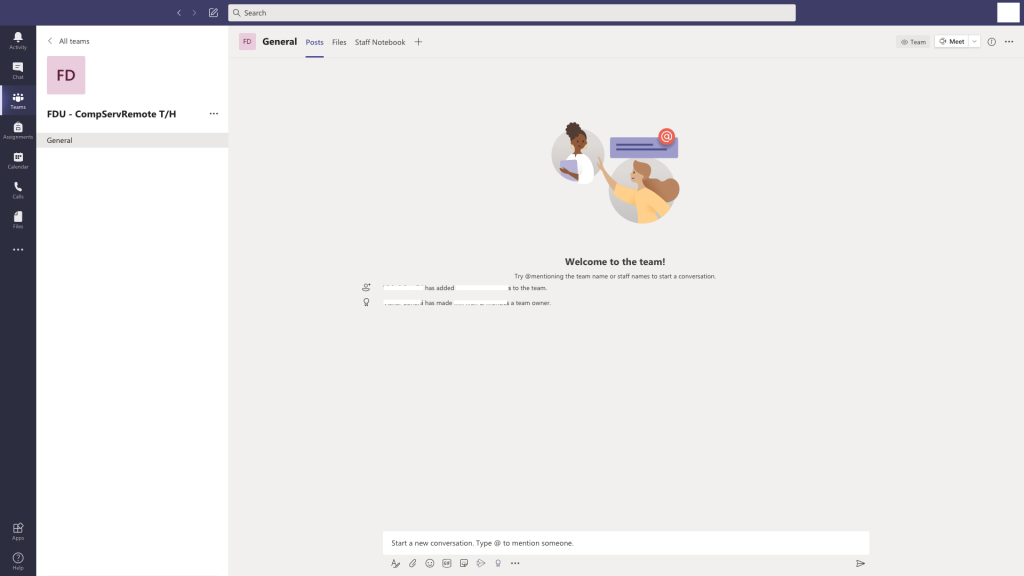
You will receive an email once the team is created. The next time you log in to Teams you will see your team listed in the Teams section
Click on your team to open the general channel. From here you can create channels, add users, and customize your team. Any team members that you add will receive an email notifying them that they were added to your team. The next time that they log in or open Teams, they will find the team listed in their Teams section
Channels are dedicated sections within a team. You can keep conversations organized by specific topics, projects, disciplines, or whatever works for your team! Channels are where conversations happen and where the work gets done. There can be public channels which are open to all team members or, if you require a more select audience, private channels can be open to a subset of your team.
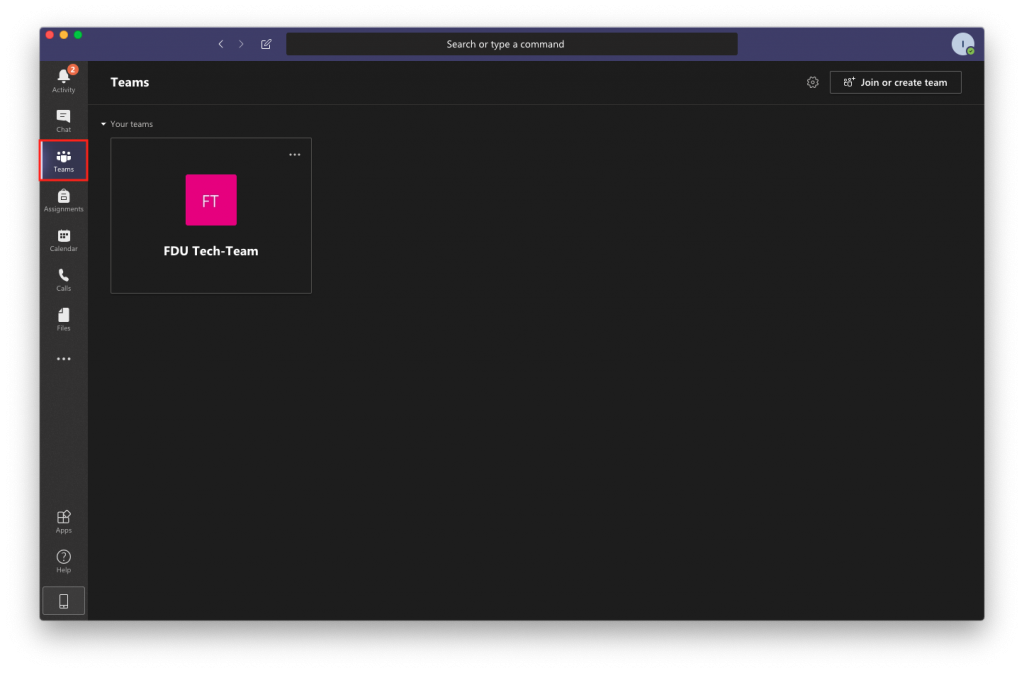
Select Teams from the menu on the left-hand side of the screen. If you have multiple teams, select your team of choice
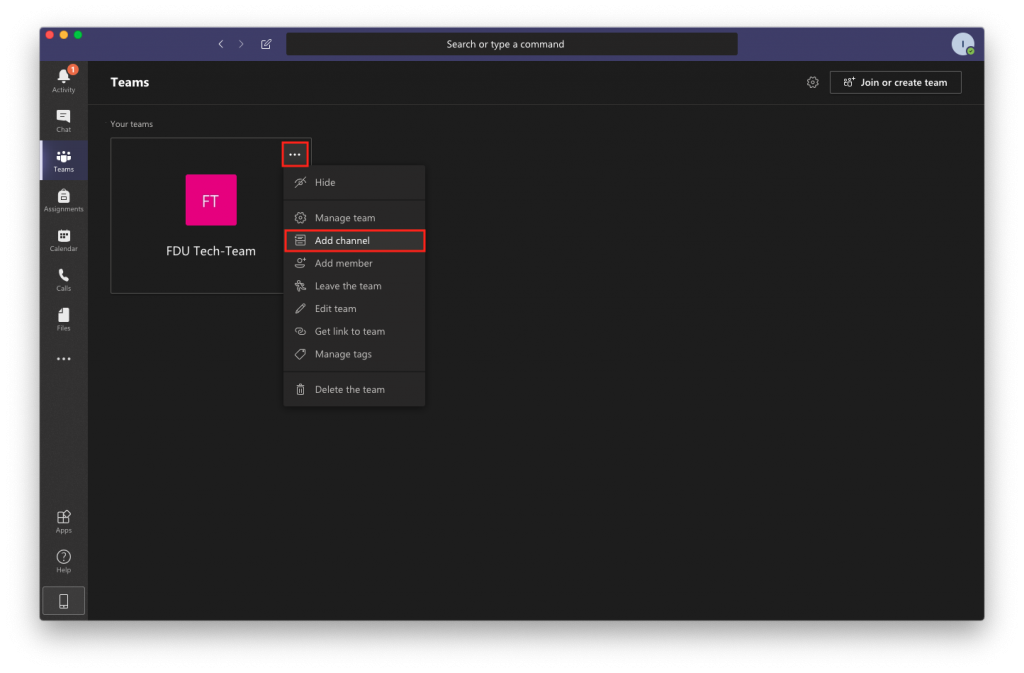
Click on the “More options” icon (•••) next to the team name and select “Add channel”
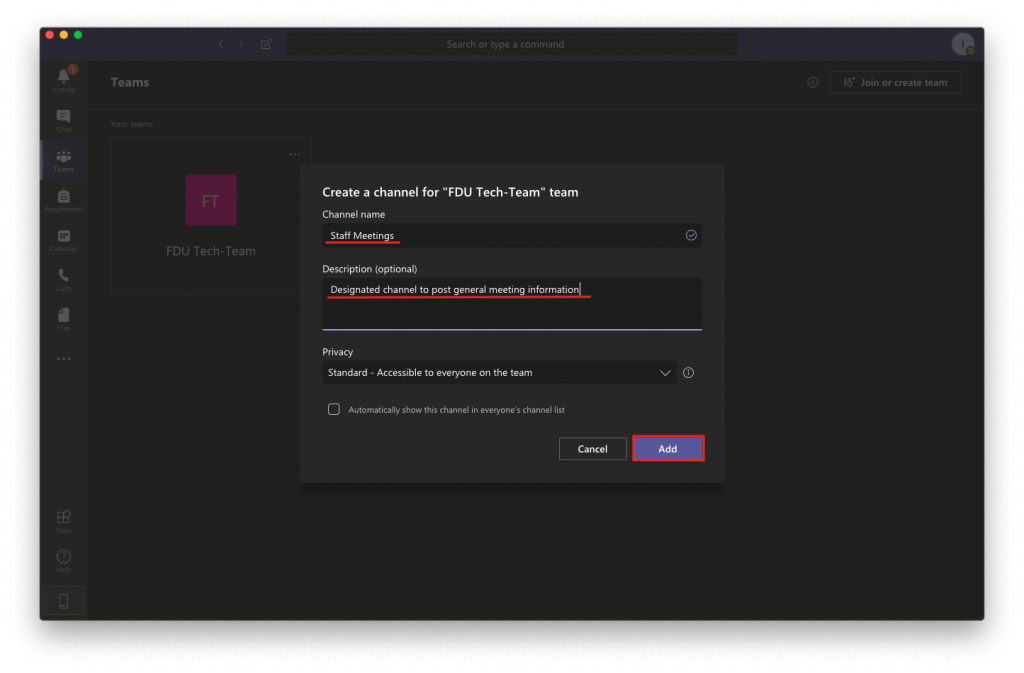
Give the channel a name, and a brief description as if would would like
Select your channel’s preferred level of privacy and press “Add”
Standard channels are open for anyone to join Private channels are invitation only
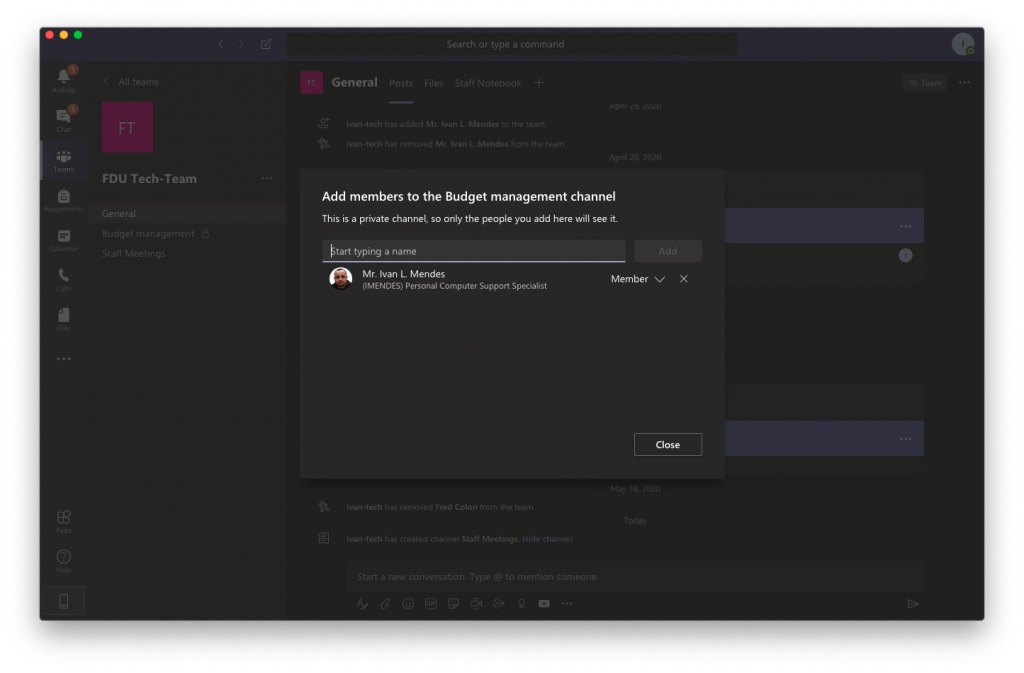
If you selected “Private” you will see a window that lets you add the team members that should have access to the channel. Once all members are added, press “Close”
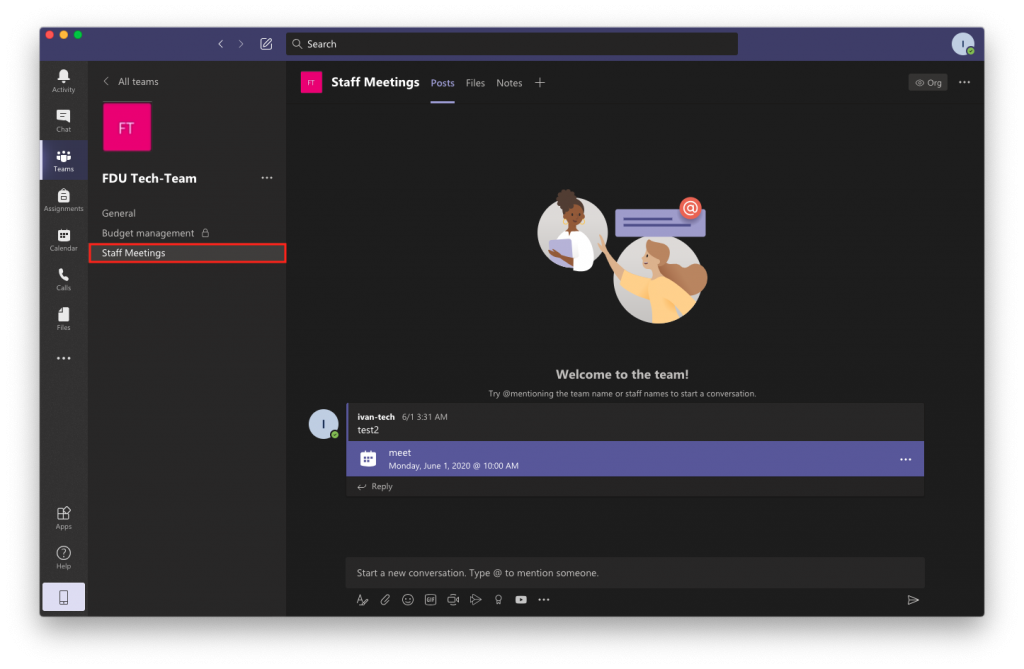
Once a channel is created it will show up under the General channel in the channels list. If the channel was set to Private, only the members can see it. Anyone who belongs to the channel can click on it to view its contents
Note
Since channels are sections within a team, it is not possible to add members to a channel that are not part of the team.
Now that your teams and channels are created, you can begin to take advantage of Microsoft Teams’ management features. Team management includes essential functions such as adding and removing members, assigning permissions for individual members, and managing your channels. You can also implement granular customizations such as setting parameters on the use of tags and emojis.
Select Teams from the left menu. If you have more than one team, click on your team
Click “More Options” icon (•••) next to the team name and select “Manage Team”. From here, you can select one of the following tabs
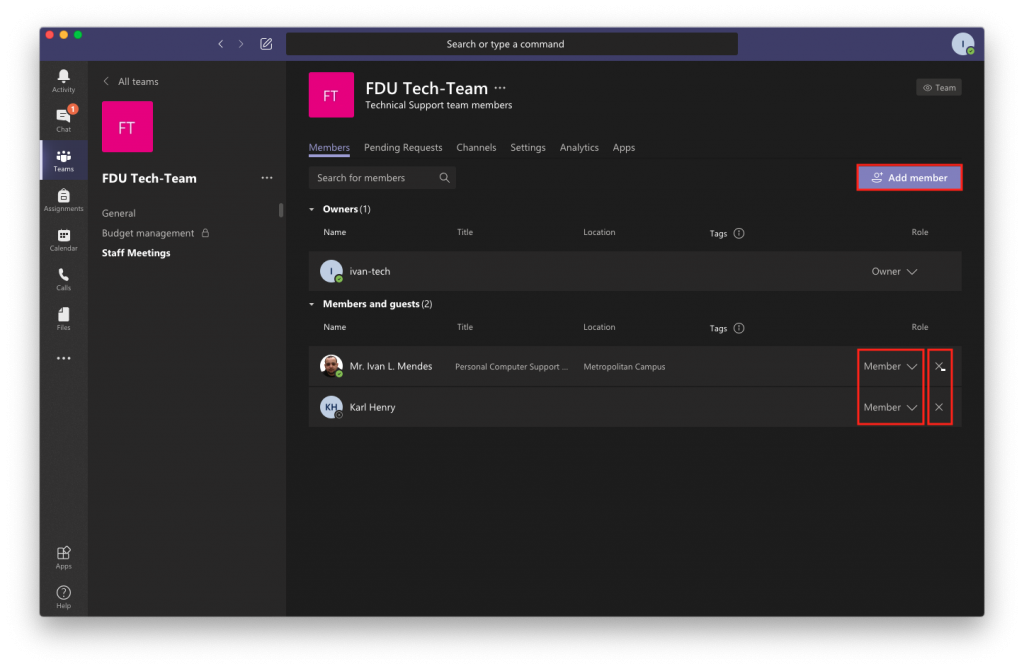
Manage Members Tab
Add a member by clicking “Add Member” button on the top right of the window
Remove a member by pressing “X” button on the right of their name
Use the drop-down menu to change a member’s role to Owner. This allows them full access to change settings
Manage Request Tab
Use this tab to accept or deny a person’s request to join your team
Manage Channels Tab
Create a channel by pressing the “Add channel” button on the top right of the window
You can restore deleted channels by expanding the “Deleted” list and pressing on “Restore”
The experience for managing a team setting varies between both the classic and new Teams.
Classic Teams – Manage Settings Tab
Team picture: is an optional setting which allows you to set a profile picture for your team. You can upload your own image or use one of the colorful templates provided by Microsoft
Member permissions: to set editing permissions for your team members
Guest permissions: settings you can allow guests to create, update, and delete channels
@mentions: lets you choose if you allow the @mention function to send notifications to individuals or entire channels
Team code: will provide you with a join code that you can give out to new members. This will allow them to join without being placed in the Pending Requests section
Fun stuff: lets you allow gifs and memes to be displayed on the channel
Tags: setting todecide who can use the tags feature. With tags, your team members can add labels help them better identify other members of the team
close
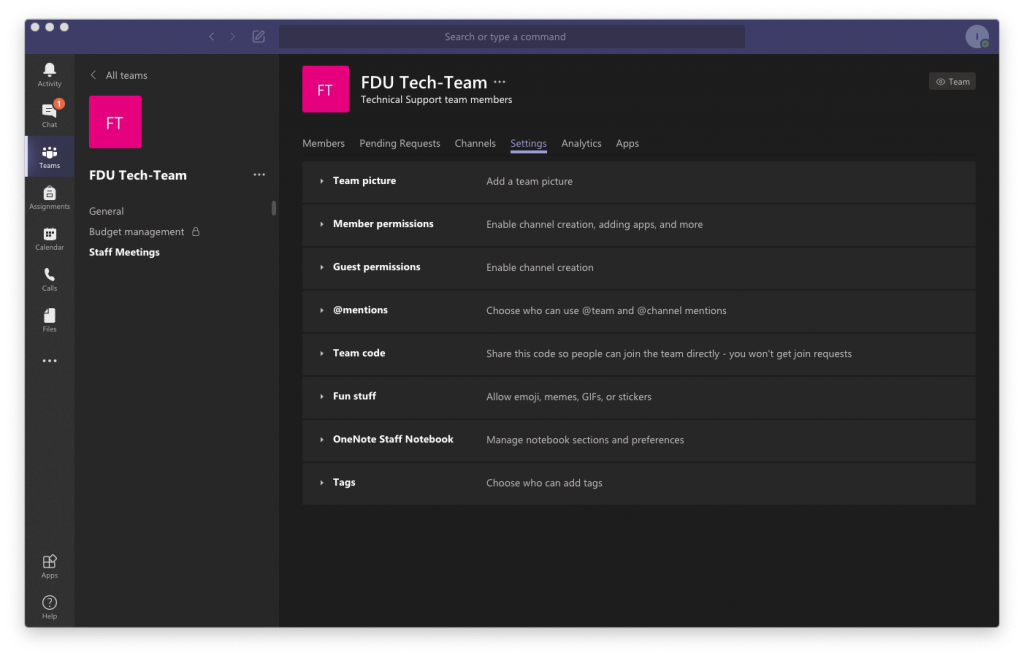
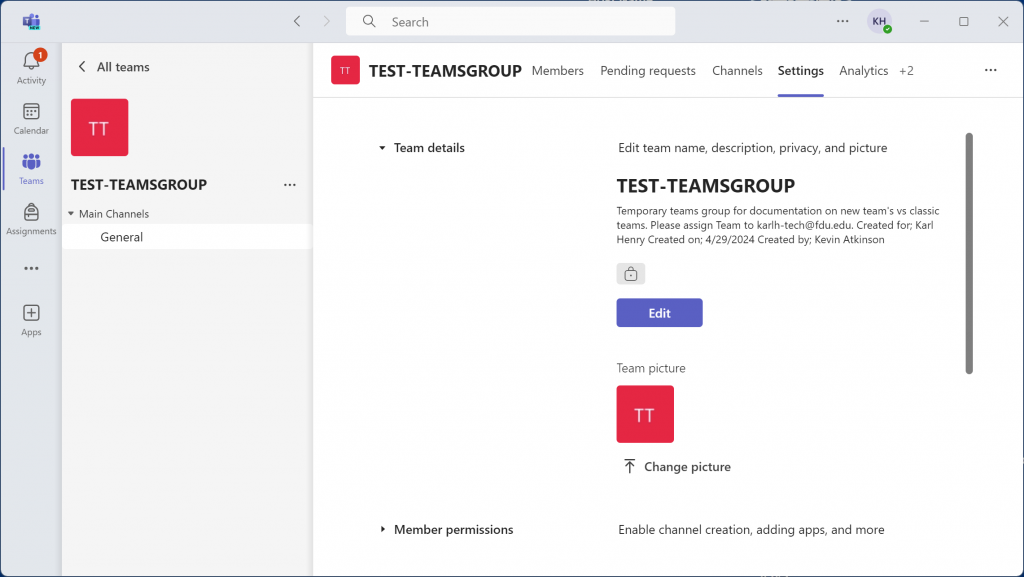
New Teams – Manage Settings Tab
Team Details: is an optional setting which allows you to set a profile picture, description and set privacy options for your team. You can upload your own image or use one of the colorful templates provided by Microsoft
Member permissions: to set editing permissions for your team members
Guest permissions: settings you can allow guests to create, update, and delete channels
@mentions: lets you choose if you allow the @mention function to send notifications to individuals or entire channels
Team code: will provide you with a join code that you can give out to new members. This will allow them to join without being placed in the Pending Requests section
Fun stuff: lets you allow gifs and memes to be displayed on the channel
Tags: setting todecide who can use the tags feature. With tags, your team members can add labels help them better identify other members of the team
Team Expiration: Specifies when the Team will expire. By policy no user can change the expiration policy and can visit SAMI Support to extend the expiration when nearing the expiration date.
New Teams – Team Settings Page
New Teams – Team Details Page
New Teams – Team Image Page
close
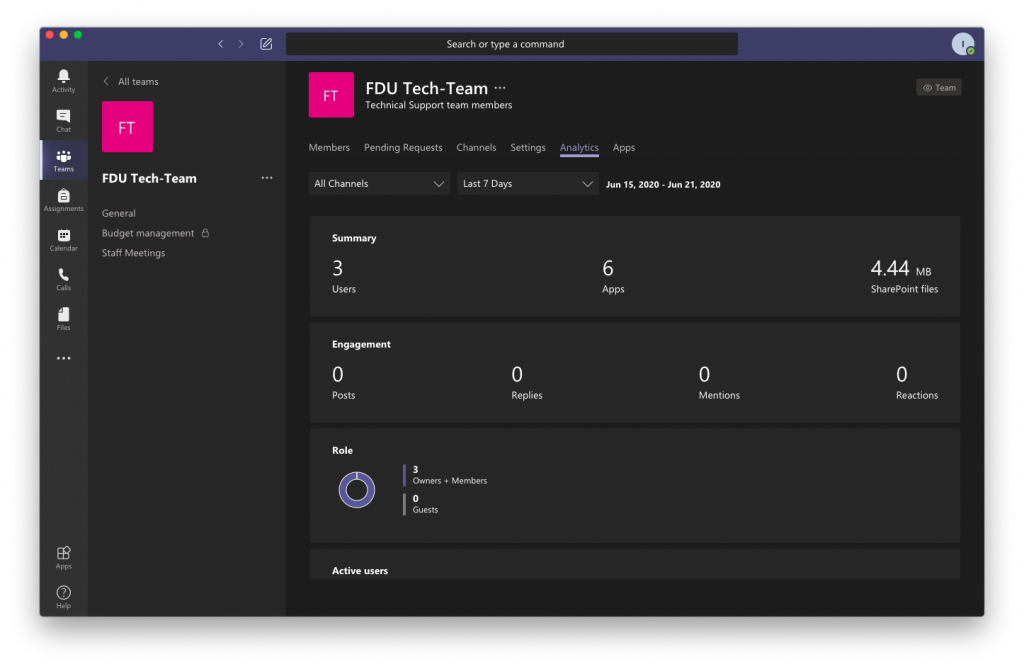
Manage Analytics Tab
The Analytics tab displays usage information for your team
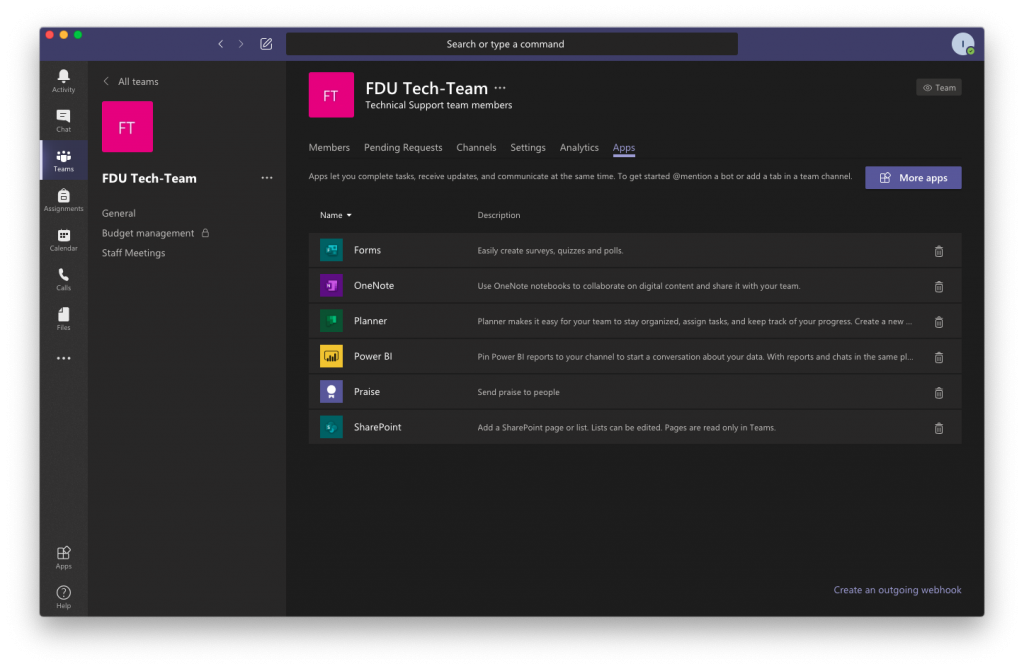
Manage Apps Tab
The Apps tab allows you to add or remove application plug ins for your channels
Instead of scheduling a meeting for a future date, you can start one right away and invite people in on the fly.
Select “Calendar” from the left-hand side of the screen and press “Meet Now”
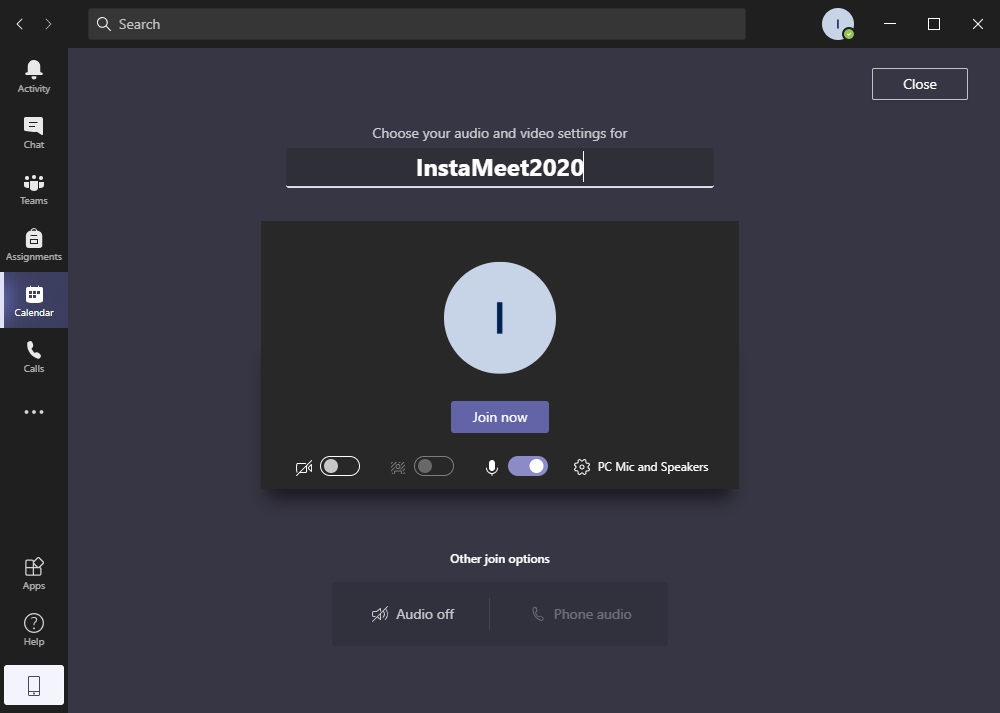
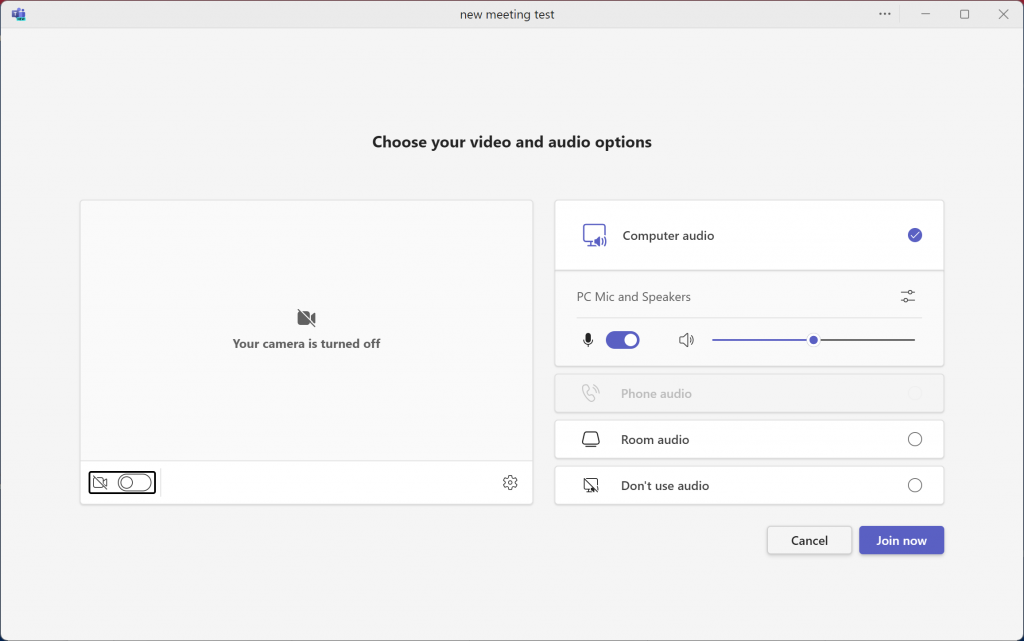
Give your meeting a name, select audio and video options, and press on “Join Now”
Classic Teams – Meet Now Options
New Teams – Meet Now Options
New Teams – Meet Now Audio Options
New Teams – Meet Now Invite Prompt
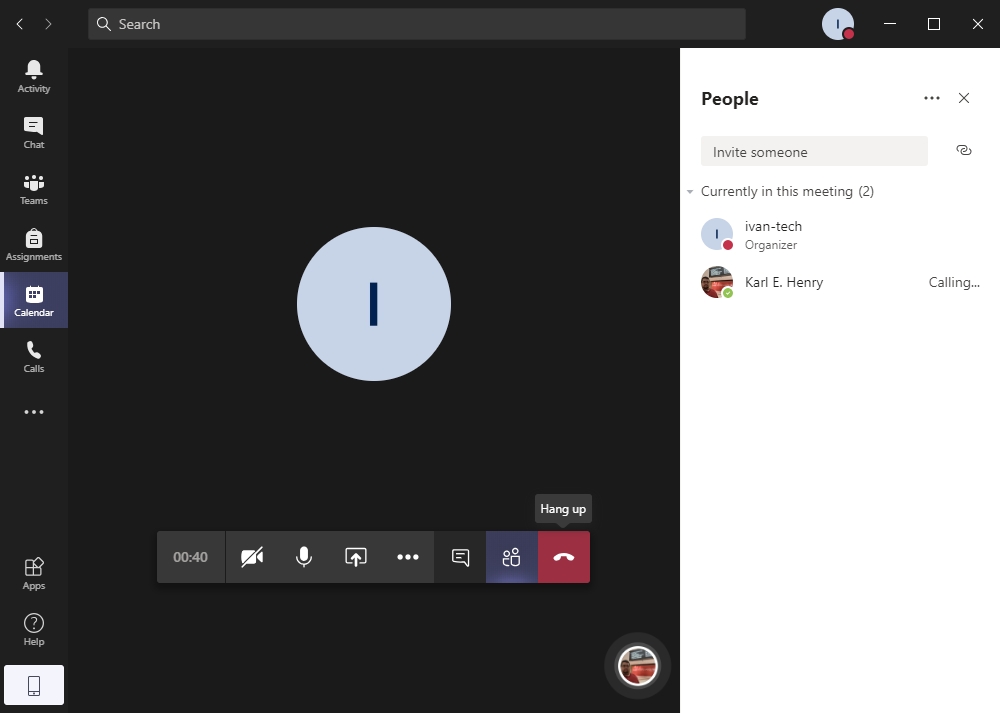
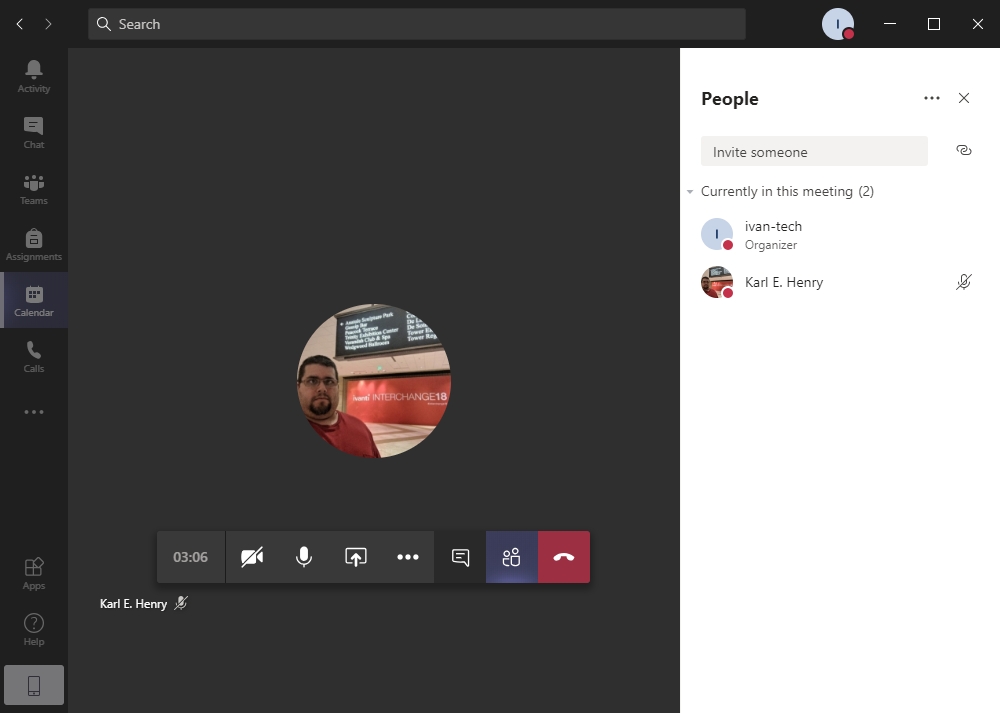
Your meeting should start with the “Participants” tab displayed so you can start inviting people right away. As you search for people and add them to your meeting, they will receive a call to be connected
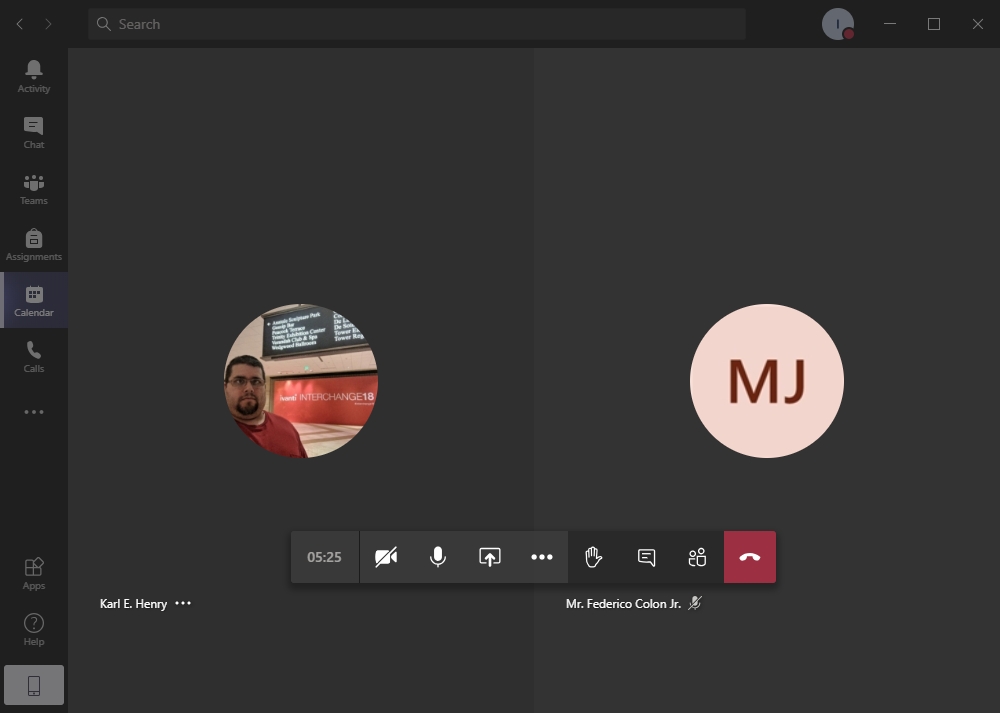
As people accept the meeting invitation they will automatically be connected
Meetings in Teams include audio, video, and screen sharing. They’re one of the key ways to collaborate in Teams.
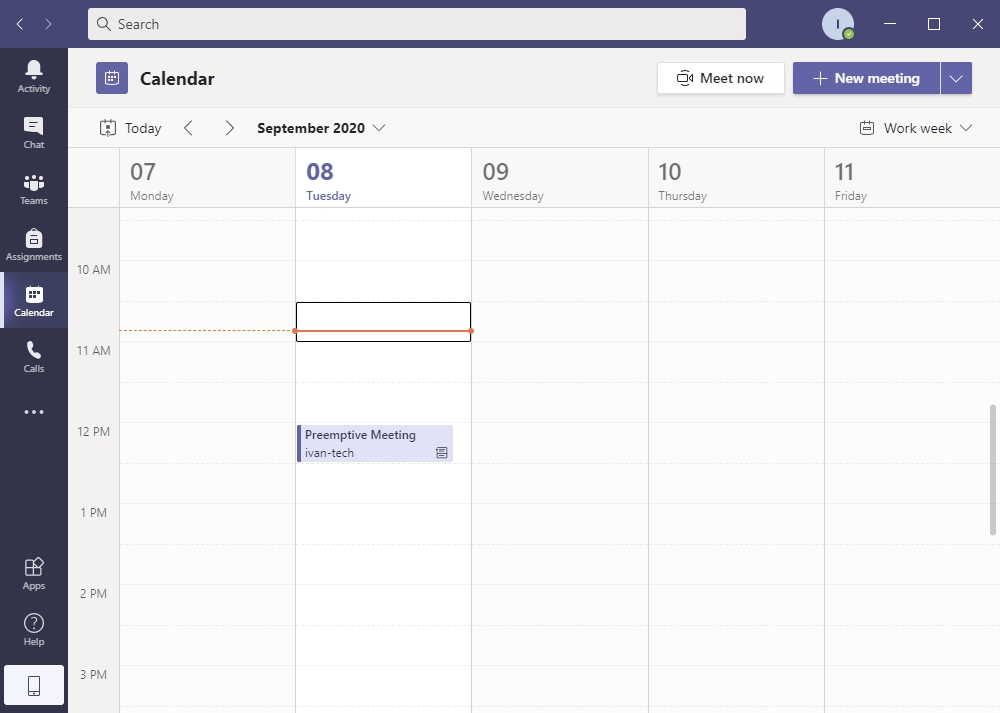
The Teams Calendar can be found by clicking Calendar in the left pane
Classing Teams – Scheduled Meeting
New Teams – Scheduled Meeting
You can join a scheduled meeting by selecting the “Calendar” tab from the left menu, then finding and left clicking on your meeting and clicking join for the Classic Teams Experience, or simply press “Join” on the New Teams experience
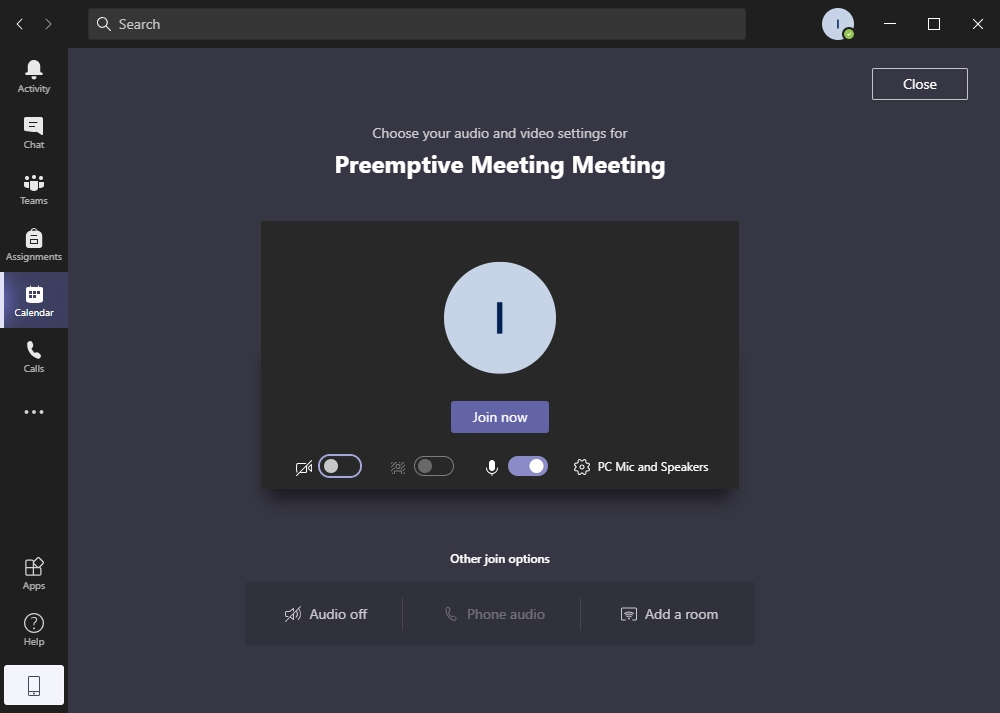
Select your video and microphone options, then left click “Join Now”
Classing Teams – Join Meeting Options
New Teams – Join Metting Options
Join
Depending on the Metting owner’s settings, you may receive a message that you are waiting for the host to let you into the meeting. You will remain on the Join Meeting Options Screen until you are admitted into the meeting.
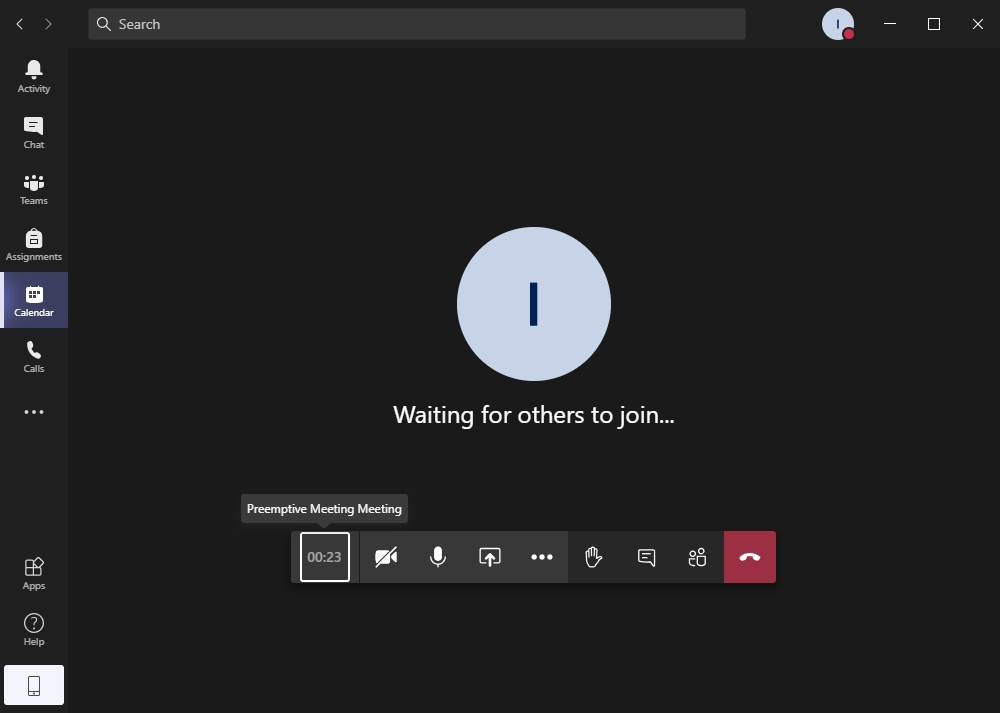
If you are the first participant that joined the meeting, you will see a black screen informing you that you are waiting for other members to join. As people join the meeting they will show up on the screen. If you are the host and your meeting has the lobby opened, you will have to admit everyone who joins the meeting
Classic Teams – Waiting in Meeting
New Teams – Person in Lobby Prompt
When you are done with the meeting, close it by pressing the red telephone icon to “Hang up” the call
Due to Office 365 calendar integration, scheduling video and voice meetings on Microsoft Teams is simple and convenient.
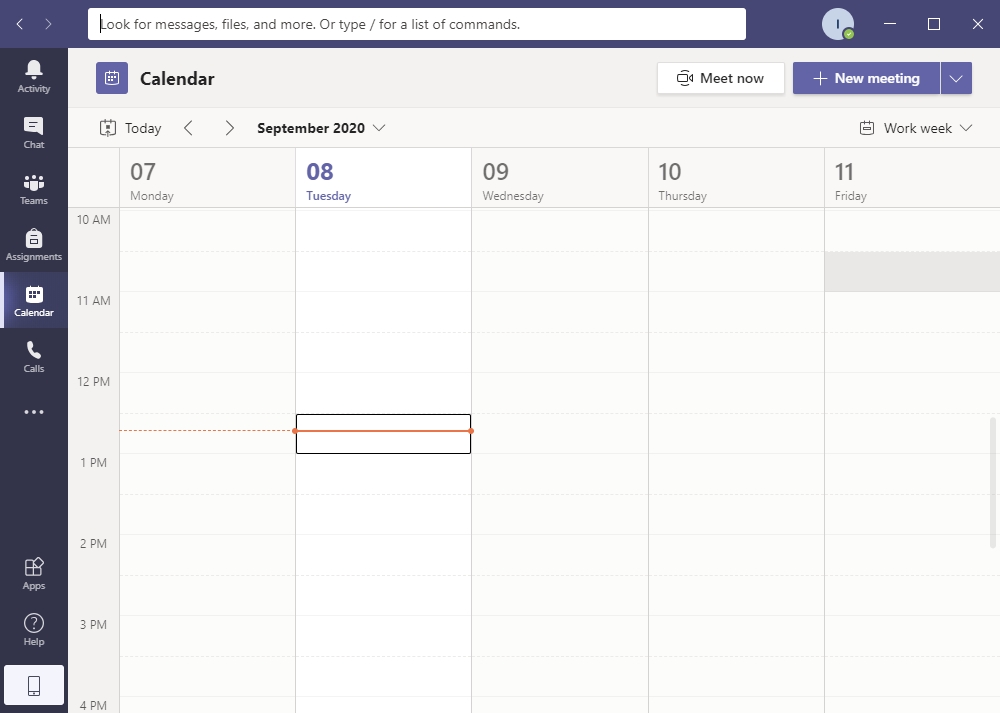
Select the “Calendar” tab from the left-hand side of the screen. This screen displays your entire FDU Office 365 calendar. Next, press “New Meeting” button on the top right of the window
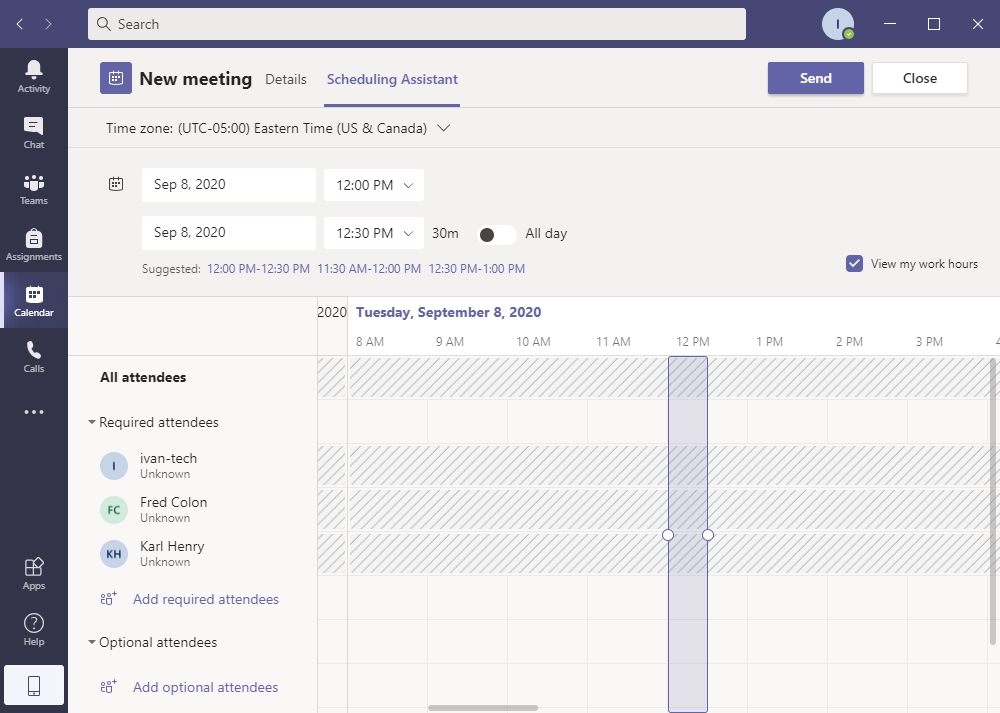
You will notice that the New Meeting window offers 2 tabs: “Details & Scheduling Assistant”
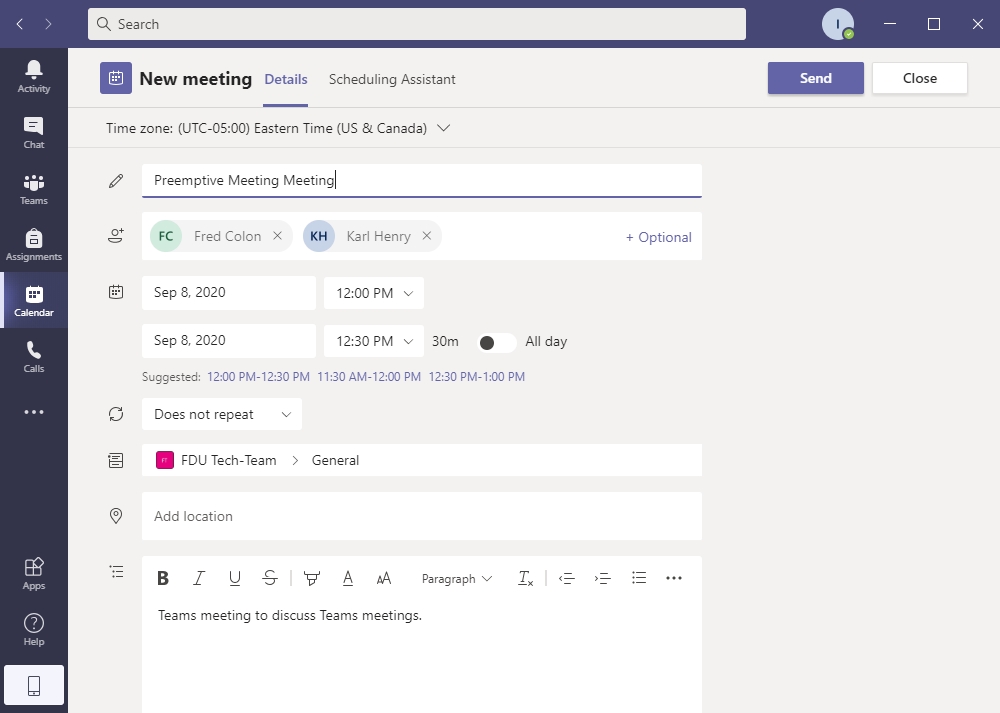
From the “Details” tab, enter the following information about your meeting:
Title
Required Attendees
Note
You can also add optional attendees by pressing + optional button
Time
Specify whether the meeting reoccurs
Add Channel is optional and lets you specify an entire Teams channel to receive a meeting notification
Add location is optional and enables you to select a physical location for members to meet at
Add details like the topic of discussion, meeting outline, etc
Classic Teams – Meeting Invitation Request
New Teams – Meeting Invitation Request
The “Scheduling Assistant” tab allows you to view the calendar of all attendees to check for availability. It is possible to adjust the meeting time on this tab
When finished, press the “Send” button on the top of the page. The meeting will be posted on the channel you selected, and invites will be emailed to all requested attendees. The meeting will also show up on the calendar of the people who have accepted the meeting invitation
Microsoft has acquired Flipgrid for video submissions for Classroom Assignments. This feature is only available from within a Classroom Team for assignment posting and submission.
Faculty can request a classroom team by using the following SAMI Support form:
The description must state that a classroom team is required.
After the new classroom team is created, the requesting faculty member can assign students to the classroom team. Students can only access the Flipgrid video submission button within the classroom team.
After you have created assignments or posted to an assignment, A new app tab will be displayed within your Teams app list labeled Assignments.
To access Forms, you will be directed to our SAMI Support Portal where you will be asked to log in using your NETID and authenticate using Duo. Once you click “Next,” you will be forwarded to samisupport.fdu.edu in a new window or tab.


 Warning
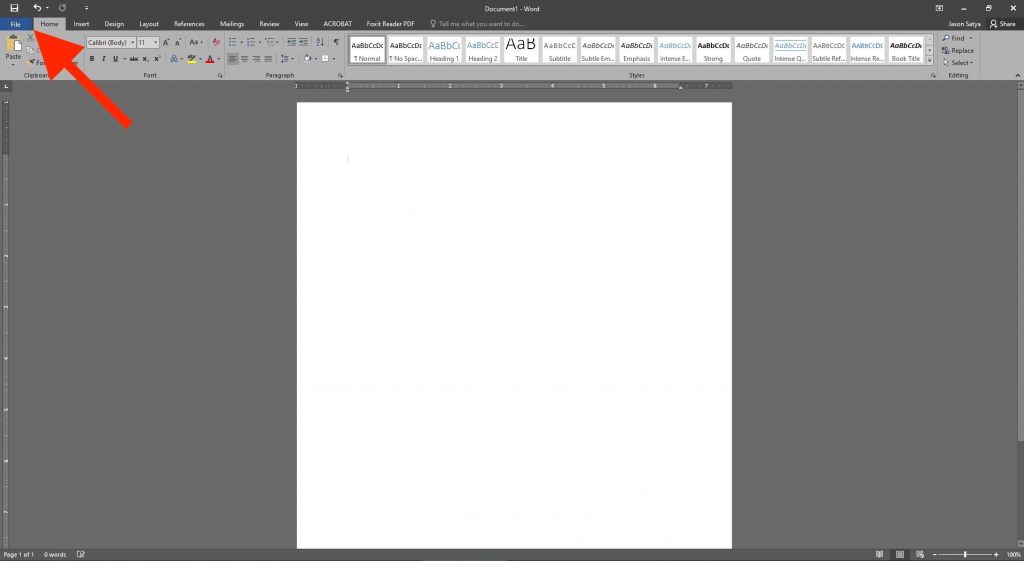


 Email
Email 

