Resources

Search our resource library below to find helpful information. You can fitler by your role at FDU as well by department or service.

icon Help Desk
Resources Header

Cisco Unified Communications Phone System Manuals

Resources for:
icon Close

Below you can download the manuals for the new FDU Unified Communications Phone Systems from Cisco. The manuals provide information on how to use and access the voicemail features.

Florham and Metro

Vancouver

Last Modified: Copy Link

Cisco Unified Communications Voice Mail Features

Resources for:
icon Close

Initial Voice Mail Set-Up from Your Own Campus Extension

From your desk phone:

  1. Press the message button on your phone instrument.
  2. Enter your Mailbox ID, this is your 4 digit extension.
  3. Enter the temporary PIN 13579 followed by the # sign.
  4. Listen to the prompts to set-up your voicemail greeting.

Initial Voice Mail Set-Up from Off Campus

When off campus, you can setup your voicemail system by dialing your campus’ assigned voicemail number:

  • Florham Campus: (973)-443-8100
  • Metropolitan Campus: (201)-692-7600
  • Vancouver Campus: (604)-648-4485

Follow these instructions to log into and setup your voicemail:

  1. Press 1 to access the voicemail system.
  2. When prompted enter your ID, this is your 4 digit extension.
  3. Enter the temporary PIN 13579 followed by the # sign.
  4. Listen to the prompts to set-up your voicemail greeting.

Accessing Voicemail On Campus

  • Press the message button on your phone instrument.
  • Enter your Mailbox ID, this is your 4 digit extension.
  • Enter your 5 digit PIN followed by the # sign.

Accessing Voicemail Off Campus

You can access your voicemail when off campus by dialing your campus’ assigned voicemail phone number:

  • Florham Campus: (973)-443-8100
  • Metropolitan Campus: (201)-692-7600
  • Vancouver Campus: (604)-648-4485

Follow these instructions to log into your voicemail:

  1. Press 1 to access the voicemail system.
  2. When prompted enter your ID, this is your 4 digit extension.
  3. Enter your 5 digit PIN followed by the # sign.

Accessing Voicemail from Another Extension That Has Voicemail

Dial the voicemail extension 8100, 7600 or 4485.

  1. Press 1 to access the voicemail system.
  2. When prompted enter your ID, this is your 4 digit extension.
  3. Enter your 5 digit PIN followed by the # sign.

Changing Voicemail Messages & Passcodes

When you first set up your mailbox, you record a greeting, your name and select a passcode. The set-up options allows you to change these at any time. You should update your greeting(s) regularly to let callers know whether you’re in or out of the office. Your voicemail message should always be appropriate, so callers will feel confident in leaving messages. And, of course, boxes should be emptied daily, if not more frequently.

When the University or your department closes you should always redo your voicemail message making the caller aware that the University or your department is closed.

The voicemail system will prompt you as to how to make changes. When you are in doubt about what to do next, you can download the manuals for the new FDU Unified Communications Phone Systems from Cisco. The manuals provide information on how to use and access the voicemail features.

If you are NOT forwarding your office phone, you should create a new voice message similar to the messages below and establish a pattern and practice of checking your voicemail regularly.

Please update your outgoing message to reflect an appropriate out of office message.

Voicemail Forwarding Suggested Message

Below is a recommended Voicemail Message:

“You’ve reached the voicemail of [NAME, TITLE/DEPT]. Fairleigh Dickinson University has moved to virtual business operations as a precaution against the spread of COVID-19. I’ll be checking my voicemail, but would appreciate you also reaching out to me by email at [YOUR EMAIL]@fdu.edu. Thank you.”

Last Modified: Copy Link

Claim or Create an FDU NetID Account

Resources for:
icon Close

Welcome to Fairleigh Dickinson University. As a new member of our campus community, one of your first priorities will be gaining access to FDU NetID. With an FDU NetID, you will have access to a variety of IT resources, including Office365. Depending on your role within the University, you will either be creating an account or claiming an account that has already been created for you. Please follow the process below which applies to you.

New Student through Welcome Email (US Students)

If you are a new student of our New Jersey campuses and you have received a Welcome email from fdu-it@fdu.edu, please visit the link below


New Student

If you are a new student at FDU Vancouver or if you are a New Jersey based student that has not received a Welcome Email, please visit the link below


New Faculty, Staff Member Temporary Employee, or On-Campus Contractor

If you are a new Faculty, adjunct Faculty, Staff member, temporary employee, or contractor who works on campus and requires a NetID, please visit the link below


All Others

If you are entitled to an FDU NetID account and either do not fall under any of the categories above or attempted to claim their NetID and received a message that your NetID has not been created, please visit the link below

Last Modified: Copy Link

Classroom Technology

Resources for:
icon Close

FDU has a number of technology enhanced classrooms that are capable of video/computer projection. To find out if your classroom is on this list please review the charts below for your campus:

Metropolitan Campus Technology Chart

Tip

Scroll left to right on the chart if viewing on a Mobile device or in Desktop preview mode. To view the full chart, rotate your Mobile device into landscape mode. On Desktop, press the full screen button (icon with expanding arrows inside of a circle) on the top right of the article header.

Building NameProjector Enabled RoomsDVD/VCR Combo RoomsSpeaker EnabledEcho 360HDMI JackSmartboard
Becton Hall202YesYes Laser
Becton Hall205Yes Yes Laser
Becton Hall208YesYes Laser
Becton Hall302Only DVD Yes YesYes
Becton Hall304Only DVD Yes YesYes
Becton Hall305 Yes Yes
Becton Hall306 Yes Yes
Becton Hall402 Yes Laser
Becton Hall403/404 (LED Screen)Yes Yes YesYes
Becton Hall405 Yes Laser
Becton Hall406 Yes Laser
Becton Hall407 Yes Laser
Becton Hall408 Yes Laser
Becton Hall Conference Room307
Dickinson Hall1104YesYes Laser
Dickinson Hall1128YesYes Yes
Dickinson Hall1129YesYes Yes
Dickinson Hall1142YesYes Laser
Dickinson Hall1143Yes Yes Yes
Dickinson Hall1144Yes Yes Laser
Dickinson Hall1148 Yes
Dickinson Hall1149YesYes Yes
Dickinson Hall1150YesYes Yes
Dickinson Hall1151YesYes Laser
Dickinson Hall1152 (LED Television)YesYes Yes
Dickinson Hall1153 (LED Televison)YesYes Yes
Dickinson Hall1165 (LED Televison)YesYes Yes
Dickinson Hall1170 (LED Television)YesYes Yes
Dickinson Hall2135YesYesYesLaser
Dickinson Hall2137Yes Yes Yes
Dickinson Hall2177YesYes Laser
Dickinson Hall2178YesYesYesLaserYes
Dickinson Hall2230Yes Yes Laser
Dickinson Hall2249 Yes YesYes
Dickinson Hall2262Individual DVD & VCR Yes
Dickinson Hall2263 Yes Laser
Dickinson Hall4468Yes Laser
Dickinson Hall4469YesYes Laser
Dickinson Hall4473YesYes Laser
Dickinson Hall4475Yes Yes Laser
Dickinson Hall5504YesYes Laser
Dickinson Hall5506YesYes Laser
Dickinson Hall5509 Laser
Dickinson Hall5520 Yes Laser
Dickinson Hall5523 Yes Yes
Dickinson Hall5529YesYes Laser
Dickinson Hall5534YesYes Laser
Dickinson Hall – Conference Room1191 Laser
Dickinson Hall – Conference Room2245 YesYesLaser
Dickinson Hall – Continuing Education1127YesYes Laser
Dickinson Hall (Lab A)2163 Yes Laser
Dickinson Hall (Lab B)2164 Yes Laser
Edward Williams Building201 Yes Yes
Edward Williams Building202 Yes Yes
Edward Williams Building203 Yes
Edward Williams Building204 YesYes Yes
Edward Williams Building205 Yes Laser
Edward Williams Building206 Yes Laser
Edward Williams Building207 Yes Yes
Edward Williams Building209 Yes Laser
Edward Williams Building301 Yes Laser
Edward Williams Building302 Yes Laser
Edward Williams Building303 Yes Laser
Edward Williams Building304 Yes Laser
Edward Williams Building305 Yes Laser
Edward Williams Building308 Yes Laser
Edward Williams Building309 Yes Laser
Edward Williams BuildingCommons 1YesYes Laser
Edward Williams BuildingCommons 2YesYes Laser
Edward Williams BuildingAuditoriumYesYes Laser
Giovatto LibraryWriting Lab Yes Laser
Giovatto LibraryWLB 3YesYes Laser
Giovatto LibraryWLB 4YesYes Laser
Giovatto LibraryAuditoriumYesYes
Giovatto LibraryWLB 1 (LED Screen)YesYes (TV Speakers)
Giovatto LibraryWLB2 (LED Screen)YesYes (TV Speakers)
Multipurpose RoomYesYesYes Laser
Muscarelle105Yes Yes Laser
Muscarelle202YesYes
Muscarelle203Yes Yes Laser
Muscarelle204 Yes Laser
Muscarelle205YesYes Yes
Muscarelle206Yes Yes Yes
Muscarelle207L Yes Laser
Muscarelle207RYesYes Yes
Robison Annex100Yes Yes Laser
Robison Annex101YesYes Laser
Robison Annex203Yes Yes Yes
Robison Annex204YesYes Yes
Robison Annex205Yes Yes Laser
Robison Annex300 Yes Laser
Robison Annex301 Yes Yes
Robison Annex303 Yes Laser
Robison Annex304YesYes Laser
Robison Annex305 Yes Laser
Robison Hall23BYesYes Laser
Robison Hall501
Robison Hall503 Laser
Rutherford RoomYesYesYes Laser
University Hall TheatreLED ScreenYes
University HallFront Lab Yes Laser
University HallBack Lab Yes Laser
University HallMultimedia Lab YesYes Laser
Williams Hall Yes
Williams Hall102YesYes Laser
Williams Hall107YesYes Laser
Williams Hall201 Yes Laser
Williams Hall202 Yes Laser
Williams Hall203 Yes Laser
Williams Hall206 Yes Laser
Williams Hall207 Yes Yes
Wilson AuditoriumYesYesYes Laser
close
Florham Campus Technology Chart

Tip

Scroll left to right on the chart if viewing on a Mobile device or in Desktop preview mode. To view the full chart, rotate your Mobile device into landscape mode. On Desktop, press the full screen button (icon with expanding arrows inside of a circle) on the top right of the article header.

Building NameProjector Enabled RoomsDVD/VCR Combo RoomsSpeaker EnabledEcho 360HDMI JackSmartboard
Dreyfuss Building102YesYes Laser
Dreyfuss Building103YesYes Laser
Dreyfuss Building104YesYes Laser
Dreyfuss Building105YesYes Laser
Dreyfuss Building106YesYes Laser
Dreyfuss Building107YesYes Laser
Dreyfuss Building121Yes Laser
Dreyfuss Building125YesYes Laser
Dreyfuss Building206 Yes Yes
Dreyfuss Building207 Yes Yes
Dreyfuss Building208 Yes Yes
Dreyfuss Building209YesLaser
Dreyfuss Building210 Yes Yes
Dreyfuss Building211
Dreyfuss Building212
Dreyfuss Building213
Dreyfuss BuildingTheater
Hennessey Room 1Yes Yes Yes
Hennessey Room 2Yes Yes Yes
LibraryLibrary ClassroomYes Yes Laser
Mansion11YesYes Laser
Mansion12Yes Yes Laser
Mansion13YesYes Laser
Mansion17Yes Yes Laser
Mansion30Yes Yes Laser
Mansion33Yes Yes Yes
Mansion35Yes Yes Laser
Mansion36YesYes Yes
Mansion38YesYes Laser
Moninger 105 Just DVDYesYesYesYes
Moninger 106 Just DVDYesYesYesYes
Moninger 107YesJust DVDYes Laser
Moninger 113Yes Yes Yes
Moninger 118 Just DVDYesYesLCD ScreenYes
Moninger 119 Just DVDYesYesLCD ScreenYes
Moninger 205 Yes
Moninger 206 Yes
Moninger 210 Yes
Moninger 228YesYesLaser
OrangerieYes Yes Yes
Science Building1 Yes Yes
Science Building3 Yes
Science Building6 Yes
Science Building7Yes Yes Yes
Science Building9 Yes Yes
Science Building11Yes Yes Laser
Science Building15A Yes Yes
Science Building17YesYes Yes
Science Building18 Yes Yes
Science Building19 Yes Laser
Student CenterSammartino RoomYes Yes Yes
Student CenterFlorham RoomYes Yes Yes
Student CenterWroxton RoomYesYes
Student CenterBottle Hill Room
Twombly LoungeYesYesYes Laser
Zen Building102YesYes Laser
Zen Building103YesYes Laser
Zen Building104YesYes LCD Panel
Zen Building105YesYes
Zen Building106YesYes
Zen Building107YesYes Yes
Zen Building108YesYes Yes
Zen Building109YesYes Laser
Zen Building110DVD onlyYes LCD PanelYes
Zen Building202YesYes Yes
Zen Building203YesYes Yes
Zen Building204Yes Yes Yes
Zen Building205YesYes Yes
Zen Building206YesYes LCD Panel
Zen Building207Yes Yes Yes
Zen Building208DVD onlyYes LCD PanelYes
Zen Building209YesYes Yes
Zen Building210 Laser
Zen Building211 YesYes Yes
Zen Building212 YesYes Yes
close
Last Modified: Copy Link

Code42 Tutorial

Resources for:
icon Close

Code42 is a backup agent that will back up all data on a university device under the primary owner’s profile. The backup sets can be used for restoring data to a machine, whether it has been reformatted, replaced, or compromised. This document will outline the steps needed to install, activate, and restore data to a new or existing device.

index

Index

About Code 42

Code42 Policy

Code42 is required on all University provided desktops and laptops to backup all University Business data to prevent data loss.

Who Can use Code42?

Code42 is presently licensed for full-time faculty and full-time staff only. The University mandates Code42 for proper data security practices. If a user has personal data that they wish to exclude from being backed up, a folder labeled “Personal Documents” can be found and utilized in your “Documents” folder. This folder and its contents will be ignored by Code42 when your system is being backed up.

Personal Documents folder locations:

Windows PCC:\users\username\Documents\Personal Documents\
macOS/users/username/documents/Personal Documents/

Tip

If the Personal Documents folder does not exist in your Documents folder, you can manually create it and the folder will be automatically ignored by Code42.

Is My Data Secure?

Code42 uses AES-256 encryption is used when storing your backups and can only be accessed by the Code42 account owner and administrators.

What is Backed Up?

All data found in a user profile will be backed up by Code42.

Location of User Profile:

Windows PCC:\users\UserName\
macOS/users/username/

Warning Warning

Any data not stored in the user profile will NOT be backed up by Code42. It is highly encouraged to store university business data within your user profile.

How to Install on a Windows PC

To install Code42 on your Windows PC, please follow the instructions below.

Note

Code42 is being automatically deployed to all systems owned by Faileigh Dickinson University.

Before Installing Code42, you must be logged in as the owner of the machine using your NetID Credentials.

  1. Open FDU Self Service Portal for Software on your University PC
  2. Click on Code42 Backup and then click “Install” on the right-hand side

Note

It could take several minutes for the client to make the first connection and start the first backup.

The entire process will take approximately 5-7 minutes, depending on your internet speed. Once Code42 is installed, your account is automatically provisioned in the Code42 system, and your backup will begin shortly.

How to Install on macOS

To install Code42 on your macOS device, please follow the instructions below.

Note

Code42 is being automatically deployed to all systems owned by Faileigh Dickinson University.

  1. Locate the FDU Self Service Portal in your applications folder or locating the icon on your dock
  2. Locate Code42 Backup and click “Enroll”
  1. After the package installs, you will be prompted to enter your FDU email address and then click “OK

Note

It could take several minutes for the client to make the first connection and start the first backup.

The entire process will take approximately 5-7 minutes, depending on your internet speed. Once Code42 is installed, your account is automatically provisioned in the Code42 system, and your backup will begin shortly.

How to Replace or Add a Second Device

This process is used when someone will be assigned a second device and wishes to have it backed up or if the Code42 needs to be re-installed on the same device. Because an account already exists, it cannot be provisioned automatically. It must be manually setup either to replace an existing device or create a new backup set on the second computer.

Note

In order to proceed, code42 must be installed prior to continuing, please refer back to the Install instructions for your operating system from the Code42 User Guide. A link is found at the bottom of this page.

Tip

A backup set is Code42’s way of describing the backup configuration and what files are being backed up.

  1. Click on the Code42 app in the system tray (PC) or Menu bar (macOS) and then click “Setup Device
  1. If prompted, log in to the FDU NetID Portal and proceed through the FDU single sign-on process
  2. Click “Replace Existing
This image has an empty alt attribute; its file name is Code42-How-to-Add-a-Second-Device-or-Replace-an-Exisiting-Device-Figure-2.png
  1. Click “Start” to continue with the replace existing device process
This image has an empty alt attribute; its file name is Code42-How-to-Add-a-Second-Device-or-Replace-an-Exisiting-Device-Figure-3.png
  1. Select the device from the list you are replacing and click “Continue
This image has an empty alt attribute; its file name is Code42-How-to-Add-a-Second-Device-or-Replace-an-Exisiting-Device-Figure-4.png
  1. Click “Select Files” on the following window
This image has an empty alt attribute; its file name is Code42-How-to-Add-a-Second-Device-or-Replace-an-Exisiting-Device-Figure-5.png
  1. Select and Choose which files you wish to replace by placing a checkmark next to each. When finished, click “Restore Files
This image has an empty alt attribute; its file name is Code42-How-to-Add-a-Second-Device-or-Replace-an-Exisiting-Device-Figure-6.png
  1. The next window will allow you to select how you wish to restore your files. Make your selections and click “Go
This image has an empty alt attribute; its file name is Code42-How-to-Add-a-Second-Device-or-Replace-an-Exisiting-Device-Figure-7.png
  1. The next window will display download progress for the restore process. You can continue forward by clicking “Continue” at the bottom
This image has an empty alt attribute; its file name is Code42-How-to-Add-a-Second-Device-or-Replace-an-Exisiting-Device-Figure-8.png
  1. The next window Downloads the Files to your device. When the transfer is completed, click “Next
This image has an empty alt attribute; its file name is Code42-How-to-Add-a-Second-Device-or-Replace-an-Exisiting-Device-Figure-9.png

Tip

You can close this window and continue working or you can click transfer more files and repeat the steps for additional files. This will extend the time it needs to restore.

  1. Your Transfer is now complete, click “Finish
This image has an empty alt attribute; its file name is Code42-How-to-Add-a-Second-Device-or-Replace-an-Exisiting-Device-Figure-10.png

Verifying a Backup Instructions

If you are unsure if you have Code42 installed and backing up your system, this quick guide will help give you some comfort.

  1. Click on the Code42 icon from the system tray on Windows and the menu bar on macOS
This image has an empty alt attribute; its file name is Code-42-Tray-Icon.svg

Code42 Icon

  1. The Progress will be displayed like in the Figure below
This image has an empty alt attribute; its file name is Code42-Verifying-Backup-Progress-Figure-2.png

Note

Depending on your backup size, this could take anywhere from a few minutes to a few days. Code42 will continue to run and backup in the background. After the first successful backup, incremental backups will occur.

How to Manage Backups

Code42 allows you to manage your backup sets.  If you want to review your backup set or request assistance, please contact the Fairleigh Dickinson University Technical Assistance Center (UTAC) to initiate a service request.

How to Restore Files

Accidentally deleted or unable to find a file? Code42 can help. Please follow the following guidelines in restoring lost or previous versions of files.

  1. Click the Code42 System Tray or macOS menu bar Icon
This image has an empty alt attribute; its file name is Code-42-Tray-Icon.svg

Code42 Icon

  1. Left-click on the gear symbol and left-click on “Open Code42….
  1. If prompted, log in to the FDU Single sign-on Portal and proceed through the FDU DUO Multifactor authentication procedures
  2. Click “Restore Files
  3. Select the device you wish to restore from
This image has an empty alt attribute; its file name is Code42-How-to-Restore-Files-Figure-2.png

Note

If you have more than one backup device, please select the device from where you want to restore the file from.

  1. You can select a date range from when you wish to restore from on the right-hand side
  2. Navigate to the folder(s) and/or file(s) you wish to restore and place a check next to each one
  3. Click “Restore Files
This image has an empty alt attribute; its file name is Code42-How-to-Restore-Files-Figure-3.png
  1. Select how Code42 will restore your files. Click “Go” when finished
This image has an empty alt attribute; its file name is Code42-How-to-Restore-Files-Figure-4.png

Note

Above are the recommended options for restoring files, this will help you find them more easily.

The time it takes to restore your files will depend on how much data is being restored, available system resources, and available bandwidth.

How to Add Backup Sets

Using Code42 you can create backup sets that will back up your data to additional devices utilizing a schedule. This is useful to have immediate access to critical files in the event of data loss.

This guide is only needed if you wish to have a local backup of your data.

Note

If you schedule multiple backup sets to run at specific times and the backup sets go to the same destination, ensure that these times do not overlap. This ensures good backup performance.

  1. Click the Code42 System Tray or macOS menu bar Icon
This image has an empty alt attribute; its file name is Code-42-Tray-Icon.svg

Code42 Icon

  1. Left-click on the gear symbol and left-click on “Open Code42….
This image has an empty alt attribute; its file name is Code-42-How-to-Add-Backup-Sets-Figure-1.png
  1. If prompted, log in to the FDU Single Sign-on Portal and proceed through the FDU DUO Multi-factor authentication procedures
  2. From the Code42 console window, click the “Dropdown Arrow” symbol next to your device name to drop down a menu, then click “Add Backup Set…
This image has an empty alt attribute; its file name is Code42-How-to-Add-Backup-Sets-Figure-2.png
  • The next window will be the Add Backup Set configuration window.
This image has an empty alt attribute; its file name is Code42-How-to-Add-Backup-Sets-Figure-3.png

Note

The “Add Set” button will be un-clickable until it is completely configured.

  1. Click “Rename” to label your backup set
  2. Changing Selected Files, click “Change”, and select the files and folders you wish to backup to a local destination
This image has an empty alt attribute; its file name is Code42-How-to-Add-Backup-Sets-Figure-4.png
  1. When finished click “Save
  2. Click “Change” to set your destination for your backup
This image has an empty alt attribute; its file name is Code42-How-to-Add-Backup-Sets-Figure-5.png
  1. Select your destination by clicking “Add Local Destination (usually an external hard drive) and click “Save
This image has an empty alt attribute; its file name is Code42-How-to-Add-Backup-Sets-Figure-6.png
  1. Click “Add Set” to finalize the setup and start backing up to a local location
This image has an empty alt attribute; its file name is Code42-How-to-Add-Backup-Sets-Figure-7.png

Your new back upset is finished and will begin backing up as configured.

This image has an empty alt attribute; its file name is Code42-How-to-Add-Backup-Sets-Figure-8.png

Backup Alert Email Notifications

Code42 will send users an email alert notifying of any incomplete backups of their devices.

  • The Code42 email alert will be sent from Code42 for Enterprise <noreply@code42.com>
  • The Subject line of the email will be labeled with: Critical: [Name of Device] not backed up

Backup Alert

You will receive an alert when your computer hasn’t backed up to Code42 for 5 calendar days. The email will look like the example below:

Code42 Backup Alert Email Notification

What to do if you get a backup alert

After receiving a Code42 backup alert email, you should locate the device the email specifies in need of backup. The Code42 device name will be listed in the Subject: line and Computer Name: line of the Code42 backup alert email. To locate the name of a Code42 device, left-click the Code42 “C” symbol icon in the Windows System Tray, also referred to as the notification area.

Tip

The Windows System Tray or notification area is usually located on the bottom right of the Windows taskbar, next to the displayed digital clock.

For macOS users left-click Code42 “C” symbol icon on the macOS icon menu bar. The Code42 device name will be displayed in the console. Ensure the Code42 application displays the same name as the Code42 backup alert email you received.

This image has an empty alt attribute; its file name is Code-42-Tray-Icon.svg

Code42 “C” symbol icon

Code42 Device Name

After locating the correct specified device stated in the Code42 backup alert email, force a backup of the device by performing the following:

  1. Left-click the “Code42” System Tray or macOS menu bar Icon
This image has an empty alt attribute; its file name is Code-42-Tray-Icon.svg

Code42 Icon

  1. Left-click “Run backup now

Note

The backup may take some time to complete. This depends on the length of time since Code42’s last complete backup and the amount of new data needed to be backed up.

Getting Support

For additional support, contact the Fairleigh Dickinson University Technical Assistance Center (UTAC) to initiate a service request.

Last Modified: Copy Link

Computer Lab Mission Statement

Resources for:
icon Close

The FDU computer labs provide a safe and welcoming study space for our users. The computer labs provide access to technological resources such as: current specialty software applications for a variety of majors, access to online libraries for research, internet access, and print services. Our labs are also available to faculty for instruction in both technology-intensive and non-intensive majors. The computer labs are also used as a venue for various workshops and university programs. The lab hours are flexible to meet the needs of both resident students and commuter students. The lab operations also provide on-campus work opportunities for our students to develop their skills and offer customer service and technical support to our campus community.

FDU Computer Labs Provide:

  • A conducive learning space that enables students to develop the skills necessary for collaboration and teamwork.
  • Hands on experience with current hardware and software applications used for a variety of majors.
  • Students access to the same technology resources for the purposes of research, printing, and producing professional work.
  • Customer service and on-site technical support from our student staff.
  • Access and opportunities for students to develop their computer skills.
  • Interactive learning opportunities between faculty and students; theory and application in one setting under the supervision of faculty with the support of student staff.

Last Modified: Copy Link

Computer Lab Reservation Policy

Resources for:
icon Close

Due to the increasing demand of the academic computer facilities, a general document detailing the policies for computer lab reservations has been outlined. The purpose of the computer lab reservation policy is to provide faculty, staff and students with equitable access to campus computing lab resources. Most computer labs are used as classrooms and they are available for open-access use when there are no classes in session.

There are currently four Computing Services computer labs which can be used for classroom instruction on each campus. They are: D206, D207, D208, and D209 located in the Dreyfuss Building on the Florham Campus. The computer labs located on the Metropolitan Campus are: DH2163 and DH2164 in Dickinson Hall and UH Front Lab (UH22) and UH Back Lab (UH28) in University Hall. Also, there are three multimedia labs; two on the Florham campus and one on the Metropolitan campus. The multimedia labs for the Florham Campus are: D211-Animation Lab and ZEN110 – Graphic Design Lab) located in the Dreyfuss and ZEN Buildings. On the Metropolitan campus, the multimedia lab (MML) is located in Becton Hall Room 403. The multimedia labs are primarily used for courses offered by the FDU School of Arts. All labs used for classroom instruction and general use are equipped with a LaserJet printer and data projector. The Animation Lab is equipped with 3-D printers. All multimedia labs are equipped with ZOOM capability to support hybrid instruction.

If you have any questions regarding the lab reservation policy, please contact Denzel James via email at: d.james@fdu.edu

Last Modified: Copy Link

Computer Tips, Tricks, and Recommendations

Resources for:
icon Close

As technology evolves and new features are offered, there may be times when unwanted or unexpected things happen. This page is dedicated to providing some tips, tricks, and recommendations to circumvent these undesired circumstances.

Normalize Sound Levels – Windows

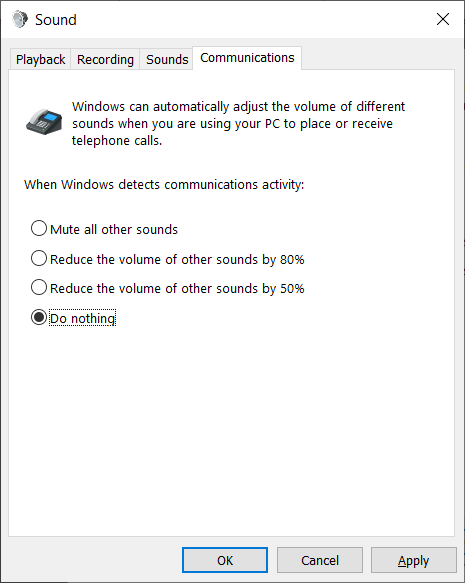
Microsoft Windows 10 automatically adjusts audio levels between different applications. This can affect the level of sounds from various applications depending on what program is currently being used. This feature can be turned off using the instructions below.

Instructions
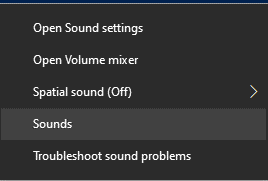
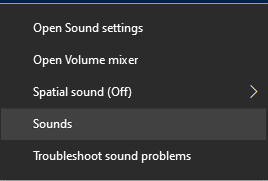
  1. From the Sound Icon in your task bar, single right-click
  1. Click “Sounds
  1. Click “Communications” tab.
  1. Select the “Do nothing” radial button
  1. Click “Apply
  2. Click “OK
close

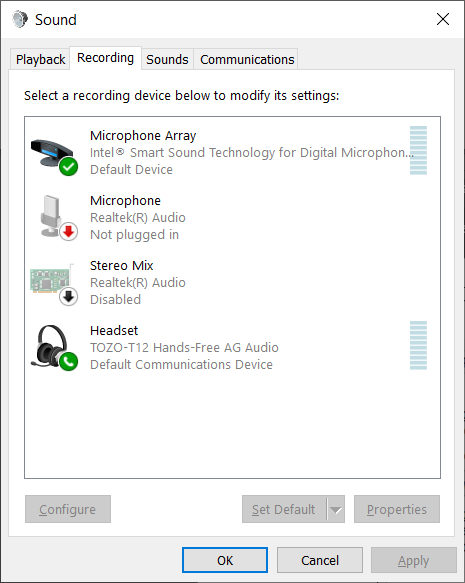
Adjust Microphone Settings – Windows

To ensure clear and audible audio in virtual meeting applications, such as Zoom, please follow the instructions below.

Instructions
  1. Right-click the Audio icon in the system tray portion of the task bar
  1. Click “Sounds
  1. Click “Recording

Note

Not all options may be visible.

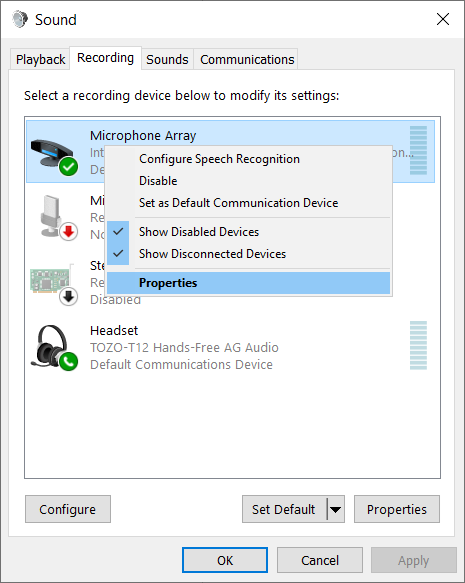
  1. Right Click on “Microphone Array” and select “Properties
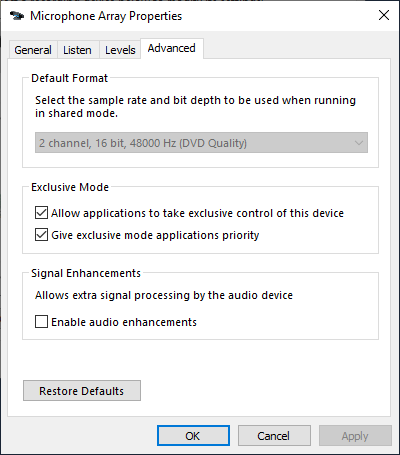
  1. Click the “Advanced” and un-check “Enable Audio Enhancements
  1. Click “Apply
  1. Click “OK
close

Adjust Power Options – Lenovo Laptops

Default power profiles in Windows 10 are configured to balance performance and battery life. To change these settings, please follow the steps below.

Instructions
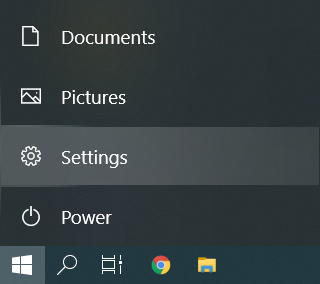
  1. Click on Start, and then click “Settings
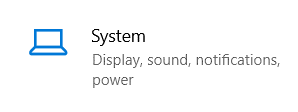
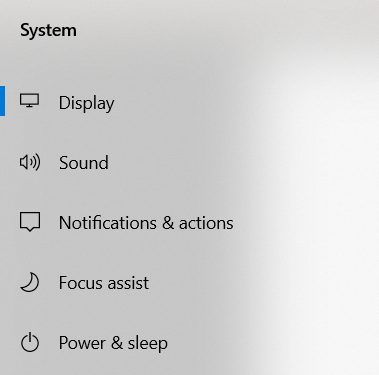
  1. Click on “System
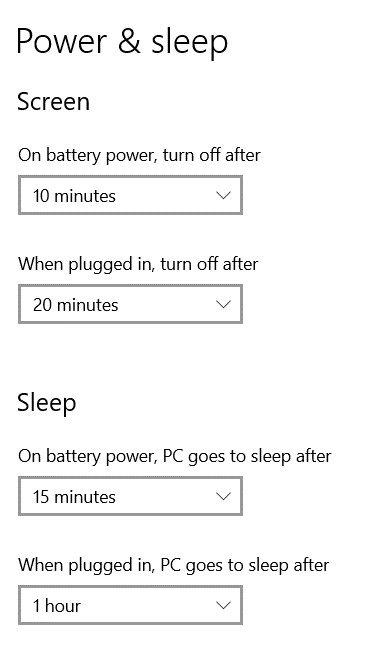
  1. Select “Power & Sleep
  1. To modify power settings while the laptop is plugged in or on battery power, modify the below options

Note:

Selecting higher times may result in shorter battery life

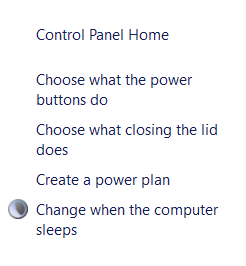
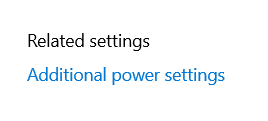
  1. For additional power settings, such as the laptop lid and power button settings, click Additional power settings

Note

Depending on window size, this option may be located towards the bottom or on the right side of the screen.

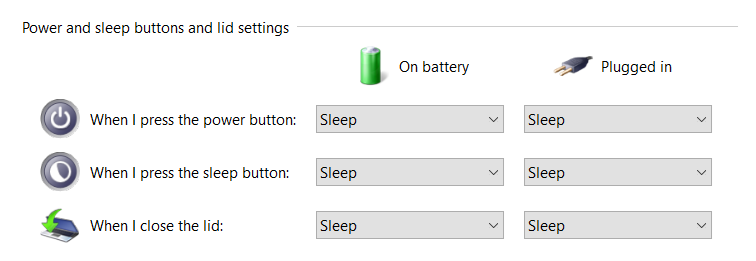
  1. Select either “Choose what the power buttons door “Choose what closing the lid does
  1. The options below will allow modifying the effects of pressing the power button and closing the lid

Note

Setting DO NOTHING when closing the lid can lead to drastically less battery life as well as overheating when the laptop is placed inside a bag or briefcase.

close

Restarting A Computer

Rebooting a device is highly encouraged as it will help keep the system running at peak performance. The benefits of a weekly reboot include:

  • Mitigate vulnerabilities to cyber-attacks by applying critical updates
  • Prevent performance degradation
  • Prevent application memory faults
  • Effectively apply system policies

To restart a device, follow the instruction below.

Tip

Make sure any open application is saved and closed before a restart is performed. This includes applications like Outlook, Word, Excel and any other applications that may be opend.

Instructions for Windows
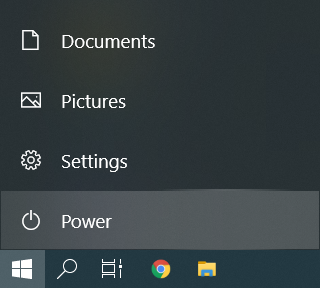
  1. Click the Start bottom on the bottom left hand side of the task bar
  1. Click the “Powerbutton
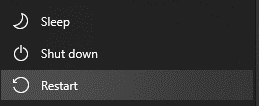
  1. Click “Restart

Note

Clicking “Shutdown” will not always properly apply updates or produce the desired effect. Clicking “restart” is the recomended option.

close
Instructions for macOS
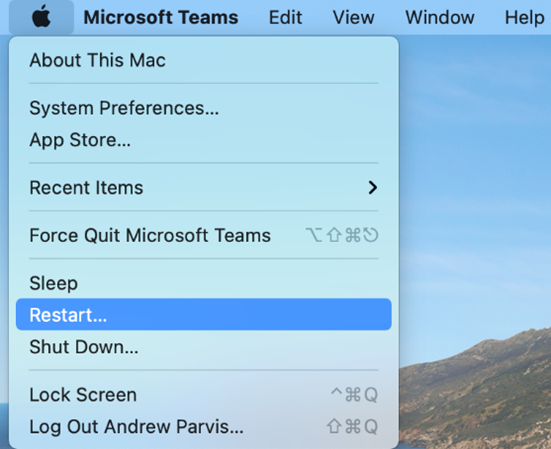
  1. Click the “Apple” at the top left-hand side of your screen
  1. Click “Restart
close
Last Modified: Copy Link

Computing Services Computer Labs

Resources for:
icon Close

Computing Services has multiple computer labs available on both New Jersey Campuses for classroom instruction and student use. Computer Lab hours of operation are subject to change based upon utilization throughout the semester.

Lab Hours of Operation

Winter Break 2024 Computer Labs Hours: Jan 2, 2024 – Jan 20, 2024

Please find the Computing Services lab hours of operations for both NJ campuses listed below for the Winter 2024 Semester.

Florham Campus

  • Phone: (973)-443-8689

    Rooms:

    • D206
    • D207
    • D208,
    • D209
    • D211
    • D212
    • D213
    Building Monday Tuesday Wednesday Thursday Friday Saturday Sunday
    Dreyfuss Building 9AM – 5PM 9AM – 5PM 9AM – 5PM 9AM – 5PM 9AM – 5PM CLOSED CLOSED
    Dreyfuss
    211, 212, 213
    9AM – 5PM 9AM – 5PM 9AM – 5PM 9AM – 5PM 9AM – 5PM CLOSED CLOSED

Metropolitan Campus

  • Phone: (201)-692-7111

    Rooms:

    • Lab A (DH2163),
    • Lab B (DH2164)
    • Lab C (DH2165)
    Building Monday Tuesday Wednesday Thursday Friday Saturday Sunday
    Dickinson Hall 9 AM – 5 PM 9 AM – 5 PM 9 AM – 5 PM 9 AM – 5 PM 9 AM – 5 PM CLOSED CLOSED
  • Phone: (201)-692-7112

    Rooms:

    • Front Lab (UH 22)
    • Back Lab (UH 28)
    • UH Side Lab
    Building Monday Tuesday Wednesday Thursday Friday Saturday Sunday
    University Hall CLOSED CLOSED CLOSED CLOSED CLOSED CLOSED CLOSED
  • Phone: (201)-692-2222

    Room:

    • Multipurpose Room 135

Note

The Student Union Building Multipurpose Room will be locked at all times. To gain access to the Student Union Building computer lab, you must contact Public Safety at (201)-692-2222.

Lab computers are available on a first-come-first-serve basis unless reserved for classes.

Class reservations are posted at the lab entrances.

Last Modified: Copy Link