We have carefully adapted the way we work and collaborate with each other where necessary. More than ever, it is imperative we employ every possible safety precaution when and where we’re able to film, to ensure all FDU productions meet the highest safety standards.
While on-site filming is typically quite low contact by nature, we have adopted procedures outlined by the CDC while upholding local social distancing requirements so that vital video productions can continue safely.
Crew Size
Having only 1 creator on-site when possible
Sanitization
Sanitizing equipment, stools, and door handles before and after filming
Sanitizing microphones before use and after use
Guiding subject of application of lapel microphones without contact
Personal Hygiene
Washing hands before and after filming
Wearing of masks and gloves between filming to further decrease exposure
Social Distancing
Implementing 6 feet distance between camera operator and subject at all times
Due to low-supplies, we ask that you bring your own gloves and masks. If you do not have access to PPE gear, PPE gear will be provided for you before entering the studio.
Home drives and departmental shared drives come with a limited capacity of data storage, known as a quota. When a drive reaches 85% of that quota, both the departmental shared drive manager as well as the user uploading the content that puts a drive over that threshold will receive a message from psadmin@fdu.edu as seen below.
By informing the share manager and providing the name of the share affected, the share manager has an opportunity to respond to the notification prior to any disruptions to day-to-day workflows.
Upon receiving this email, the share owner should:
Review and confirm that all uploaded content is required for current business purposes
Review and consolidate any duplicated items
Remove any documents, files, or pictures no longer needed
Note
Shared drives are not intended for archival purposes. We ask that the share manager please remove documents, files or pictures that are no longer actively required.
These measures will resolve most shared drive quota issues. If the shared drive is still nearing its storage quota, please fill out the Home/Department Share Management Form using the link below:
Oracle is a product from Oracle corporation, that provides a relational database management system. Oracle’s database simply known as Oracle is a multi-model relational database management system, mainly designed for enterprise grid-computing and data warehousing. It is one of the first choices for enterprises for cost-effective solutions for their applications and data management. It supports SQL as a query language to interact with the database.
Now let’s discuss how to use Oracle in the FDU environment.
Accessing Oracle
FDU provides Oracle access to students and faculty on the Opus server. The Oracle environment is provided to support coursework and skill development.
Opus users are automatically granted access to Oracle after first successfullogin (It may take up to six hours before access is available).
If you do not already have Opus access you will need to request access by selecting “Opus (Linux) Request” on the FDU Forms site:
Access to the Opus server is restricted to FDU networks only. If you are off campus and would like to access Opus for your Oracle work you will need to use FDU’s Virtual Private Network (VPN).
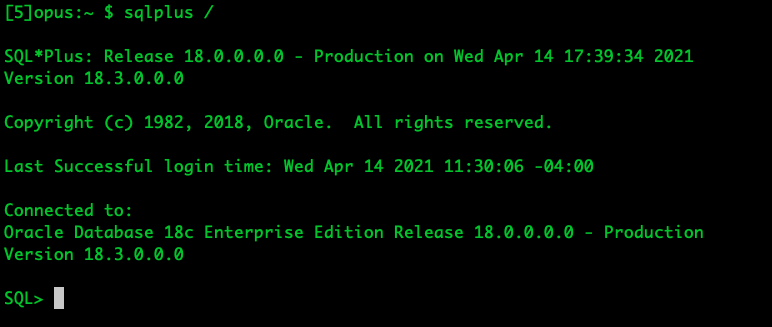
The Oracle Database is accessed using the SQL Plus utility, which has a command-line interface. To start using SQL Plus simply type “sqlplus /” on the Opus command line.
Interactive use can then start by entering a SQL statement (terminated by a semicolon), a PL/SQL block, or another command. For example:
SQL> select 'Hello world' as example from dual;
EXAMPLE
--------------------------------
Hello world
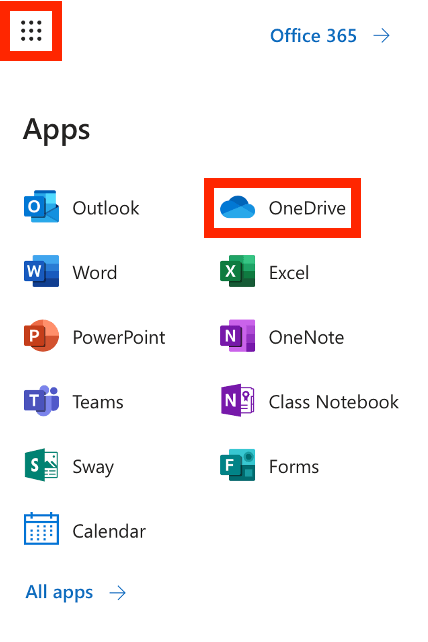
Click “App launcher” (icon located at top left corner ) which should show list of applications available to you and then click the “OneDrive” icon. This should open your OneDrive page either in new tab in your browser or in a new browser window.
Note:
Please look for the pop-up blocker in case you don’t see OneDrive window after clicking this icon.
close
Accessing OneDrive in Mobile Devices
You can access OneDrive in your iOS or Android devices.
Sign-in with your FDU NetID and password. Please select “OneDrive for Business” or “OneDrive for School” if given a choice to select type of account. DO NOT select personal OneDrive option if it is available. You’ll be presented with FDU’s Single Sign-On screen where you’ll be required to enter your NetID and password
close
Accessing OneDrive in Windows
If you are using Windows 10 computer, then OneDrive should already have been installed. If not, please follow steps below to download and install it in your computer
Click “App launcher” (icon located at top left corner ) which should show list of applications available to you and then click the “OneDrive” icon. This should open your OneDrive page either in new tab in your browser or in a new browser window
Note:
Please look for the pop-up blocker in case you don’t see OneDrive window after clicking this icon.
Click “Get the OneDrive apps” located at lower left corner which should download installation file for OneDrive
Execute this newly downloaded installation file which should install OneDrive in your computer
Start “OneDrive” and enter your NetID and click “Sign In”
Select “Work or School” option which should take you to FDU’s Single Sign-On screen
Enter your NetID and password
close
Accessing OneDrive on a macOS
Click below to install OneDrive from the Mac App Store
The Fairleigh Dickinson University Technical Assistance Center (UTAC) is the university’s technical help desk. Fairleigh Dickinson University students, faculty, and staff can contact UTAC via the SAMI Support portal, email, or phone call to initiate support requests for application software, desktop environments and peripherals, network connectivity, computer password maintenance (i.e. Microsoft 365), hardware and software configuration support, another computer related product and service issues, Blackboard, and classroom projector problems.
There are four ways to create a ticket and get support:
SAMI Support Portal – quickest, easiest and most direct way to open a ticket
Create SAMI Support requests by filling out a quick form
Access the most updated status of your SAMI support request
Interact with the technician currently assigned to resolve your SAMI support request
Review all your open and closed SAMI support request history
Access our knowledge base to view information about our current systems
Access solutions for the most frequently asked questions
close
SAMI Support Public Form – online form if you can’t login to the SAMI support portal
You can submit a request for support by filling out the form below
Warning
The form below is not compatible with dark mode. For an optimal experience, disable dark mode either in your device’s system settings or directly from the FDU IT website.
close
Call Center – if you would like to call to open up a ticket
Our Technical Assistance Center is available 24 hours a day for you to log a support ticket
The center can be reached at (973)-443-8822
close
Email – if you want to email the call center to open up a ticket
Users can log tickets by sending an email to our technical assistance Center
Once you have connected via the VPN, open your File Explorer.
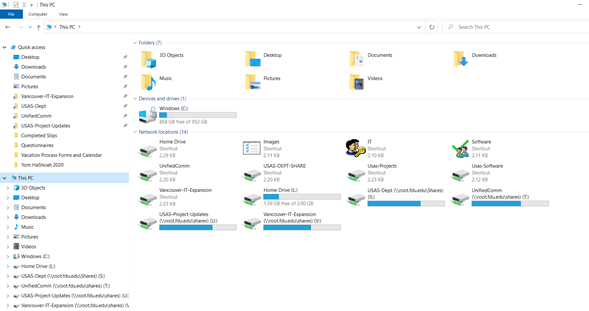
Halfway down the left panel, click on “This PC“. Your available Network Locations will appear in the center of the screen.
To access any of your drives, simply double click on the icon next to Drive description.
Note:
If you see a red X on the drive icon, please ensure you have successfully logged into the VPN. If so, click on the red X and your drive should appear and the red X will go away.
close
macOS
Go to your Finder app
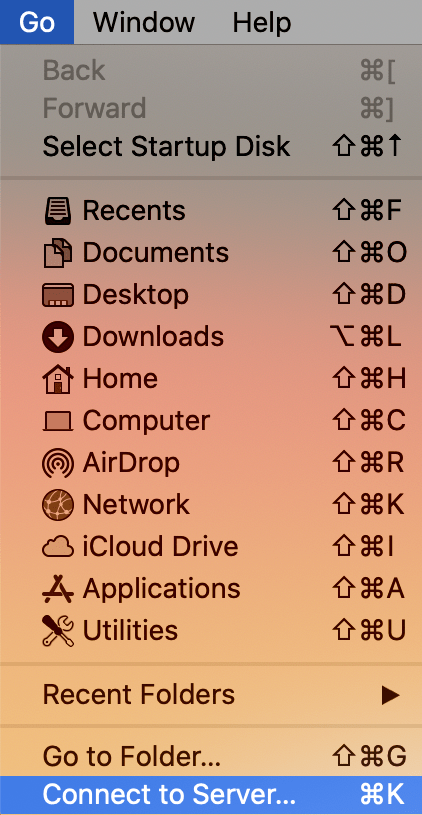
On the menu bar on top, click “Go” and select the last option “Connect to Server…” or alternatively on your keyboard press and hold “command” then press “K“
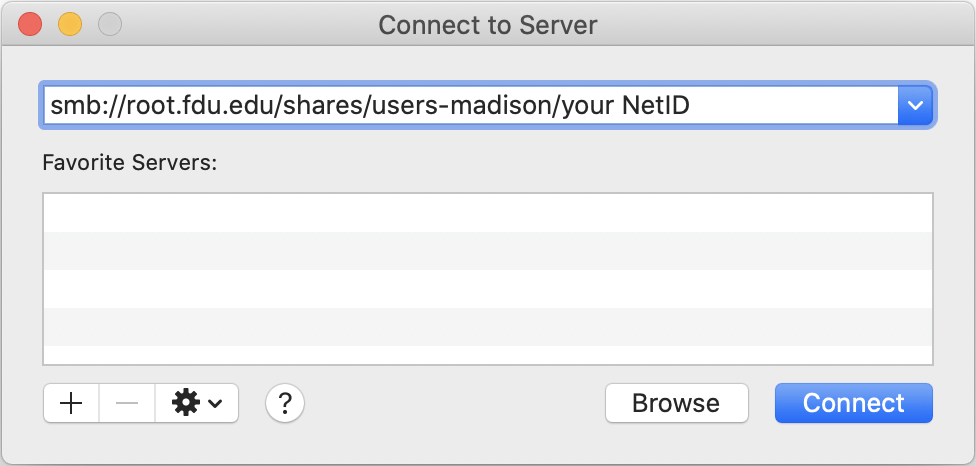
In the Connect to Server window enter SMB:// followed by the path of your network share
In the case of your home drive this will follow the convention of:
smb://root.fdu.edu/shares/users-madison/your NetID for Florham users
smb://root.fdu.edu/shares/users-metro/your NetID for Metro users
smb://root.fdu.edu/shares/users-vancouver/your NetID for Vancouver users
Pressing the “+” will add this to your list of Favorite Servers.
There are a few different ways to change your University NetID password. However, Computing Services strongly urges everyone to change their FDU NetID password using a provided Apple or Windows university computer.
The process for changing your FDU NetID password on a macOS device differs from a Windows device, so please follow the instructions provide for macOS computers below.
If you do not have a university-owned Apple or Windows laptop/desktop and cannot use a University lab computer, please follow the procedures described in “Using identity.fdu.edu Web Portal to Change your FDU NetID Password” below.
Please click on one of the links below for instructions on how to change your FDU NetID password:
Windows: Changing a FDU NetID Password on a University Computer
Note
You must already be logged into the machine when performing the password change process.
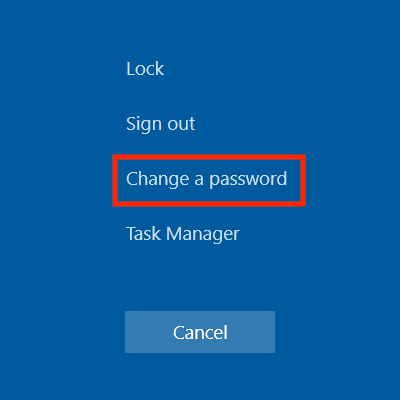
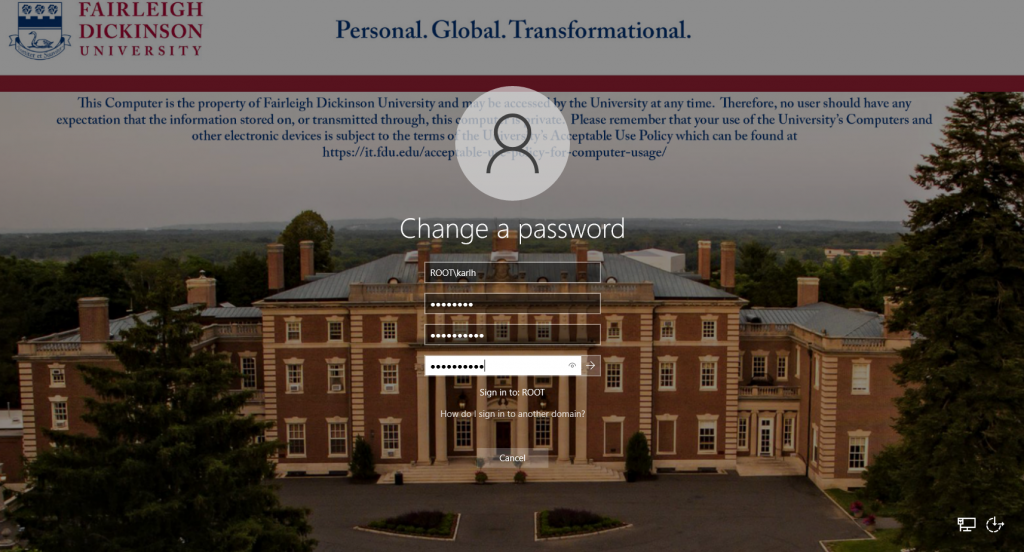
On FDU issued laptops, desktops, and lab machines, the FDU NetID password can be changed by pressing the “Ctrl+Alt+Del” button combination on the keyboard from any screen and selecting “Change a Password”
Now enter the following:
Your old or current password
Type in a new password
Retype the new password to confirm
Press the “Right Arrow” button to continue
Tip
The newly created FDU NetID password must meet the complexity requirements.
Use 8 to 16 characters for your new password. Passwords must include all of the following 4 character types: Upper case letters, lower case letters, numbers, and special characters. Allowed special characters are: ! # $ @ _ + , ? [ ] . – ) ( ` ~ % ^ & * = { } | : ? , / and a dot. Please refrain from using portions of your name or email address within the password. Please refrain from using a password that you have already used.
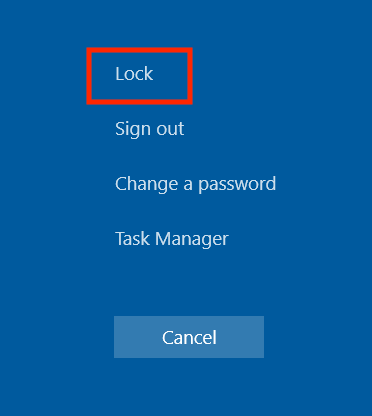
Once this has been done, you must lock and unlock the machine once to complete updating your password:
Press the “Ctrl+Alt+Del” keys combination again
Click “Lock”
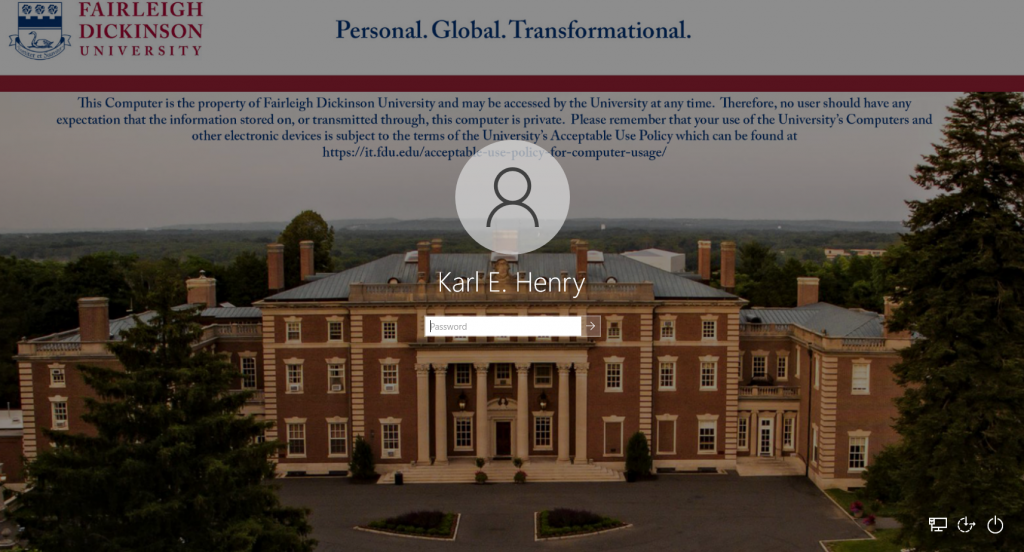
Then log back in with your new password
Your FDU NetID password was changed successfully!
Note
Your new password will need to be updated in all web browsers with saved passwords and email clients across all devices. Examples include faculty and staff e-mail accounts synched to their iPad, iPhone, and or Android device. FDU-Secure Wi-Fi network access is also attached to your FDU NetID username and password and will need to be updated on devices that use it.
close
macOS: Changing a FDU NetID Password while ON CAMPUS using a University macOS Computer
Note
You must already be logged into the machine when performing the password change process.
Locate and then select the SSO extension “key” icon on the macOS menu bar
Select “Change Password…“
Enter your current FDU NetID password into the “Old Password” field
Choose and then enter a new FDU NetID password into the “New Password” field
Tip
The newly created FDU NetID password must meet the complexity requirements.
Use 8 to 16 characters for your new password. Passwords must include all of the following 4 character types: Upper case letters, lower case letters, numbers, and special characters. Allowed special characters are: ! # $ @ _ + , ? [ ] . – ) ( ` ~ % ^ & * = { } | : ? , / and a dot. Please refrain from using portions of your name or email address within the password. Please refrain from using password that you have already used.
Enter your new FDU NetID password again into the “VerifyPassword” field
Select “Change Password“
When your password change is successful, you will be prompted, “Password change successful.” Click “OK” to confirm
Note
Your new password will need to be updated in all web browsers with saved passwords and email clients across all devices. Examples include faculty and staff e-mail accounts synched to their iPad, iPhone, and or Android device. FDU-Secure Wi-Fi network access is also attached to your FDU NetID username and password and will need to be updated on devices that use it.
close
macOS: Synchronizing your Password on a University Computer
Note
You must already be logged into the machine when performing the password change process.
Launch the Cisco AnyConnect Secure Mobility Client VPN or “FDU VPN” software and connect to FDU’s VPN Service. If you need to install the “FDU VPN” or need instructions on how to launch the VPN Client, please follow the link below before proceeding:
You will not be disconnected from FDU VPN after performing the NetID password change.
Locate and then select the SSO extension “Key” icon on the macOS menu bar
Select “Change Password…“
Enter your current FDU NetID password into the “Old Password” field
Choose and then enter a new FDU NetID password into the “New Password” field
Tip
The newly created FDU NetID password must meet the complexity requirements.
Use 8 to 16 characters for your new password. Passwords must include all of the following 4 character types: Upper case letters, lower case letters, numbers, and special characters. Allowed special characters are: ! # $ @ _ + , ? [ ] . – ) ( ` ~ % ^ & * = { } | : ? , / and a dot. Please refrain from using portions of your name or email address within the password. Please refrain from using password that you have already used.
Enter your new FDU NetID password again into the “VerifyPassword” field
Select “Change Password“
When your password change is successful, you will be prompted, “Password change successful.” Click “OK” to confirm
Note
Your new password will need to be updated in all web browsers with saved passwords and email clients across all devices. Examples include faculty and staff e-mail accounts synched to their iPad, iPhone, and or Android device. FDU-Secure Wi-Fi network access is also attached to your FDU NetID username and password and will need to be updated on devices that use it.
close
Using “identity.fdu.edu” Web Portal to Change your FDU NetID Password
Adjunct professors, students, and anyone with a personal laptop/desktop/tablet device will use the FDU Identity Web Portal to change their NetID password.
If the user has an FDU issued or owned Microsoft Windows-based machine, they should always follow the procedures in “Changinga NetID Password while ON CAMPUS (Preferred Method) or “Changing a NetID Password while OFF-CAMPUS.” Changing your FDU NetID password through the identity.fdu.edu Web Portal while having an FDU issued or owned Microsoft Windows-based machine could cause temporary account lockouts and should only be used as a last resort. If lockout issues occur, please open up a service request with the Fairleigh Dickinson University Technical Assistance Center (UTAC), and they will be dealt with promptly.
Open a web browser (e.g., Google Chrome, Mozilla Firefox, Internet Explorer, Safari) and navigate to the following URL:
Click on “Account Maintenance” on the top right hand of the web page
You will be redirected to the FDU Single-Sign-On login page. Enter your FDU NetID email and password in the corresponding text boxes and click “Sign In.” Complete the FDU 2fa Duo push notification to proceed
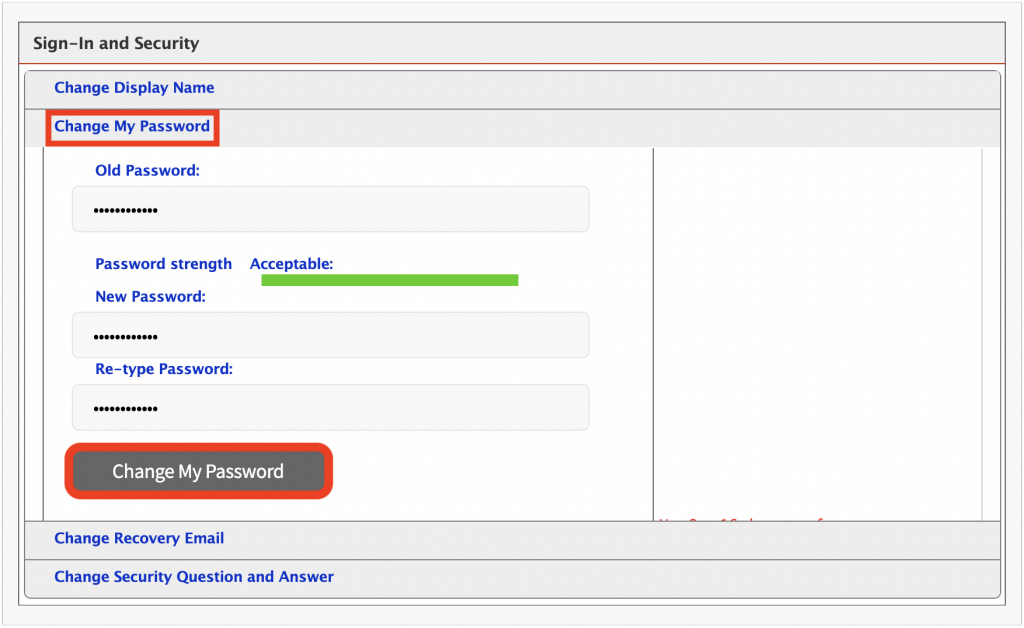
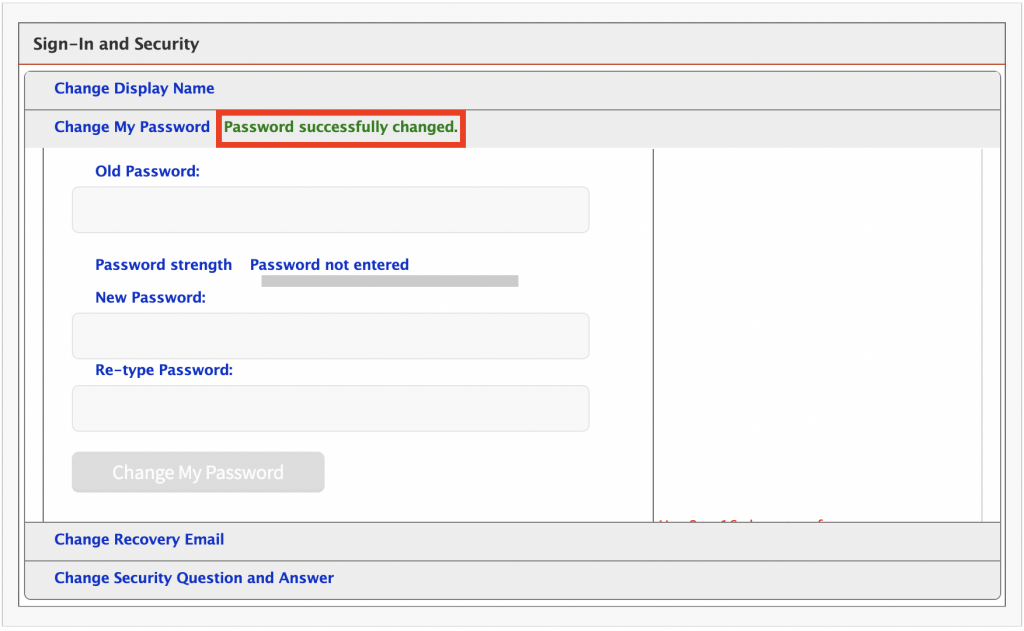
Under Sign-In and Security, select “Change My Password”
Enter your current password
Enter a new password
Retype your new password to confirm
When finished, select “Change My Password”
Tip
The newly created FDU NetID password must meet the complexity requirements.
Use 8 to 16 characters for your new password. Passwords must include all of the following 4 character types: Upper case letters, lower case letters, numbers, and special characters. Allowed special characters are: ! # $ @ _ + , ? [ ] . – ) ( ` ~ % ^ & * = { } | : ? , / and a dot. Please refrain from using portions of your name or email address within the password. Please refrain from using password that you have already used.
“Password successfully changed” will be displayed if your FDU NetID password was successfully changed
Note
Your new password will need to be updated in all web browsers with saved passwords and email clients across all devices. Examples include faculty and staff e-mail accounts synched to their iPad, iPhone, and or Android device. FDU-Secure Wi-Fi network access is also attached to your FDU NetID username and password and will need to be updated on devices that use it.
close
Using “identity.fdu.edu” Web Portal to Change your FDU NetID Display Name
You also have the option to change the name that gets displayed on your NetID account.
Open a web browser (e.g., Google Chrome, Mozilla Firefox, Internet Explorer, Safari) and navigate to the following URL:
Click on “Account Maintenance” on the top right hand of the web page
You will be redirected to the FDU Single-Sign-On login page. Enter your FDU NetID email and password in the corresponding text boxes and click “Sign In.” Complete the FDU 2fa Duo push notification to proceed
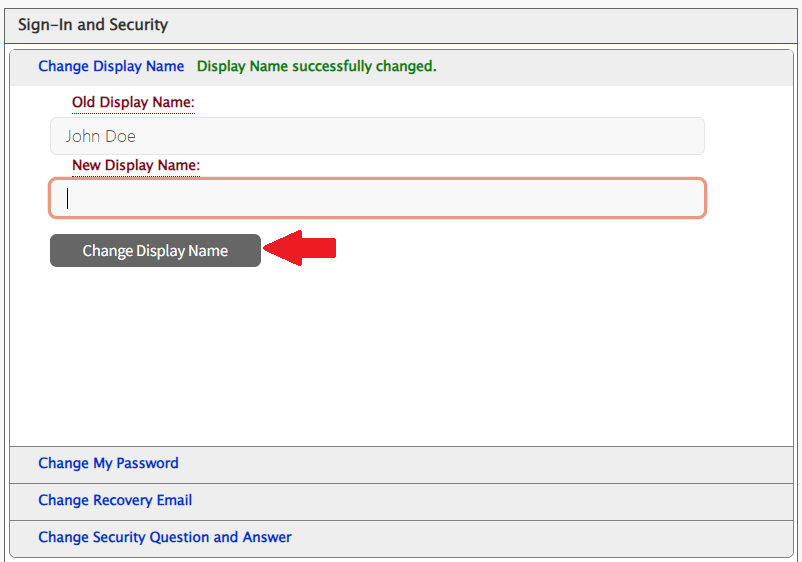
Under Sign-In and Security, select “Change Display Name”
Enter your New Display Name
Click on “Change Display Name“
“Display Name successfully changed” will be displayed if your Display Name was successfully changed
Lab reservation requests for the entire semester, (i.e. January through May or September through December are processed by the Office of Enrollment Services. To make a lab reservation request for the Summer, Winter, Fall, or Spring semesters, please contact the Scheduling Officers in Enrollment Services for the Florham and Metropolitan campuses. The phone and fax numbers are listed below:
Metropolitan Campus Ph. (201)-692-2217 / 2517
Florham Campus Ph. (973)-443-8600
Reserving a Computer Lab for Specific Dates within a Semester
Once logged into the support website, locate ‘Forms for Faculty & Staff’ and click on the “Computing Services – Lab Reservation & Lab Software Request (Faculty & Staff NJ Only)” option.
You will be directed to a reservation request form. Please provide the necessary details, such as the desired date, time, and location of the lab reservation. Additionally, please include any specific requirements or equipment you may need for your session.
After completing the form, you can submit your request by locating and clicking the submit button.
Once your request has been submitted, the Lab & Operations Manager will review and confirm the details of your request. You will receive written confirmation of your request.
Should you require any further assistance, please feel free to reach out to the Lab & Operations Manager, Denzel W. James (d.james@fdu.edu).
Any changes including cancellations to your request should be submitted by using the SAMI support link to locate the ‘My SAMI Support Request’ tile and browse for your lab related request ticket. All updates can be entered directly into the ticket.
Thank you for choosing Computing Services for your lab reservation needs. We look forward to providing you with a seamless and efficient experience.
To access Forms, you will be directed to our SAMI Support Portal where you will be asked to log in using your NETID and authenticate using Duo. Once you click “Next,” you will be forwarded to samisupport.fdu.edu in a new window or tab.